
Source: Roblox Creator Hub · CC BY 4.0 · View source · Code samples: MIT Imported 2026-10-03. Formatting adapted for this site.
Create seams and unwrap
Texturing is the process of customizing the color, tone, and shading of your model's surface. Custom meshes and models use a 2D image, known as a texture map, to project various surface appearance elements onto your 3D object. In this tutorial, apply a complete color to your shirt and add a smaller design using Blender's Texture Paint mode.
Note
This tutorial does not cover PBR textures, which are advanced textures that can replicate real-world texture properties, like reflectivity and surface roughness, and are recommended to give your clothing items an extra dimension of creativity and visual pop. PBR textures often require a third-party application such as Substance Painter.
<img src="https://prod.docsiteassets.roblox.com/assets/art/accessories/creating/Texturing-Start.png" />Clothing mesh after sculpting
<img src="https://prod.docsiteassets.roblox.com/assets/art/accessories/creating/Texturing-Complete-3.png" />Clothing mesh after texturing
The next three texturing sections cover the following processes:
- Creating seams in your mesh to define how Blender unwraps your 3D object.
- Unwrapping the UV of your model to create a distinct front and back 2D surface to apply textures on based on your seams.
- Creating a new texture image to save as your 2D map.
- Painting a custom texture using Blender's Texture Paint tools.
Create seams
To begin texturing, you must first generate a UV map, or 2D projection, of the surface of your mesh. To set up this UV map, you tell Blender which edges of your mesh to use as seams when creating the projection.
To create seams that naturally separate the front and back of the shirt:
With LongSleeve active, switch to Edit mode.
Press 2 to switch to edge selection.
Hold Alt and click on the center vertical edges of your shirt. The detected edge highlights.
Whenever a complete edge is selected, right-click in the viewport and select Make Seam from the contextual menu. The edge highlights to indicate the seam in your model.
Repeat to create a continuous seam across your mesh.
UV unwrap
After applying the seams, Blender now knows how to "unwrap" the mesh surface onto a 2D plane as a front and back surface.
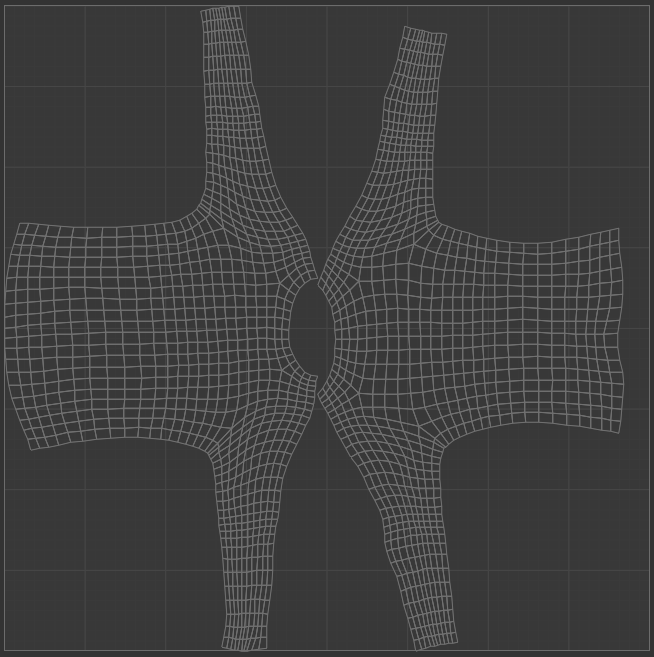
UV-mapping of your 3D clothing mesh.
To UV Unwrap your object by your selected seams:
While still in Edit mode, press A to highlight all vertices.
At the top of the viewport, select UV > Unwrap.
Switch to Texture Paint mode. Your UVs display on the left window when your t-shirt is active.