
Source: Roblox Creator Hub · CC BY 4.0 · View source · Code samples: MIT Imported 2026-10-03. Formatting adapted for this site.
Avatar in-experience creation
Note
The following guide applies to creators who are familiar with scripting and Roblox Studio and intend to develop experiences that allow user-generated avatar items.
You can publish an experience that allows players to create, customize, and purchase avatar bodies in real time. When purchased, these custom bodies save directly to the player's Roblox inventory, allowing players to equip and wear the custom avatars in other experiences.
Experience owners that implement in-experience avatar creation benefit from Marketplace commissions as both creator of the avatar item and experience owner. If an asset created in-experience is inspected, the item provides a link to the original experience it was created.
You can test in-experience creation in Roblox's Avatar Creator demo.
Note
Avatar assets created in-experience are not listed on the Marketplace, and cannot be resold or traded. At this time, in-experience creation only allows the creation of custom avatar bodies.
How to implement in-experience creation
Use the following instructions and code references to create your first in-experience avatar creation project. The following instructions uses a base body Model that players can modify and customize before publishing.
Before getting started, familiarize yourself with the following:
- Avatar models — The following implementation requires importing a base body that meets Roblox's 15 part specifications. This
Modelserves as a base for additional user customization and modification.- The base body must meet Roblox's Avatar body guidelines, including the minimum number of FACS control for facial rigging.
- Avatar creation tokens — Experiences implementing avatar creation require at least one creation token. These tokens require Robux to purchase and allow you to set prices and other sale settings for purchases made in-experience.
- API classes
AvatarCreationService— Handles avatar creation prompting and validation.EditableImage— Handles runtime creation and manipulation of textures.EditableMesh— Handles runtime manipulation of mesh geometry.WrapDeformer— Handles runtime manipulation of invisible outer cage geometry that allow avatar characters to equip 3D clothing.
Import a base body
The base body acts as the initial foundation which users can customize and edit. You can use your own Model, or import a custom asset with the Importer and setup through Avatar Setup.
Base bodies must adhere to Roblox's avatar specifications, and must include components such as the 15 MeshPart instances that make up 6 body parts: head, torso, left arm, left leg, right arm, and right leg, as well as other avatar components.
Note
If you have a single-mesh body, you can try using the Avatar Auto Setup to automatically add all the necessary avatar components.
For references and samples of properly configured avatar bodies, see Avatar references.
Implement editing APIs
To develop a system where users can edit the MeshPart instances on an avatar in your experience for creation, use EditableImage for texture editing, EditableMesh for mesh editing, and WrapDeformer for maintaining skinning and FACS data during mesh edits.
After importing your base body, use the following script to set up your
EditableImages,EditableMeshes, andWrapDeformers.```lua local AssetService = game:GetService("AssetService") local function setupBodyPart(meshPart, wrapTarget) -- Create and attach a WrapDeformer to the MeshPart local wrapDeformer = Instance.new("WrapDeformer") wrapDeformer.Parent = meshPart -- Create an editable mesh for the wrap target's cage mesh local cageEditableMesh: EditableMesh = AssetService:CreateEditableMeshAsync(Content.fromUri(wrapTarget.CageMeshId), { FixedSize = true, }) -- Assign the cage mesh to the WrapDeformer wrapDeformer:SetCageMeshContent(Content.fromObject(cageEditableMesh)) end local function setupRigidMesh(meshPart) -- Create an editable mesh from the original MeshPart local editableMesh = AssetService:CreateEditableMeshAsync(Content.fromUri(meshPart.MeshId), { FixedSize = true, }) -- Generate a new MeshPart from the editable mesh local newMeshPart = AssetService:CreateMeshPartAsync(Content.fromObject(editableMesh)) -- Copy size, position, and texture from the original MeshPart newMeshPart.Size = meshPart.Size newMeshPart.CFrame = meshPart.CFrame newMeshPart.TextureContent = meshPart.TextureContent -- Apply the new MeshPart back to the original meshPart:ApplyMesh(newMeshPart) end local function setupMeshTexture(meshPart, textureIdToEditableImageMap) -- If EditableImage already exists for this TextureID, resuse it rather than making a new one if textureIdToEditableImageMap[meshPart.TextureID] then meshPart.TextureContent = Content.fromObject(textureIdToEditableImageMap[meshPart.TextureID]) return end -- Create a new EditableImage and apply it as the texture content local editableImage = AssetService:CreateEditableImageAsync(Content.fromUri(meshPart.TextureID)) textureIdToEditableImageMap[meshPart.TextureID] = editableImage meshPart.TextureContent = Content.fromObject(editableImage) end local function setupModel(model) -- Map for reusing EditableImage instances by texture ID local textureIdToEditableImageMap = {} for _, descendant in model:GetDescendants() do if not descendant:IsA("MeshPart") then continue end -- Configure MeshPart based on WrapTarget presence -- If WrapTarget is present, add a WrapDeformer child with an EditableMesh -- Otherwise, apply EditableMesh to the MeshPart directly local wrapTarget = descendant:FindFirstChildOfClass("WrapTarget") if wrapTarget then setupBodyPart(descendant, wrapTarget) else setupRigidMesh(descendant) end -- Configure the EditableImage for the MeshPart setupMeshTexture(descendant, textureIdToEditableImageMap) end end ```Create
EditableImagetools that allow players to recolor, draw, or add stickers to your base body. You can leverage APIs in likeDrawImage(),DrawRectangle(),WritePixelsBuffer().For advanced transformations,
DrawImageTransformed()allows you to specify position, rotation, and scale when drawing one EditableImage onto another. Similarly,DrawImageProjected()works much likeDrawImage()but projects the drawn image properly if theEditableImageinstance is used with aMeshPart.```lua local function recolorTexture( meshPart: MeshPart, color: Color3 ) local bodyPartTexture = AssetService:CreateEditableImageAsync(meshPart.TextureID) meshPart.TextureContent = Content.fromObject(bodyPartTexture) bodyPartTexture:DrawRectangle( Vector2.new(0, 0), bodyPartTexture.Size, color, 0, Enum.ImageCombineType.Overwrite ) end local function applySticker( meshPart: MeshPart, textureCoordinate: Vector2, stickerId: TextureId ) local bodyPartTexture = AssetService:CreateEditableImageAsync(meshPart.TextureID) meshPart.TextureContent = Content.fromObject(bodyPartTexture) local stickerTexture = AssetService:CreateEditableImageAsync(stickerId) bodyPartTexture:DrawImage(textureCoordinate, stickerTexture, Enum.ImageCombineType.BlendSourceOver) end local function applyStickerProjected( meshPart: MeshPart, targetMesh: EditableMesh, stickerId: TextureId, raycastHitPos: Vector3 ) local bodyPartTexture = AssetService:CreateEditableImageAsync(meshPart.TextureID) local relativePos = meshPart.CFrame:PointToWorldSpace(raycastHitPos) local direction = (workspace.CurrentCamera.CFrame.Position - relativePos).Unit local projectionParams: ProjectionParams = { Direction = meshPart.CFrame:VectorToObjectSpace(direction), Position = meshPart.CFrame:PointToObjectSpace(relativePos), Size = Vector3.new(1, 1, 1), Up = meshPart.CFrame:VectorToObjectSpace(Vector3.new(0, 1, 0)), } local stickerTexture = AssetService:CreateEditableImageAsync(stickerId) local localBrushConfig: BrushConfig = { Decal = stickerTexture, ColorBlendType = Enum.ImageCombineType.BlendSourceOver, AlphaBlendType = Enum.ImageAlphaType.Default, BlendIntensity = 1, FadeAngle = 90.0 } bodyPartTexture:DrawImageProjected(targetMesh, projectionParams, localBrushConfig) end ```
Using
WrapDeformerandEditableMesh, create tools for editing mesh deformations on your body.WrapDeformerhandles the live deformations of the renderedMeshPartgeometry while maintaining the underlying skinning and FACS data.EditableMeshallows you to modify the cage mesh that theWrapDeformerresponds to.- Use
WrapDeformer:SetCageMeshContent()to apply theEditableMeshinstance that represents the relevant cage mesh to theWrapDeformer. - Use
EditableMesh, such asSetPosition(), to deform vertices and edit the shape of theMeshPart.
local function deformBodyPart( meshPart: MeshPart, controlPointCenter: Vector3, controlPointRadius: number, controlPointDeformation: Vector3 ) local wrapTarget = meshPart:FindFirstChildWhichIsA("WrapTarget") local cageMeshId = wrapTarget.CageMeshId local wrapDeformer = Instance.new("WrapDeformer") wrapDeformer.Parent = meshPart local cageEditableMesh = AssetService:CreateEditableMeshAsync(cageMeshId) local verticesWithinSphere = cageEditableMesh:FindVerticesWithinSphere(controlPointCenter, controlPointRadius) for _, vertexId in verticesWithinSphere do local vertexPosition = cageEditableMesh:GetPosition(vertexId) cageEditableMesh:SetPosition(vertexId, vertexPosition + controlPointDeformation) end wrapDeformer:SetCageMeshContent(Content.fromObject(cageEditableMesh)) end- Use
Create creation prompt
After setting up your base body and editing APIs, create a prompt for users to create and purchase from the experience using AvatarCreationService:PromptCreateAvatarAsync().
export type BodyPartInfo = {
	bodyPart: Enum.BodyPart,
	instance: Instance --Folder with Created MeshParts
}
export type BodyPartList = {BodyPartInfo}

local function publishAvatar(bodyPartInstances: BodyPartList, player: Player, tokenId: string)
	local humanoidDescription = Instance.new("HumanoidDescription")
	for _, bodyPartInfo in bodyPartInstances do
		local bodyPartDescription = Instance.new("BodyPartDescription")
		bodyPartDescription.Instance = bodyPartInfo.instance
		bodyPartDescription.BodyPart = bodyPartInfo.bodyPart
		bodyPartDescription.Parent = humanoidDescription
	end

	local success, result, bundleIdOrErrorMessage, outfitId = pcall(function()
		return AvatarCreationService:PromptCreateAvatarAsync(tokenId, player, humanoidDescription)
	end)
	if success then
		if result == Enum.PromptCreateAvatarResult.Success then
			print("Successfully uploaded with BundleId: ", bundleIdOrErrorMessage)
      print("Successfully uploaded with OutfitId: ", outfitId)
		else
			print("Unsuccessfully uploaded with error message:", bundleIdOrErrorMessage)
		end
	else
		print("Avatar creation unsuccessful")
	end
end
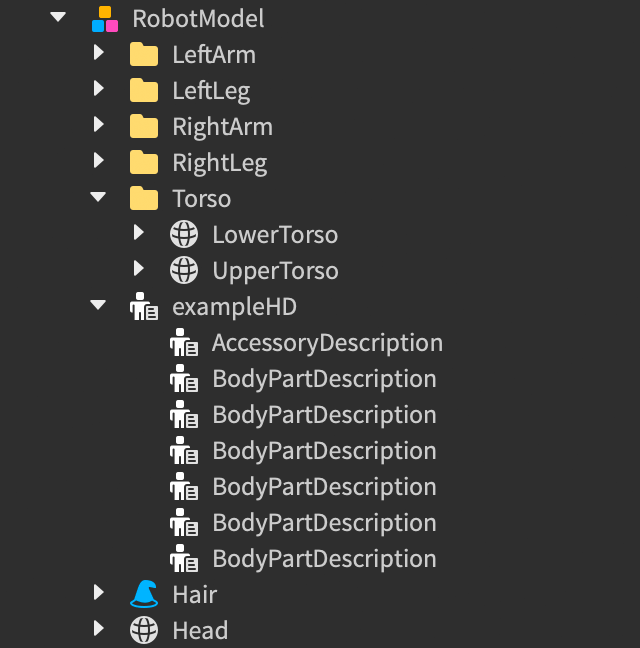
AvatarCreationService:PromptCreateAvatarAsync() takes a HumanoidDescription parameter to represent the avatar intended for purchase or creation. For avatar creation, the character's HumanoidDescription must include new assets to be created for each of the 6 body parts (Head, Torso, RightLeg, LeftLeg, RightArm, LeftArm). Optionally, it can also include a new Hair accessory.
To support this, the HumanoidDescription should include 6 BodyPartDescription children. Each BodyPartDescription.Instance property references a Folder which includes all of the MeshPart instances that make up the body part. For example, the LeftArm folder contains LeftHand, LeftUpperArm, and LeftLowerArm MeshParts. The BodyPartDescription.BodyPart property should also be set to the relevant BodyPart.
Each of the 15 MeshPart body parts must include:
- An
EditableImage. - A
WrapDeformerwith anEditableMesh.
The provided HumanoidDescription should not include any pre-existing asset IDs to represent body parts or accessories on the intended creation. On the other hand, the HumanoidDescription may include the humanoid scales of BodyTypeScale, HeadScale, HeightScale, WidthScale, and ProportionScale. Be mindful of the scales that a base body is imported with so that they match the scales provided to the HumanoidDescription.
Include accessories
If including an accessory, such as hair, the HumanoidDescription should include a child AccessoryDescription where:
- The
AccessoryDescription.Instanceproperty references theAccessoryinstance. - The
AccessoryDescription.AccessoryTypeproperty is set to the relevantAccessoryType.- In the case of including
AccessoryType.Hairin your creations, theMeshPartshould include anEditableImage. However, it should not include aWrapDeformerchild but should include anEditableMeshset on theMeshPartdirectly.
- In the case of including
Generate an avatar creation token
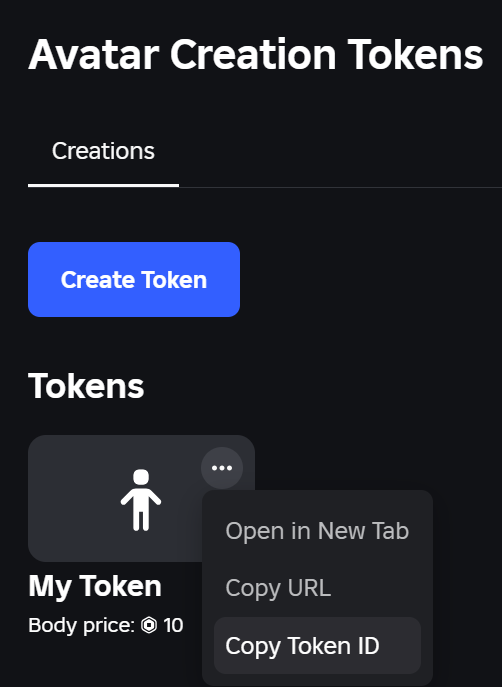
AvatarCreationService:PromptCreateAvatarAsync() takes an Avatar Creation Token ID parameter. This token is the key for creations from your universe, and it is what you can use to set the price of avatar creation from your experience. For instructions and additional details on generating tokens, see Avatar Creation Tokens.
After purchasing and generating your token, you can inspect the token in the Creator Hub to find the ID which you can then use for the AvatarCreationService:PromptCreateAvatarAsync() API.
Respond to players joining by attribution
Avatar bundles created in-experience include an attribution link to the original experience the avatar was created. If the avatar is inspected by another player, a prompt displays providing an option to visit the experience where the avatar was created.
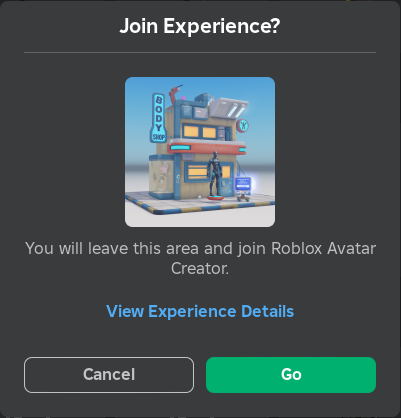
To handle players joining your experience using this attribution link, use Player:GetJoinData() and parse the returned table for GameJoinContext.
GameJoinContext includes the following table values:
JoinSource—JoinSource- A
Playerjoining your experience from this attribution link will haveJoinSource.CreatedItemAttributionto indicate entry from a created item.
- A
ItemType— optionalAvatarItemTypeAssetId— optionalstringOutfitId— optionalstringAssetType— optionalAssetType