
Source: Roblox Creator Hub · CC BY 4.0 · View source · Code samples: MIT Imported 2026-10-03. Formatting adapted for this site.
Packages
To keep assets organized and reusable across your team or across multiple projects, you can group your instances and convert them into reusable packages. Packages make the overall process of building worlds faster and more ergonomic, but they also help with consistency, deduplication, collaboration, and versioning:
- Easily update all copies of a package to the latest version, or only update specific copies.
- Set packages to automatically update whenever there's a new version.
- Give collaborators Edit or Use permissions to the contents of a package.
- View the full version history for a package, compare versions, and restore old versions.
The most efficient workflow is to create a package, share it with any collaborators, and set it to auto-update. And you don't have to wait for a model to be "done" before using it in a package. Even if the package is a placeholder on top of a simple shape, you can use it to greybox your environment and then have the placeholder copies automatically update as you publish more detailed versions.
Create packages
Note
If you want to create a package with restricted assets that you don't have explicit permission to use, you can still create the package but those specific restricted assets will not be visible or audible at runtime unless the game itself has permission to use those assets.
You can create a package from any single object or any single parent and children branch of objects. If you want to create a package for a single object, add it to a Model grouping first so that you can add, remove, or scale child objects within the package later without breaking the package.
To create a package:
- In the Explorer window or 3D viewport, right-click the object(s) you want to turn into a package and, in contextual menu, select Convert to Package.
- In the new window, fill in the package details. In particular, if you're working in a group, set Ownership to the appropriate group in which you have permission to create/edit group games.
Note
Ownership transfers are not supported by the asset system, so carefully consider the owner when creating a package.
Click Submit.
After the conversion completes, the object receives a "chain link" symbol in the Explorer window to identify it as a package. Additionally, you can see a new
PackageLinkobject parented to the object.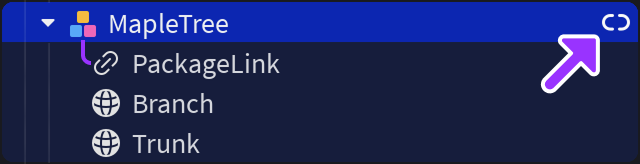
Select the PackageLink object and enable AutoUpdate in the Properties window. Note how the icon changes to indicate that the package is set to automatically update.
Note
Do not delete or move the PackageLink object! Doing so for any package copy converts the copy back into a normal object and loses package capabilities, such as ability to update itself when there's a new version.
Insert packages
To insert a package that doesn't already exist in the current place, you must initially insert it from the Toolbox:
From Inventory ⟩ My Packages for packages that you've published to or obtained from the Creator Store, as well as packages that a friend owns and has given you permissions to use.
From Creations ⟩ Group Packages for packages published by members of your group (including yourself).
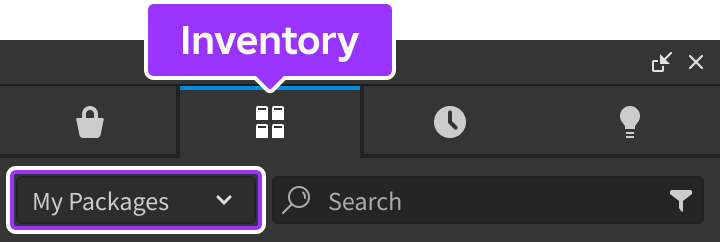
Toolbox ⟩ Inventory ⟩ My Packages
<img src="https://prod.docsiteassets.roblox.com/assets/studio/toolbox/Creations-Group-Packages.png" alt="A close up view of the Toolbox with the Creations tab highlighted." width="360" />Toolbox ⟩ Creations ⟩ Group Packages
Once you've inserted a package into a published place's data model, it appears in the Asset Manager and remains there even if you later delete all copies of it.
Note
Be careful when inserting assets that you didn't create into your games, as they can contain malicious scripts. Save your game first and then investigate any scripts within unfamiliar assets so that you can easily revert back to the place version.
Modify packages
You can edit packages and their children just like other objects. Modifying packages disables auto‑update until you publish or revert the changes.
Most edits flag the package as modified, although the following changes are not considered package modifications:
- Changing the name of the root node.
- Changing the position or rotation of the root node of a package that is a
BasePart,Model, orGuiObject. - Changing the
Enabledproperty of a root nodeGuiObjectsuch as aScreenGui,SurfaceGui, orBillboardGui. - Changing a part reference of a
Weldinside the package that references an instance outside of the package.
Once modified, packages with unpublished changes get a modified icon in the Explorer window:

Add or update configurations
You can include instance attributes at the root of a package to customize its behavior. When you publish a package, the current set of attributes/values will become the package's default configurations. On any given copy of a package, those attribute values can be changed on a per‑instance basis, and those changed are noted through bold italics. When package copies are updated, modified configuration values will be preserved, while other attributes will be updated to the latest default value.
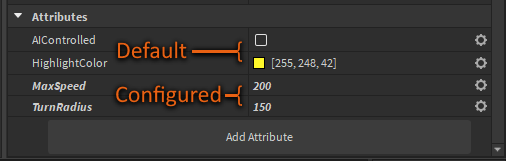
Note
Currently the only way to handle configuration values is to add scripts in the package which read and apply behavior based on the configuration at runtime.
Note
If you simply want to update the default values for configurations, you can change those attribute values and republish the package (the package will not be flagged as modified in this case). If you want to publish other modifications but not change the default configuration values, you should publish on a package without any value changes, or revert the configurations to their defaults before you publish.
Nested packages
You can nest packages inside of other packages to maintain and collaborate on complex hierarchies, such as a series of vehicle mechanics which can be modified independently of the vehicle's parent package.
If you modify a nested package, both the nested package and the parent package are considered as modified. You must publish changes to any nested package before you're allowed to publish changes to its parent package, since publishing the parent would mark it as current/unmodified and conflict with the nested package's modifications.
Package scripts
Each script within an unmodified package is read-only and shows a notification on the top with a hyperlink to unlock the script.

Clicking the hyperlink:
- Flags the package as modified regardless of whether you edit the script.
- Removes the notification/hyperlink from other scripts within the package.
Once the package is published and moved to an unmodified state, the scripts under it become read‑only with a hyperlink to modify.
Publish package changes
You can publish any change to a package as a new version, making your updates available to other package copies throughout the place and across all games. It's not required to publish a modified package before publishing a place because the modified version is saved along with the place for future iteration.
To publish changes to a package:
In the Explorer window or 3D viewport, right-click the modified copy and select Publish to Package.
If a package copy has auto-update turned on, it immediately pulls in the updated version when you open the place that contains them. Other copies get a "download" symbol that indicates an update is available. You can individually update or mass-update all copies.

Add a description of your changes:
- Right-click the package and select Package Details.
- In the Asset Configuration window, select Versions.
- Under your most-recent change, select Add.
- Describe your changes, then click the Submit button.
Update outdated copies
You can update outdated package copies to the most recent version, or you can continue to use the older version.
In the Explorer window, locate outdated copies by the "download" symbol. You can also select the outdated copy in the 3D viewport.
Right-click an outdated copy and select Get Latest Package. You can also select multiple packages, right-click, and Get Latest For Selected Packages.
Mass updates
Extensive use of packages may result in many package copies across multiple places in a game. In addition to individual syncing and automatic updates, you can update all copies of a package through mass updating.
Close other Studio instances with any of the game's places open; this prevents another unsaved instance of a place from potentially overwriting your updates.
- In the Explorer window or 3D viewport, right-click the desired package and select Update All.
- Choose all places in the game or some subset of places and click Update.
Note
Mass updating packages automatically saves the selected places but does not publish them. Additionally, to prevent unintended overwrites, mass updating does not affect modified versions of a package; after the mass update completes, Studio displays a warning with the number of packages that it did not update, if any.
Automatic updates
To make syncing easier, you can set a package copy to update automatically whenever a newer version is published. Auto-update of the package copies will take place when a place is opened in Studio.
In the Explorer window, expand the package's hierarchy tree and select its
PackageLinkobject.
In the Properties window, enable the
AutoUpdateproperty. If you have nested packages, this property only applies to the highest-level parent package, meaning automatic updates only occur when the parent package is updated.
Note
Automatic updating does not apply to modified package copies. Once you modify a package instance, its AutoUpdate property becomes disabled and is ignored.
Share and access levels
You can grant permission to friends, games, groups, or specific group user roles so that they can freely use your packages in their creations. For more information on asset access, see Asset privacy.
Note
If you share a package with restricted assets that you don't have explicit permission to use, you can still share the package but those specific restricted assets will not be visible or audible at runtime unless the friend, game, or group has permission to use those assets.
To collaborators
To change package permissions for a collaborator, such as a friend or group:
In the Explorer window, Toolbox, or Asset Manager, right-click the desired package and select Package Options ⟩ Package Details.
In the Asset Configuration window, select Permissions.
Using the search bar, input and select a collaborator that you want to grant permission to use your package, then choose a permission level.
Permission Description **Use & View** The collaborator can use and view (but not edit) the current and previous package versions. Once you provide a collaborator with this ability, you cannot revoke access to a copy they already inserted into their game; revoking access prevents reinsertion or package updates, but package copies in their data model remain intact. **Edit** The collaborator can use, view, and edit the current and previous package versions, including publishing changes to it.
To games
To grant package access to a game, the game must be editable to either you or a group that you belong to in which you have the Manage access to this group's resources role permission.
To change package permissions for a game:
- Navigate to the Creator Dashboard.
- In the upper tab bar, select Development Items, then click Models & Packages.
- Select the package you want your game to have permission to use. The package's Configure page displays.
- In the package's left-hand navigation, select Permissions. The package's Permissions page displays.
- From the Experiences tab, click the Add experiences button.
- Type the game's universeID into the Enter Universe IDs input, then click the Add button. The game displays beneath the input with its access visible.
Note
If you want to give multiple games permission to use your restricted access at the same time, you can enter multiple universeIDs as long as you separate them with a comma.
- Click the Done button to finalize your package asset access permissions.
Revert package changes
Instead of undoing an entire series of package changes one by one, you can revert unpublished changes in one action, restore a package to a previous version, or revert changes to specific configurations.
Revert unpublished changes
To undo an entire series of unpublished changes:
In the Explorer window, locate modified copies by the dot on their package icons. You can also select modified copies in the 3D viewport.
Right-click a single modified copy and select Undo Changes to Package, or select multiple copies (at least one of them modified), right-click, and select Undo Changes to Selected Packages.
Restore to published version
To restore a package to a previously published version:
- In the Explorer window, Toolbox, or Asset Manager, right-click the desired package and select Package Options ⟩ Package Details.
- In the Asset Configuration window, select Versions. The window displays details for each published version, including the date and time of publication, along with any descriptions of the changes.
- Click the checkmark next to the version you want to restore and click Submit.
Note
Reverting changes to a package does not reset the configuration to the default. See revert configurations.
Revert configurations
To revert any configuration attribute to its default, select Reset from its options menu in the Attributes section of the Properties window.
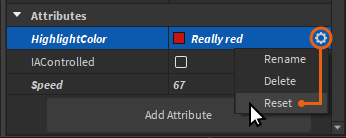
Compare package versions
When a package has multiple versions, you can compare changes between versions using the diff viewer. The tool has a package hierarchy menu that indicates all added, removed, or modified instances between versions using corresponding icons, including the following features:
Visual Overview shows the visual differences of the 3D rendering under different camera positions. It's the default view for packages with a 3D object (models, parts) as the root object, and it's currently only available for the root object.
Properties shows changes of properties and attributes. It's the default view for packages with a non-3D object (scripts, lights, 2D objects) as the root object, and it's available for all instances in a package.
Script shows line-by-line script differences. It's available for packages containing scripts, regardless of whether the script is the root object or not.
To compare package versions:
In the Explorer or 3D viewport, right‑click the target package and select Package Options ⟩ Compare Package Versions.
By default, the window compares changes between your local copy and the latest version. Use the two dropdown menus to compare different versions.

Note
Some older versions might be incompatible with the package diff tool.
After selecting versions:
To compare the visual renderings of the root model, if applicable, select the Visual Overview tab and adjust the camera control for your desired angle. Controls are synchronized across views:
- Pan the camera using left mouse clicks.
- Rotate the camera using right mouse clicks.
- Zoom in and out the camera with the mouse wheel.
- Recenter using the keyboard shortcut F.
To compare properties and attributes of an instance, select the instance and the Properties tab.
To compare script differences for a package that is a script or contains scripts, use the Script tab.
Note
This tool only allows you to compare script changes between the current version and the latest published or local version, without indicating the collaborators who made the change.Note
Alternatively, you can open the script diff tool directly by right‑clicking the target package in the [Explorer](/docs/roblox-studio-explorer) window or 3D viewport and selecting **View Script Changes**.