
Source: Roblox Creator Hub · CC BY 4.0 · View source · Code samples: MIT Imported 2026-10-03. Formatting adapted for this site.
Connect the beam
Now that you've made the attachments, it's time to connect them to the beam so that a texture can be shown.
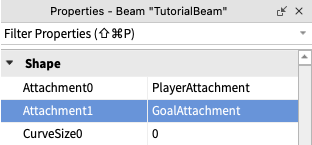
Under TestPlayer, select the TutorialBeam. In the Properties window, find Attachment0. Click the empty box to the right of the property. Then, in the Explorer window, find TestPlayer and click on PlayerAttachment.
In the TutorialBeam properties, set Attachment1 to the attachment you created in GoalPart1, the GoalAttachment.
Adjust the beam
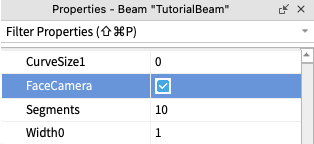
By default, a beam doesn't always face the camera. This may lead to situations where players are unable to see a beam from different angles. This can be fixed by turning on a property called FaceCamera.
<img src="https://prod.docsiteassets.roblox.com/assets/education/build-it-play-it-mansion-of-wonder/connect-the-beam/face-camera-off.jpeg" />FaceCamera Off
<img src="https://prod.docsiteassets.roblox.com/assets/education/build-it-play-it-mansion-of-wonder/connect-the-beam/face-camera-on.jpeg" />FaceCamera On
Make the beam visible at any position by going into the beam's properties and enabling FaceCamera.
Once finished, you should see a white beam between the player and goal, regardless of camera angle.

Make the tutorial arrows
The image displayed along the beam can be customized by changing its 2D texture. In addition, beams have a variety of visual options, such as texture, color, motion that can be modified.
To stream arrows along the beam like in the example, copy
5886559421and paste it into the beam's Texture property.
Note
Custom textures can be any image that you have. Learn how to upload them in the Asset Manager article.
Right now, the arrow's texture is stretched. Set TextureMode to Static to make the arrow repeat at its original size.

Note
If the arrow doesn't point the correct direction, attachments may be swapped. Make sure that Attachment0 connects to PlayerAttachment and Attachment1 to GoalAttachment. Alternatively, if you're using a custom texture, you may need to mirror the image in a photo-editing program.
Modify beam properties like Color, LightEmission, and TextureSpeed to design something that feels eye-catching and appealing. Below is just one example.
Tips for color choices
Color is one opportunity for improving a first time user experience. For example, contrasting or saturated colors get more attention, making it easier to inform players where to look on their screen.
Additionally, as you design, consider accessibility for your players. Some players may struggle to see certain color combinations, making it important that colors appeal to the broadest audience.