
Source: Roblox Creator Hub · CC BY 4.0 · View source · Code samples: MIT Imported 2026-10-03. Formatting adapted for this site.
Nested loops
Nesting loops allows you to repeat tasks in batches. For example, baking three batches of six cupcakes, or assigning weapons to players on two teams.
How nested loops run
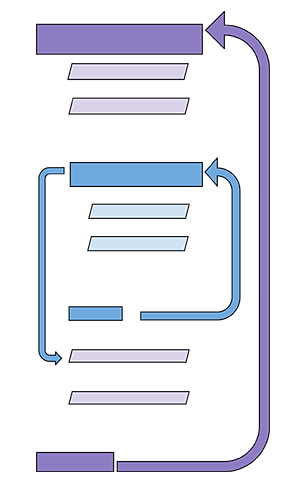
When loops are nested, scripts go line by line until it reaches the next loop. The inner loop will run until it's condition is met before returning to the outer loop.
Nested loop logic
The following diagram shows the steps a loop takes.
|  |
Nested loop example
Nested loops can seem somewhat abstract, so a visual example can help. For this exercise, copy and paste a sample script and run it in Studio. This script will create towers of parts. The outer loop will control how many parts to make, while the inner loop will create the actual batch.
Create a new script in ServerScriptService named PartMaker. Copy the code below.
local numberOfBatches = 7
local partsPerBatch = 5
local partsMade = 0

-- Makes a single cube
local function createPart()
  local part = Instance.new("Part")
  part.Size = Vector3.new(2, 2, 2)
  part.CFrame = CFrame.new(20, 0, 20)
  part.Color = currentColor
  part.Parent = workspace
end

-- Outer loop
for partBatch = 1, numberOfBatches do
  print("Top outer loop: part batch " .. partBatch)
  currentColor = Color3.fromRGB(math.random(0, 255), math.random(0, 255), math.random(0, 255))

  -- Inner loop
  for partNumber = 1, partsPerBatch do
    createPart()
    print("Inner loop: part " .. partNumber)
    partsMade += 1
    task.wait(0.5)
  end

  print("Bottom outer loop: " .. partsMade .. " parts made so far.")

  task.wait(2)
end
Watch as the script spawns a different batch of colored parts. After going through one batch, it'll pause for 2 seconds. The print statement in the outer loop will run only one time per completed inner loop.
Nested for loop tower
Each loop has its own set of code, so can be responsible for different tasks. One thing nested loops can do is change the placement of where an object spawns to create a tower like the one in this video. There's three different loops, one each for controlling where along the width, length, and height of the tower the cube spawns.
Code a cube maker script
To practice nested loops, you'll make a script that creates a tower of cubes. For the cube tower script, first code a function that spawns a single cube. The tower will be built by repeatedly calling this function.
Set up the script
For the cube tower script, first code a function that spawns a single cube. The tower will be built by repeatedly calling this function.
Delete the PartMaker script or disable it (in the script properties, check Disabled). If you don't, there will be two scripts making parts at the same time in the same place.
Create a new script named TowerBuilder. Add variables for tower size and cube size at the top.
local TOWER_SIZE = 4
local CUBE_SIZE = 2
Note
Notice how the variables above are all capitalized. These are called constants, or variables that don't change. To set them apart from variables that will be changed within the script, type them using capitals and underscores.
Add a local function named
makeCube()that creates a single square cube usingCUBE_SIZE.local TOWER_SIZE = 4 local CUBE_SIZE = 2 -- Creates individual cubes local function makeCube() local cube = Instance.new("Part") cube.Size = Vector3.new(CUBE_SIZE, CUBE_SIZE, CUBE_SIZE) endSet the cube's color to a variable which will be updated in the nested loops.
local function makeCube()
  local cube = Instance.new("Part")
  cube.Size = Vector3.new(CUBE_SIZE, CUBE_SIZE, CUBE_SIZE)
  cube.Color = currentColor
end
Lastly, parent the new cube to the workspace so it appears.
local function makeCube()
    local cube = Instance.new("Part")
    cube.Size = Vector3.new(CUBE_SIZE, CUBE_SIZE, CUBE_SIZE)
    cube.Color = currentColor
    cube.Parent = workspace
end
Note
In Roblox code, once an object is created by script, it's recommended to parent it at the end. It's faster to make changes to an instance before there is a physical object in the 3D world.
Spawn in different directions
To create a tower, spawn cubes at specific points by setting the X, Y, Z properties of each new cube. X and Z are side to side. Y is up and down.
In
makeCube(), add parameters forspawnX,spawnY, andspawnZ. These numbers will set each new cube's spawn location.-- Creates individual cubes local function makeCube(spawnX, spawnY, spawnZ) local cube = Instance.new("Part") cube.Size = Vector3.new(CUBE_SIZE, CUBE_SIZE, CUBE_SIZE) cube.Color = currentColor cube.Parent = workspace endInside the function, set the cube's CFrame property to a new CFrame using the
spawnX,spawnY,spawnZparameters.local function makeCube(spawnX, spawnY, spawnZ) local cube = Instance.new("Part") cube.Size = Vector3.new(CUBE_SIZE, CUBE_SIZE, CUBE_SIZE) cube.Color = currentColor cube.CFrame = CFrame.new(spawnX, spawnY, spawnZ) cube.Parent = workspace end
Note
In Roblox, CFrame is a data type used to store 3D position and orientation. It's used to place objects in a world.
Spawn with nested loops
The script will have three loops total, one each for the length, width, and height of the tower. To complete an entire floor before moving upwards, start with setting the Y coordinate in the first, outermost loop.
Under the
makeCube()function, Create a for loop to set how high each cube spawns.- Control variable:
heightIndex = 1 - End point:
TOWER_SIZE - Inside the loop, add: local spawnY = (heightIndex - 1) * CUBE_SIZE
-- Builds tower for heightIndex = 1, TOWER_SIZE do local spawnY = (heightIndex - 1) * CUBE_SIZE end- Control variable:
Note
The calculation for spawnY makes sure the first cube spawns at ground height and then moves over the space of a single cube every time. Ground level is at 0, which is why 1 needs to be subtracted from the heightIndex.
With the first loop for height finished, start on the second. Inside the first for loop, add a new for loop for where to place the cube along the length of the tower.
- Control variable: lengthIndex = 1
- End point:
TOWER_SIZE - Inside that loop add: local spawnX = lengthIndex * CUBE_SIZE
for heightIndex = 1, TOWER_SIZE do
    local spawnY = (heightIndex - 1) * CUBE_SIZE

    for lengthIndex = 1, TOWER_SIZE do
        local spawnX = lengthIndex * CUBE_SIZE
    end
end
Note
When working with nested loops, it's important to make sure code is well indented. This helps make your code readable and organized.
Inside the second loop, add a third for loop for the tower width. In this final loop, call
makeCube()and pass in the X,Y, Z parameters.- Control variable:
widthIndex = 1 - End point:
TOWER_SIZE - Inside the loop add:
local spawnZ = widthIndex * CUBE_SIZEmakeCube(spawnX, spawnY, spawnZ)- A wait time of 0.25 so you can watch the tower be built.
-- Builds tower for heightIndex = 1, TOWER_SIZE do local spawnY = (heightIndex - 1) * CUBE_SIZE for lengthIndex = 1, TOWER_SIZE do local spawnX = lengthIndex * CUBE_SIZE for widthIndex = 1, TOWER_SIZE do local spawnZ = widthIndex * CUBE_SIZE makeCube(spawnX, spawnY, spawnZ) task.wait(0.25) end end end- Control variable:
To have each floor be a random color, change
currentColorto randomRGBnumbers in the same loop in which you create a new floor.for heightIndex = 1, TOWER_SIZE do local spawnY = (heightIndex - 1) * CUBE_SIZE currentColor = Color3.fromRGB(math.random(0, 255), math.random(0, 255), math.random(0, 255)) for lengthIndex = 1, TOWER_SIZE do local spawnX = lengthIndex * CUBE_SIZE for widthIndex = 1, TOWER_SIZE do local spawnZ = widthIndex * CUBE_SIZE makeCube(spawnX, spawnY, spawnZ) task.wait(0.25) end end endRun the project and wait to see that a full tower has been created without any errors in the Output window.
Optional challenges
Below are different self-directed challenges that use nested loops in different ways. Try and code on your own before looking at the solution.
Fade away parts
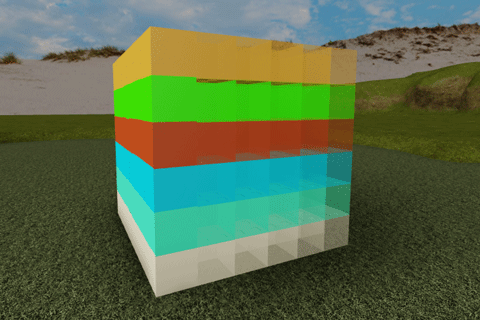
As the tower is built, have the parts fade in transparency from left to right.
The code solution is below.
local TOWER_SIZE = 6
local CUBE_SIZE = 2

-- Creates individual cubes
local function makeCube(spawnX, spawnY, spawnZ)
    local cube = Instance.new("Part")
    cube.Size = Vector3.new(CUBE_SIZE, CUBE_SIZE, CUBE_SIZE)
    cube.Color = currentColor
    cube.Transparency = cubeTransparency -- Sets transparency
    cube.CFrame = CFrame.new(spawnX, spawnY, spawnZ)
    cube.Parent = workspace
end

-- Builds tower
for heightIndex = 1, TOWER_SIZE do
    local spawnY = (heightIndex - 1) * CUBE_SIZE
    currentColor = Color3.fromRGB(math.random(0, 255), math.random(0, 255), math.random(0, 255))

    for lengthIndex = 1, TOWER_SIZE do
        local spawnX = lengthIndex * CUBE_SIZE
	cubeTransparency = (lengthIndex - 1) * 0.10 --Updates every loop starting at 0

        for widthIndex = 1, TOWER_SIZE do
            local spawnZ = widthIndex * CUBE_SIZE
            makeCube(spawnX, spawnY, spawnZ)
            task.wait(0.05)
        end
    end
end
Rain down objects
Instead of parts, try spawning an actual object. The example here used cupcakes.
On your own, see if you can:
- Create an object from base parts. Make sure to weld all parts together so the object doesn't fall apart.
- Place the object in ServerStorage
- Modify the PartMaker found in the Nested Loop Exampleto use your object instead of parts.
A sample is shown here.
A code solution using cupcakes is included.
local numberOfBatches = 30
local cupcakesPerBatch = 6

local cupcakesBaked = 0

--Makes a single cupcake
local function makeCupcake()
    local ServerStorage = game:GetService("ServerStorage")
    local cupcake = ServerStorage.Cupcake:Clone()
    local cup = cupcake.Cup
    local frosting = cupcake.Frosting
    cupcake:SetPrimaryPartCFrame(CFrame.new(0, 20, 0) * CFrame.Angles(0, 0, -90))
    frosting.Color = frostingColor
    cup.Color = cupColor
    cupcake.Parent = workspace
end


-- Outer loop
for cupcakeBatch = 1, numberOfBatches do
    print("Top outer loop: cupcake batch " .. cupcakeBatch)
    frostingColor = Color3.fromRGB(math.random(0, 255), math.random(0, 255), math.random(0, 255))
    cupColor = Color3.fromRGB(math.random(0, 255), math.random(0, 255), math.random(0, 255))

    -- Inner loop
    for cupcakeNumber = 1, cupcakesPerBatch do
        makeCupcake()
        print("Inner loop: cupcake " .. cupcakeNumber)
        -- Track muffins baked
        cupcakesBaked += 1
        task.wait(0.5)
    end

    print("Bottom outer loop: " .. cupcakesBaked .. " cupcakes baked so far.")
end
Summary
To accomplish more complex tasks, coders will find it helpful to combine multiple loops, and even different types of loops. All loops can be nested, meaning that one loop is inside another. Nested loops follow the same logic as any other loop. It starts in the first, outermost loop, runs tasks through inner loops, and then cycles back to the first loop if applicable.