
Source: Roblox Creator Hub · CC BY 4.0 · View source · Code samples: MIT Imported 2026-10-03. Formatting adapted for this site.
Control the user's camera
The user's view of the world is represented by a Camera object. You can change the camera behavior to suit your game in a variety of ways. For example, the camera can react to events in the world, such as shaking when a monster walks by, or locked to the side of the user character, as in a side-scroller.
Create a first-person camera
A first-person camera is a view where the camera stays locked with the character's head, which is more accurate to real life. It's common in shooter and story games where the goal is to make the user feel immersed in the world.
<img src="https://prod.docsiteassets.roblox.com/assets/tutorials/controlling-the-players-camera/FirstPersonCameraExample.jpg" />First Person Camera
<img src="https://prod.docsiteassets.roblox.com/assets/tutorials/controlling-the-players-camera/ThirdPersonCameraExample.jpg" />Classic Roblox Camera
In Studio, the StarterPlayer object contains a number of properties that affects the user's camera. The CameraMode property determines how the camera behaves.
Select StarterPlayer.

Change CameraMode to LockFirstPerson. This ensures the user's camera doesn't move away from their head.

Playtest to see the first person camera in action.
Note
If your cursor is stuck in the middle of the screen while testing, you can free up your mouse by pressing the Escape key or press ShiftF5 to end the test.
Create a side-scrolling camera
A side-scrolling view keeps the camera at a fixed position relative to the side of the character, giving the world a two-dimensional feel.
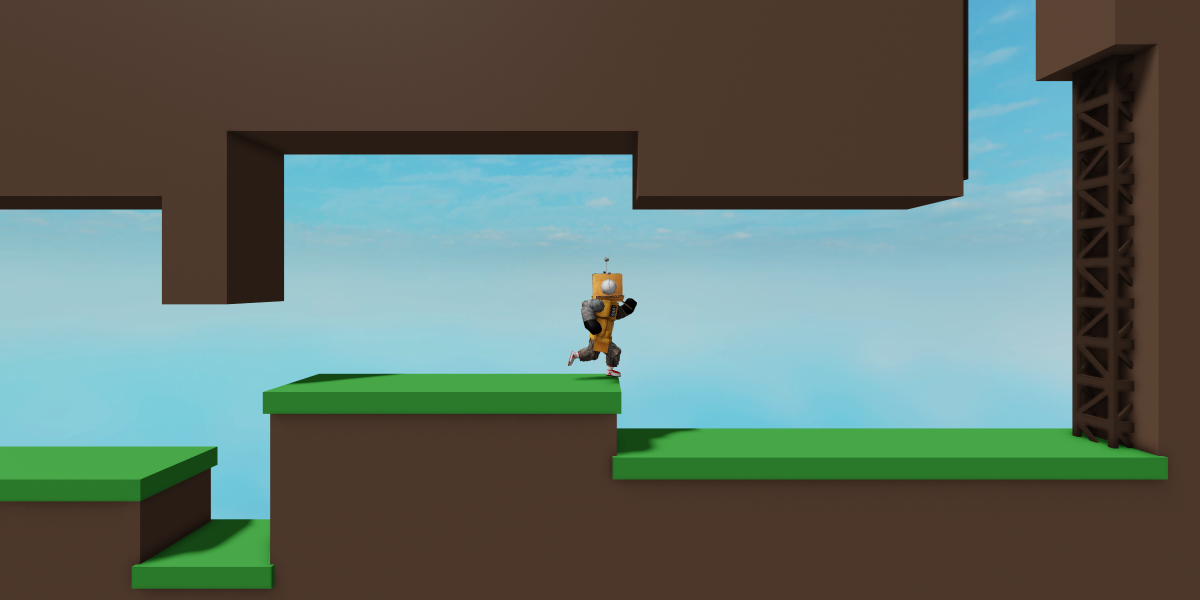
Script the camera
Expand StarterPlayer, and in StarterPlayerScripts add a LocalScript named
CameraManager.
At the top of the script, copy and paste the following code sample to get the Players service, and then in a new variable get the local user.
local Players = game:GetService("Players")

local player = Players.LocalPlayer
Create a function called
updateCamera. This holds the logic needed to get and set a new position for the camera.local Players = game:GetService("Players") local player = Players.LocalPlayer local function updateCamera() endInside the function, get the user's character model and check if it exists by using an if statement.
local Players = game:GetService("Players")

local player = Players.LocalPlayer

local function updateCamera()
    local character = player.Character
    if character then

    end
end
Note
Only a user can see their own camera configuration, so it is always controlled from a client script.
Point the camera
All character models contain a part named HumanoidRootPart, which can be used to get the character's position in the world. This sets position the camera points at.
Use
FindFirstChildto get the HumanoidRootPart and check it exists using an if statement.local Players = game:GetService("Players") local player = Players.LocalPlayer local function updateCamera() local character = player.Character if character then local root = character:FindFirstChild("HumanoidRootPart") if root then end end endThe position of the HumanoidRootPart is actually 2 studs below the user's head. To fix this, add a new
Vector3with a height of 2 studs to the root's position.local Players = game:GetService("Players") local player = Players.LocalPlayer local HEIGHT_OFFSET = 2 local function updateCamera() local character = player.Character if character then local root = character:FindFirstChild("HumanoidRootPart") if root then local rootPosition = root.Position + Vector3.new(0, HEIGHT_OFFSET, 0) end end end
Note
Separate individual numbers into variables to make them easier to tweak later.
Set the camera position
The camera also needs a position. To give the user's view a 2D side-scrolling look, the camera needs to look directly at the side of the character. Place the camera to the side of the user by adding depth to just the Z axis of the camera's position using a Vector3.
local player = Players.LocalPlayer

local CAMERA_DEPTH = 24
local HEIGHT_OFFSET = 2

local function updateCamera()
    local character = player.Character
    if character then
        local root = character:FindFirstChild("HumanoidRootPart")
        if root then
            local rootPosition = root.Position + Vector3.new(0, HEIGHT_OFFSET, 0)
            local cameraPosition = Vector3.new(rootPosition.X, rootPosition.Y, CAMERA_DEPTH)
        end
    end
end
Update CurrentCamera
Now that the variables for the camera's position and the camera's target are ready, it's time to update the camera's position. You can access the user's camera through the CurrentCamera property of Workspace. The camera has a CFrame property to determine its position.
You can use CFrame.lookAt() to update the camera. It takes two positions and creates a CFrame located at the first position pointed towards the second. Use CFrame.lookAt() to create a CFrame that is positioned at cameraPosition and pointed toward rootPosition.
local player = Players.LocalPlayer
local camera = workspace.CurrentCamera

local CAMERA_DEPTH = 24
local HEIGHT_OFFSET = 2

local function updateCamera()
    local character = player.Character
    if character then
        local root = character:FindFirstChild("HumanoidRootPart")
        if root then
            local rootPosition = root.Position + Vector3.new(0, HEIGHT_OFFSET, 0)
            local cameraPosition = Vector3.new(rootPosition.X, rootPosition.Y, CAMERA_DEPTH)
            camera.CFrame = CFrame.lookAt(cameraPosition, rootPosition)
        end
    end
end
Sync the camera
The last step is to run this function repeatedly to keep the camera in sync with the user. The image the user sees is constantly refreshing. The split second it takes to do all of the calculations necessary is called the render step.
RunService:BindToRenderStep() makes it simple to execute a function on every frame by accepting these three parameters:
name- The name of this binding, which should be unique so it won't clash with other functions of the same name.priority- The higher the number, the higher the priority. This function should run after Roblox's default camera update, so the priority is set to 1 level higher than the internal camera's RenderPriority.function- The function to be bound to the render step.
Use
RunService:BindToRenderStep()to bind theupdateCamerafunction to the render step.local Players = game:GetService("Players") local RunService = game:GetService("RunService") local player = Players.LocalPlayer local camera = workspace.CurrentCamera local CAMERA_DEPTH = 24 local HEIGHT_OFFSET = 2 local function updateCamera() local character = player.Character if character then local root = character:FindFirstChild("HumanoidRootPart") if root then local rootPosition = root.Position + Vector3.new(0, HEIGHT_OFFSET, 0) local cameraPosition = Vector3.new(rootPosition.X, rootPosition.Y, CAMERA_DEPTH) camera.CFrame = CFrame.lookAt(cameraPosition, rootPosition) end end end RunService:BindToRenderStep("SidescrollingCamera", Enum.RenderPriority.Camera.Value + 1, updateCamera)Playtest your code. Use the A and D keys to move your character from side to side.
Create an isometric camera
The basic structure of getting the user's position and updating the camera's position every frame can be adapted to many other camera styles, such as an isometric camera. An isometric camera is a 3D view pointing slightly down at a fixed angle towards the user character.

Modify position and view
Using the code from the previous example, modify
cameraPositionto add the same amount to all 3 dimensions.
local function updateCamera()
    local character = player.Character
    if character then
        local root = character:FindFirstChild("HumanoidRootPart")
        if root then
            local rootPosition = root.Position + Vector3.new(0, HEIGHT_OFFSET, 0)
            local cameraPosition = rootPosition + Vector3.new(CAMERA_DEPTH, CAMERA_DEPTH, CAMERA_DEPTH)
            camera.CFrame = CFrame.lookAt(cameraPosition, rootPosition)
        end
    end
end

RunService:BindToRenderStep("IsometricCamera", Enum.RenderPriority.Camera.Value + 1, updateCamera)
Changing the camera's
FieldOfViewproperty simulates zooming it in and out, which can give the view a flatter look. Try setting it to a value of20to zoom in, and increasing the camera's distance from the user to compensate.local Players = game:GetService("Players") local RunService = game:GetService("RunService") local player = Players.LocalPlayer local camera = workspace.CurrentCamera local CAMERA_DEPTH = 64 local HEIGHT_OFFSET = 2 camera.FieldOfView = 20 local function updateCamera()
By changing the way the camera behaves, you can achieve a whole new look for your game. See if you can change the cameraPosition to achieve a top-down camera with the same script. Try tweaking settings to get a result you like!