
Source: Roblox Creator Hub · CC BY 4.0 · View source · Code samples: MIT Imported 2026-10-03. Formatting adapted for this site.
Animation Graph Editor
The Animation Graph Editor is a visual, node-based tool that empowers technical artists and animators to build complex animation logic directly within Roblox Studio. By providing a streamlined interface for creating behaviors like blend trees, it removes the traditional dependency on manual scripting for character motion.
This system works in tandem with your existing animation workflow:
- Animation Editor: Continue using the Animation Editor as your primary tool for authoring individual clips and fine-tuning keyframes and curves.
- Animation Graph Editor: Use this tool to take those clips and organize them into a logic tree to drive sophisticated gameplay behavior.
Designed to enhance collaboration, the visual graph allows developers to quickly inspect, debug, and understand the logic created by animators. While artists focus on refining interactive motion, developers can still access animation graph nodes programmatically for direct control over blended animations and states.
Build a graph
To begin building logic for an animatable character, access the Animation Graph editor via the Avatar tab in the Studio ribbon. The following steps demonstrate how to initialize a rig and construct a basic node network using default walking and waving animations.
For a deeper dive into practical applications, you can explore the Animation Graph Reference File, which contains both foundational and complex implementation examples.
To create your own animation graph, similar to the basic example provided in the reference, use the following steps:
In Studio, add an animatable rig by navigating to the Avatar tab and selecting Character ⟩ My Avatar.

Open the Animation Graph Editor by navigating to Graph Editor in the Avatar tab.

Select the animatable rig in the 3D viewport and select Create Graph.
In the Graph Editor, right-click and select Clip.

In the new Clip node, set the Animation ID.
Select the Animation ID dropdown.
To submit a specific animation asset ID, click Import.

In the Animation ID field, add the default Walk animation:
507777826.Select Import.
Add another clip node by repeating steps 4-5 using the default Wave animation:
507770239.
In the Graph Editor, right-click and select Add.
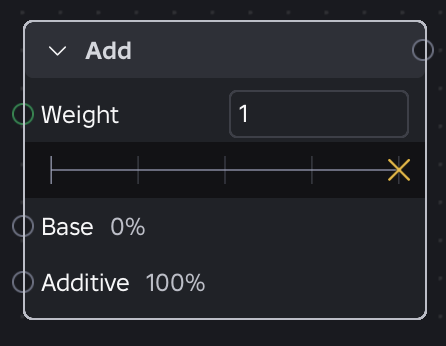
Connect the Clip nodes to the Add node by dragging the top-right output connector to the appropriate port:
- Connect the Clip node with the Walking animation to the Base port.
- Connect the Clip node with the Waving animation to the Additive port.
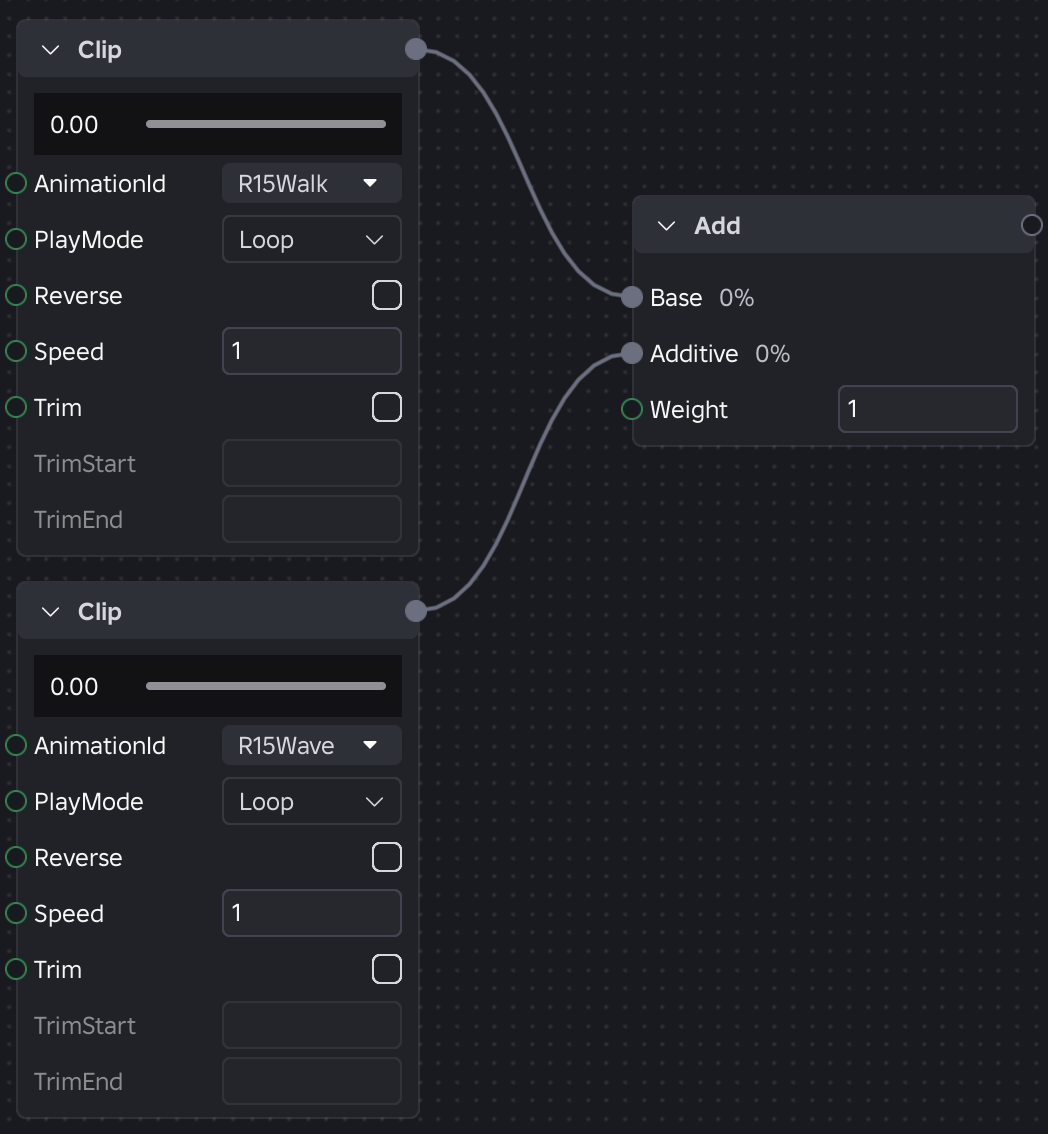
From the Add node, connect the top-right output connector to the Graph Output Pose port.

Assign a parameter to your Speed variable.
1. Click and drag the green Speed port to an empty area. A new parameter node displays.
   <img src="https://prod.docsiteassets.roblox.com/assets/animation/graph-editor/Parameter-Noodle.png" width="80%" alt="Click and dragging connector from Speed port of Clip node." />

2. In the top left of the graph editor, use the parameter pane to quickly modify parameters in your nodes. You can also access this [programmatically](#api-integration).
   <img src="https://prod.docsiteassets.roblox.com/assets/animation/graph-editor/Parameter-Pane.png" width="80%" alt="Parameter pane, parameter node, and clip node showing shared values." />
Test the animation by pressing the play button.

Try testing various weights, speeds, playmodes, and other animations. For more information on individual nodes, see the Node reference.
Note
Check out the reference place for different examples of various animation graph configurations.
API integration
Creating and deploying an Animation Graph follows the standard Roblox animation pipeline. After selecting a rig in the Animation Graph Editor, a new AnimationGraphDefinition asset is created. This asset serves as the container for your nodes, connections, and parameters. Once your logic is finalized, you publish the graph to receive a standard Asset ID.
In your scripts, you interact with these graphs by loading them onto an Animator as you would a traditional animation. To drive the graph's internal logic, use AnimationTrack:SetParameter to pass real-time values—such as movement speed or state booleans—directly into the graph's variables.
local animation = Instance.new("Animation")
animation.AnimationId = "rbxassetid://123456789" -- Your Published Graph ID

local animationTrack = animator:LoadAnimation(animation)
animationTrack:Play()

-- Dynamic parameter updates via RunService
game:GetService("RunService").Stepped:Connect(function(_, dt)
    local currentSpeed = humanoidRootPart.AssemblyLinearVelocity.Magnitude
    animationTrack:SetParameter("humanoidSpeed", currentSpeed)
end)
Node reference
Note
For details about each node type, see AnimationNodeType.
Global event rules
For all nodes and transitions, the following rules apply by default:
- Events propagate upward from their source node through the graph. Each event carries a weight representing its source's influence in the final blend. If the weight reaches zero at any point, the event is silenced.
- Nodes without custom event logic pass all events through unchanged; nodes that blend or select between inputs may scale the weight or block events from non-primary inputs (see per-node Event section).
- Marker events that reach the top of the graph can be observed via
AnimationTrack:GetMarkerReachedSignal.
Transitions
Several nodes in the Animation Graph (such as Select, Priority Select, Sequence, and Random Sequence) manage how animations blend when switching between active inputs. To prevent redundancy in the node reference, these behaviors are defined by standardized transition property groups.
Default transition

The baseline blending behavior applied to the node whenever it switches to a new active input.
- DefaultTransitionDuration (number): The time (in seconds) it takes to fully blend into the new pose.
- DefaultTransitionCurve (
PoseEasingStyle): The easing function applied during the blend. Currently only supportsPoseEasingStyle.LinearandPoseEasingStyle.CubicV2.
Transition override

Input-specific link properties that supersede the default transition. These are applied when the node transitions to that specific input.
- TransitionOverrideDuration (number): Overrides the default transition duration.
- TransitionOverrideCurve (
PoseEasingStyle): Overrides the default transition curve. Currently only supportsPoseEasingStyle.LinearandPoseEasingStyle.CubicV2
Replication
Animation graph parameters and internal node state replicate automatically. The replication mode is determined by Workspace.AuthorityMode at the time the Animate script is created:
- In
AuthorityMode.Automatic: Parameters set viaAnimationTrack:SetParameterreplicate automatically to other peers. - In
AuthorityMode.Server: The server drives the full graph simulation. All node states, such as elapsed time forAnimationNodeType.ClipNode, and graph parameters replicate automatically from server to clients. The owning player's client uses prediction for smooth local playback.
Sample Animate Scripts
To generate example scripts to drive an animation graph for a rig, use Graph -> Create Animate script in the Animation Graph Editor. This produces a script hierarchy placed under StarterCharacterScripts (for player characters) or directly on the rig (for NPCs):
Animate (ModuleScript)
├── RunClient (LocalScript)
└── RunServer (Script, RunContext = Legacy)
The Animate ModuleScript contains the graph-loading logic. The RunClient and RunServer scripts invoke it in the appropriate context. Which scripts are included depends on the use case:
| Use Case | Scripts Included | Behavior |
|---|---|---|
| **NPC** (any mode) | RunServer | Server loads and plays the graph. State replicates to all clients automatically. |
| **Player + [`AuthorityMode.Server`](/docs/enum-authoritymode#server)** | RunServer + RunClient | Server drives the graph authoritatively. The owning client enables [`PredictionMode`](/docs/enum-predictionmode) for rollback-based local prediction. |
| **Player + [`AuthorityMode.Automatic`](/docs/enum-authoritymode#automatic)** | RunClient | Owning client loads and plays the graph. Parameters replicate automatically to the server and other clients. |
The following attributes are stored on the Animate script and configure its behavior:
| Attribute | Type | Description |
|---|---|---|
| **GraphName** | String | Name of the animation graph asset. |
| **CharacterName** | String | Name of the rig the graph targets. |
| **SourceAssetId** | String | The published Asset ID of the graph. Used at runtime in published games. |
| **IsServerAuthority** | Boolean | Whether the script was created with [`Workspace.AuthorityMode`](/docs/workspace#workspace-authoritymode) set to **Server**. Determines the replication strategy. |
| **PreviewInStudio** | Boolean | When true (default), Studio play-testing loads the unpublished graph locally so you can iterate without publishing. Set to false to test the published asset in Studio. Note that this is currently not supported in [`AuthorityMode.Server`](/docs/enum-authoritymode#server). |
Parameter replication in Automatic mode
When Workspace.AuthorityMode is Automatic:
- The owning client drives player character graphs; the server drives NPC graphs.
- Parameters set via
AnimationTrack:SetParameterare automatically replicated to other peers. MultipleSetParametercalls within a single frame are coalesced (last-writer-wins). - No additional scripting is needed for parameter transport — the engine handles replication internally.
- Other clients see parameter updates with a small delay (one send interval plus network latency).
Server authority
When Workspace.AuthorityMode is Server:
- The server is authoritative for all graphs — it runs the simulation and replicates the full graph state.
- What is replicated: Both parameters and internal node state, including elapsed time, current selections, transition progress, loop counts, and RNG seeds. This ensures all clients see identical animation behavior.
- Player characters: The server drives the graph. The owning client's RunClient script automatically enables
PredictionModeon theAnimator, so the local player sees smooth, predicted animation that reconciles with the server on mismatch. - NPCs: The server drives the graph exclusively; clients observe the replicated state with no local simulation.
Driving parameters
Use AnimationTrack:SetParameter from every script that runs the graph:
- NPC (any mode): Call
SetParameterfrom RunServer (or any serverScriptwith access to theAnimationTrack). - Player character in
AuthorityMode.Server: CallSetParameterfrom both RunServer and RunClient. The server needs parameters to drive the authoritative simulation, and the owning client needs the same parameters to drive its local prediction. - Player character in
AuthorityMode.Automatic: CallSetParameterfrom RunClient (or any clientLocalScriptwith access to theAnimationTrack).
The generated Animate script includes a commented-out SetParameter block as a starting point. Uncomment and modify it to drive parameters from gameplay state (movement speed, humanoid state, input direction, etc.).