
Source: Roblox Creator Hub · CC BY 4.0 · View source · Code samples: MIT Imported 2026-10-03. Formatting adapted for this site.
Cross-platform development
Roblox is inherently cross‑platform, as players can discover and join games on their phone or tablet, then later continue where they left off on their PC or console. To support an expanding suite of platforms, you should build user interfaces that seamlessly adapt to the input type (touch, gamepad, mouse/keyboard), screen size, and device orientation. This guide, the adaptive design guide, and the linked resources can help you design a true cross‑platform game that's compatible, accessible, and enjoyable on all platforms.
Note
To explore a pre-made game that showcases the following cross‑platform design concepts, check out the Interactivity Showcase.
Input
A carefully designed game should support all primary input types, including mouse and keyboard, touch, and gamepads.
Cross-platform actions
Note
Support all primary input types (mouse/keyboard, touch, and gamepads) using the Input Action System.
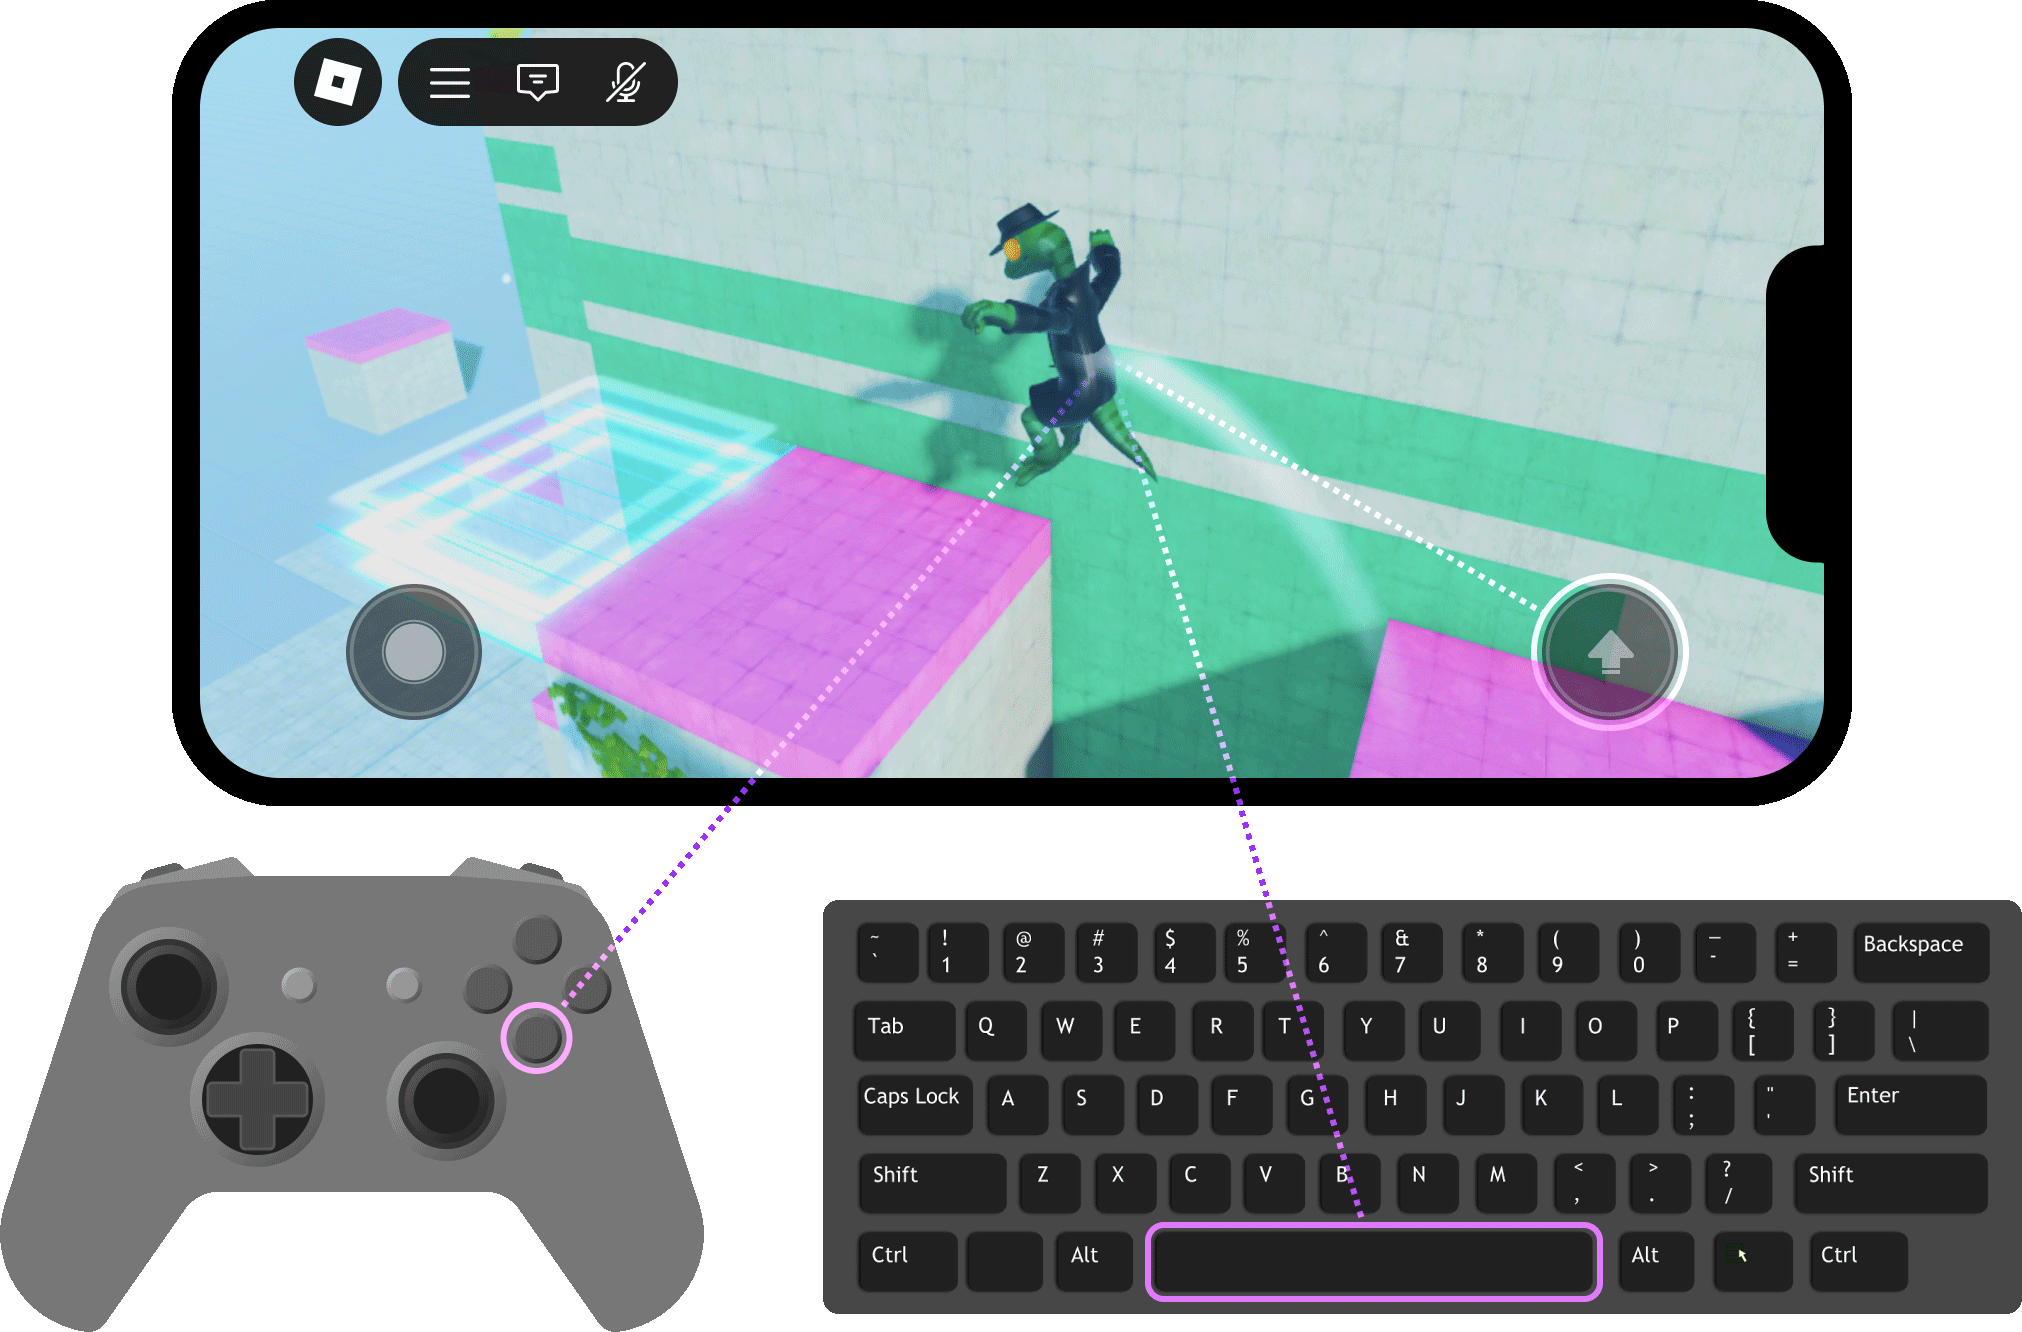
To simplify cross‑platform inputs, Roblox provides the Input Action System to define actions such as "jump," "sprint," or "shoot" and set up bindings for multiple hardware inputs to drive those actions. You do not need to think about all the technical aspects of hardware inputs and when to listen for specific input triggers; you simply define which inputs perform which actions.
Input type detection
Note
Ensure that UI elements respond and adapt to the player's primary input type as detailed in input type detection. Also consider assistive hints to help players understand specific input changes.
In cross-platform development, it's important that you determine and respond to the primary input type a player is using, normally to ensure that UI elements like on‑screen buttons and menus work elegantly and support interaction across devices.
For example, a touch‑enabled device assumes touch is the default input and that touch buttons may appear for actions, but a player may choose to connect a bluetooth gamepad. In this case, touch remains a valid input, but you can assume the player wants to switch to the connected gamepad as the primary input type and possibly use touch as a backup input for on‑screen UI.
If you're using the Input Action System, the PreferredBinding property complements primary input detection: just as PreferredInput reports the player's current primary input type, PreferredBinding reports the specific InputBinding that matches the player's current device. Both update automatically as the player switches devices, so you can drive device‑aware UI without writing device‑switch logic yourself.
Assistive hints
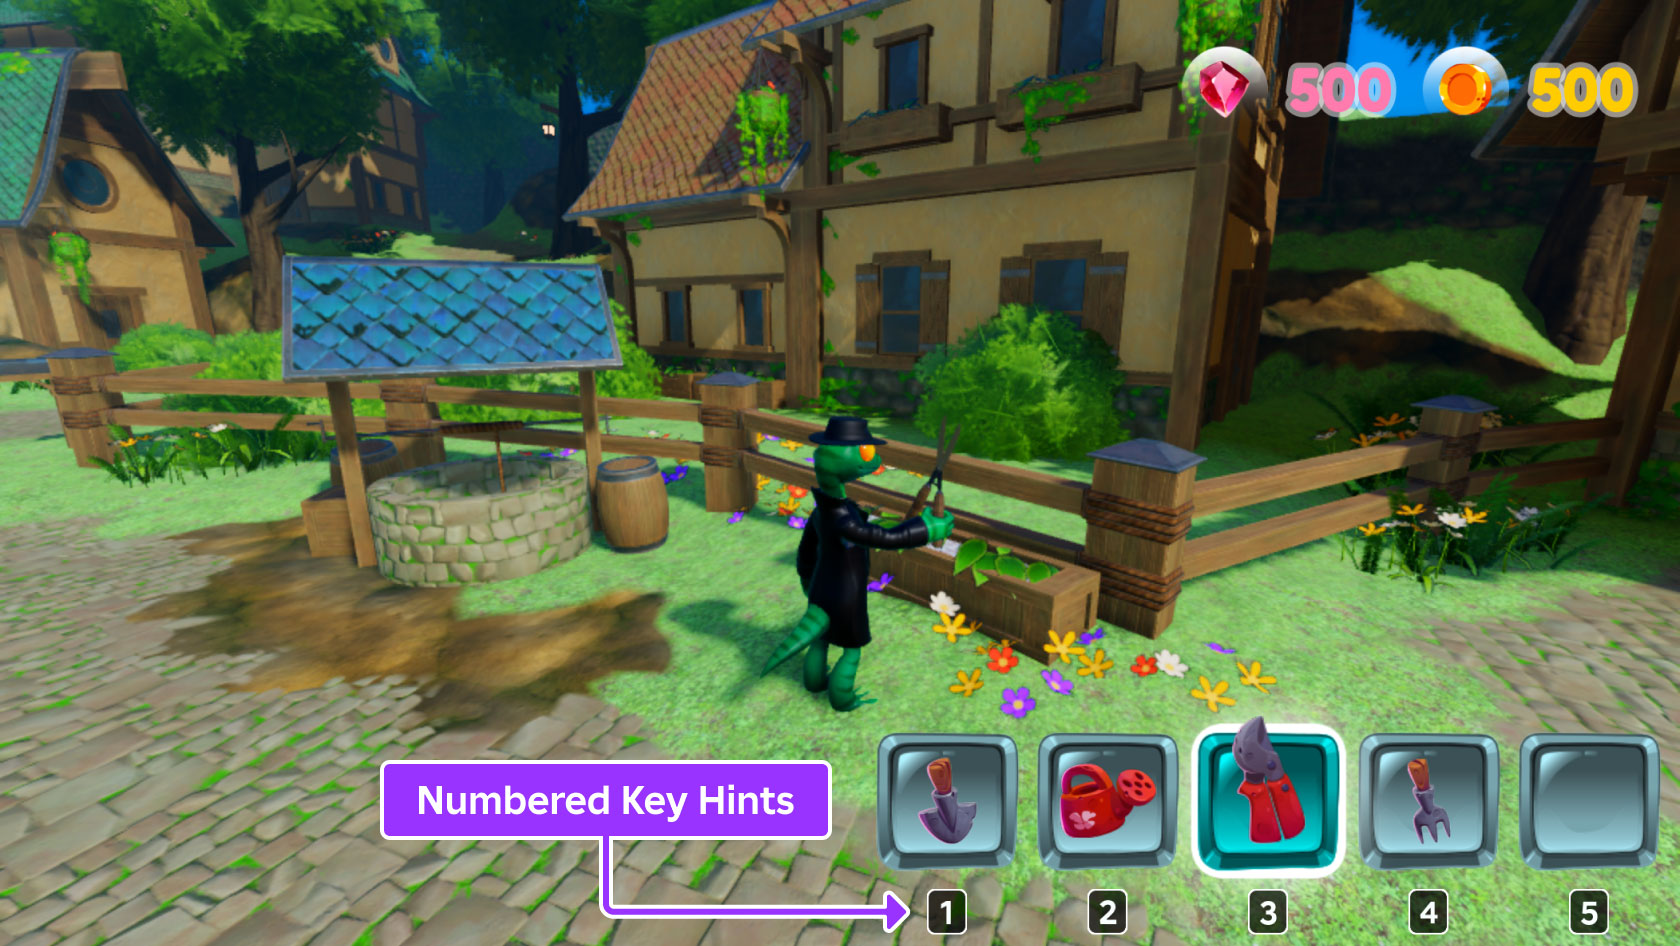
Based on the primary input type, it's recommended that you include assistive UI hints whenever possible. For example, when selecting tools to equip, display input‑specific hints such as 1–5 when the player is using a keyboard, or gamepad trigger hints when the player is using a gamepad.
Note
For no-code assistive hints that automatically update when the player switches devices, use InputActionLabel and point it at any InputAction to display the correct input per platform. See displaying bindings for full details.
For more granular control, or if you need to customize hint display beyond what InputActionLabel offers, you can use the UserInputService methods below to manually gather platform‑specific images and strings:
Keyboard Input
Gamepad Input

The GetImageForKeyCode() and GetStringForKeyCode() methods are helpful in gathering a platform‑specific image or string to use in a UI hint, such as the following examples:
| Key Code | Xbox Image | PlayStation Image | String |
|---|---|---|---|
| [`KeyCode.ButtonA`](/docs/enum-keycode#buttona) |  |  | `ButtonA` |
| [`KeyCode.ButtonX`](/docs/enum-keycode#buttonx) |  |  | `ButtonX` |
| [`KeyCode.One`](/docs/enum-keycode#one) | n/a | n/a | `1` |
| [`KeyCode.Five`](/docs/enum-keycode#five) | n/a | n/a | `5` |
User interface
A well-designed user interface is essential for players on all platforms to interact with your game.
Position and size
Note
Ensure that all UI elements are visible on all screen sizes and orientations.
Note
Ensure that all buttons/controls are interactable and that they are not blocked or obscured by device cutouts or Roblox UI elements.
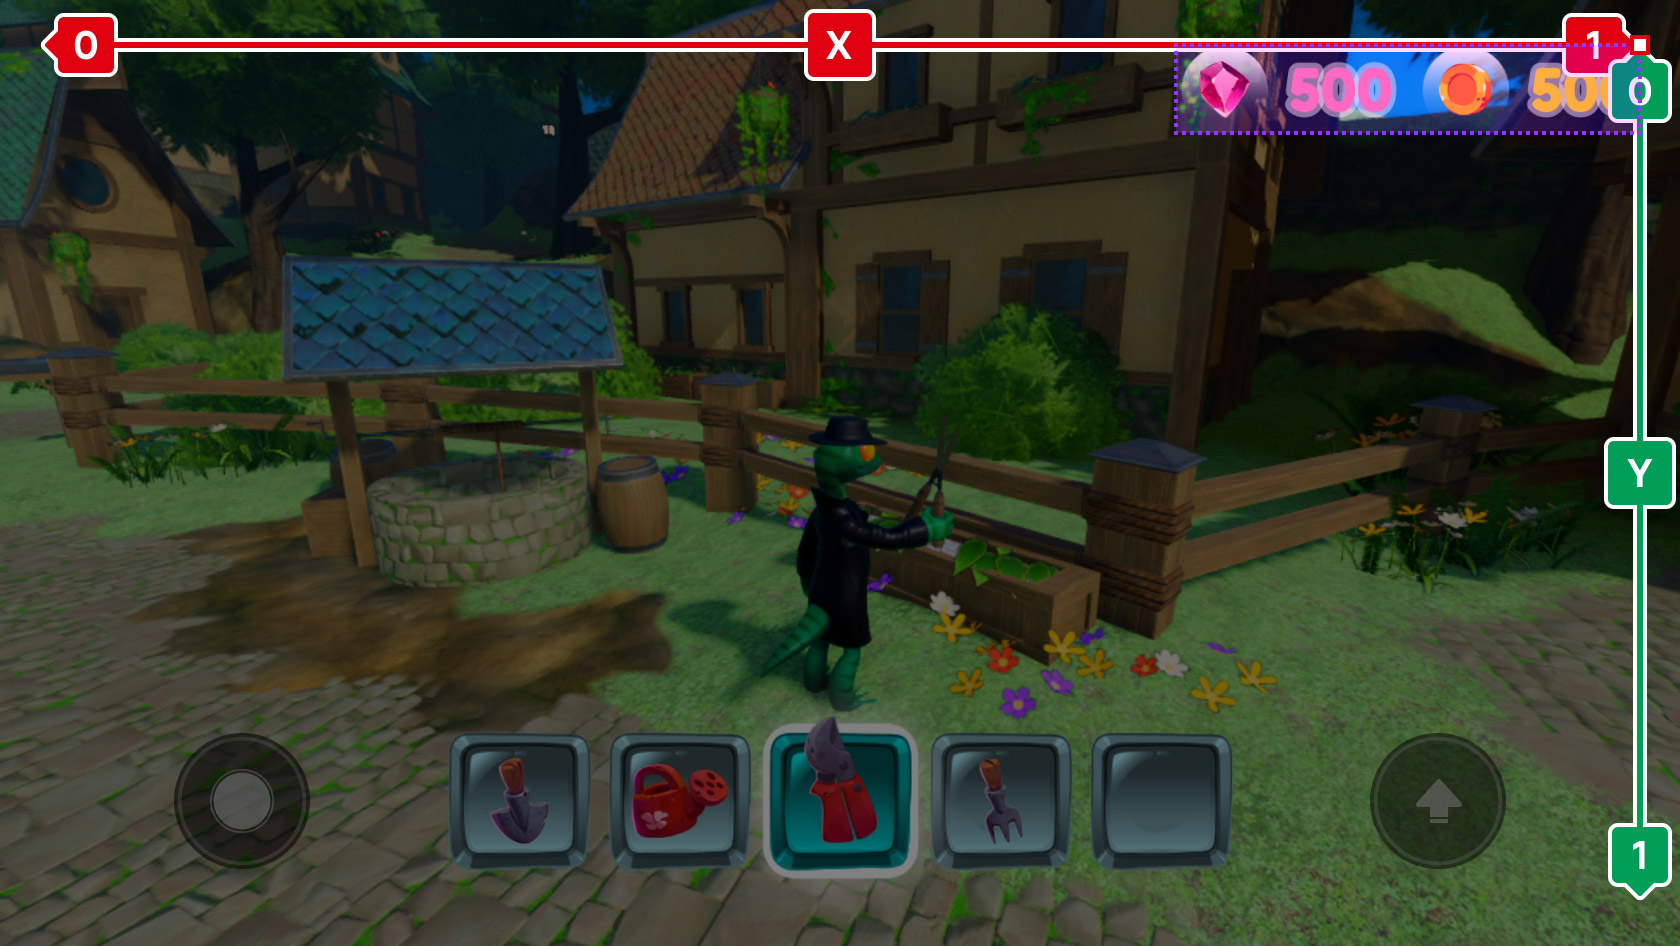
All UI elements should be positioned and sized appropriately to ensure visibility and interactivity across multiple screen sizes. Positioning UI elements by Scale is a common approach since it's based on a percentage of the screen's X and Y bounds, not a pixel value (pixels can vary arbitrarily by both number and density across devices). You can also utilize the element's AnchorPoint to set its positional origin. For example, the UI container holding the gem/coin counters in the following image is positioned at an X scale of 1 (right) and Y scale of 0 (top) with an upper‑right anchor point.
Scale is also recommended for sizing UI elements, such as making a UI container span 75% width on every screen. However, 75% would render to a huge size on 4K TVs for console players, so it's recommended that you explore screen size adaptation as a way to adapt UI layouts across different viewports.
Screen size adaptation
Note
Adapt UI to various display sizes by checking and listening for changes to the viewport display size.
With a multitude of possible screen sizes accessible to the Roblox platform, attempting to predict screen size by pixels often leads to misinterpretation. To assist in determining a player's screen size to adapt the size/position of UI elements, Roblox provides the read‑only ViewportDisplaySize property which represents the internally‑categorized rendering size of the viewport.
| [`ViewportDisplaySize`](/docs/guiservice#guiservice-viewportdisplaysize) | Summary |
|---|---|
| [`Small`](/docs/enum-displaysize#small) | Most tablet/mobile/handheld devices |
| [`Medium`](/docs/enum-displaysize#medium) | Most laptops and monitors |
| [`Large`](/docs/enum-displaysize#large) | Most TVs or larger |
For more native customization, you can use the UI Style Editor to configure Style Queries for both ViewportDisplaySize and PreferredInput values. Using intrinsic selectors like @ViewportDisplaySizeSmall or @PreferredInputTouch allows your UI to automatically swap tokens for text sizes, container dimensions, and other measurements as the player's device environment or primary input method changes.
Layout containers
Note
Use layouts to organize individual UI components and ensure that containers adjust responsively to the children elements within them.
For easier UI organization, you should use layout components to organize children. When using layout containers, make sure that the children are legible, accessible, and non‑cluttered. A common layout component is UIListLayout, which positions sibling GuiObjects into rows or columns and adjusts accordingly whenever you add or remove a sibling object.
You should also consider the distribution and relative positioning of elements within layout containers for the best user experience. Integrating flex into a list layout is a powerful way to equally fill/distribute or align/stretch items across their line, or flex specific items across a variable space.

Accessibility
Note
Ensure that all text is legible on all screens. Also make sure all UI has sufficient contrast and that nothing relies solely on color to distinguish an action or outcome.
Even with UI elements properly sized across all device screen sizes, the overall game should meet accessibility standards for players with impaired vision or color blindness. Text size can factor heavily into the legibility of text‑based UI, so you should include a text size constraint to ensure text doesn't become illegible (too small) or visually too large on larger screens like 4K TVs.
For more tips on accessibility, see accessibility guidelines.
Final tips & tricks
As you work toward a full cross‑platform game, consider the following tips and tricks:
- Device emulation is essential to designing an optimal game on Roblox. Utilize the built‑in Device Emulator and Controller Emulator to emulate various devices and gamepads directly in Studio.
- Roblox's UI styling pipeline, similar to CSS, lets you declare and globally apply overrides to UI instance properties. Along with the integrated Style Editor, you can set up a complete and easy‑to‑modify user interface.
- Once your game is effectively cross-platform, explore native features like haptic feedback on mobile and gamepads, touch gestures such as
TouchSwipeandTouchPinch, or accelerometer and gyroscope functionality onAccelerometerEnabledandGyroscopeEnableddevices.