
Source: Roblox Creator Hub · CC BY 4.0 · View source · Code samples: MIT Imported 2026-10-03. Formatting adapted for this site.
Audio objects
Roblox's modular audio objects allow you to have dynamic control over sound and voice chat in your experiences. Almost every audio object corresponds to a real-world audio device, and they all function together to capture and play audio like their physical counterparts.
For example, every audio object conceptually falls into the following categories:
- Objects that produce audio streams, such as audio players.
- Objects that consume audio streams, such as audio emitters.
- Objects that modify audio streams, such as audio effects.
- Objects that carry audio streams from one audio object to another, such as wires.
As you read through this guide and learn about how all of these audio objects work together to emit sound, you will learn how to accurately capture and feed music, sound effects, and the human voice from the experience to the player and vice-versa.
Note
Sound, SoundGroup, and SoundEffect objects are now discouraged in favor of the more robust functionality of audio objects.
Play audio
To play audio within your experience, it's important to understand the role of each available audio object:
- An
AudioPlayerloads and plays the audio file using a set audio asset ID. - An
AudioEmitteris a virtual speaker that emits audio into the 3D environment. - An
AudioListeneris a virtual microphone that picks up audio from the 3D environment. - An
AudioDeviceOutputis a physical hardware device within the real world, such as a speaker or headphones. - An
AudioDeviceInputis a physical microphone within the real world. - The
AudioTextToSpeechobject converts text to audio using an artificial human voice. - The
AudioSpeechToTextobject converts spoken audio to text. - A
Wirecarries audio streams from one audio object to another.
How you pair these audio objects together depends on if you want to emit audio directly to the player's speaker or headphones or from objects in the 3D space. The following sections detail both scenarios.
2D audio
2D audio is non-directional sound that plays from no particular location, remaining at the same volume regardless of the player's position or orientation in the 3D space. This type of audio requires three audio objects:
- An audio player to produce an audio stream.
- A physical hardware device to play the audio stream in the real world.
- A wire to carry the audio stream from the audio player to the output device.
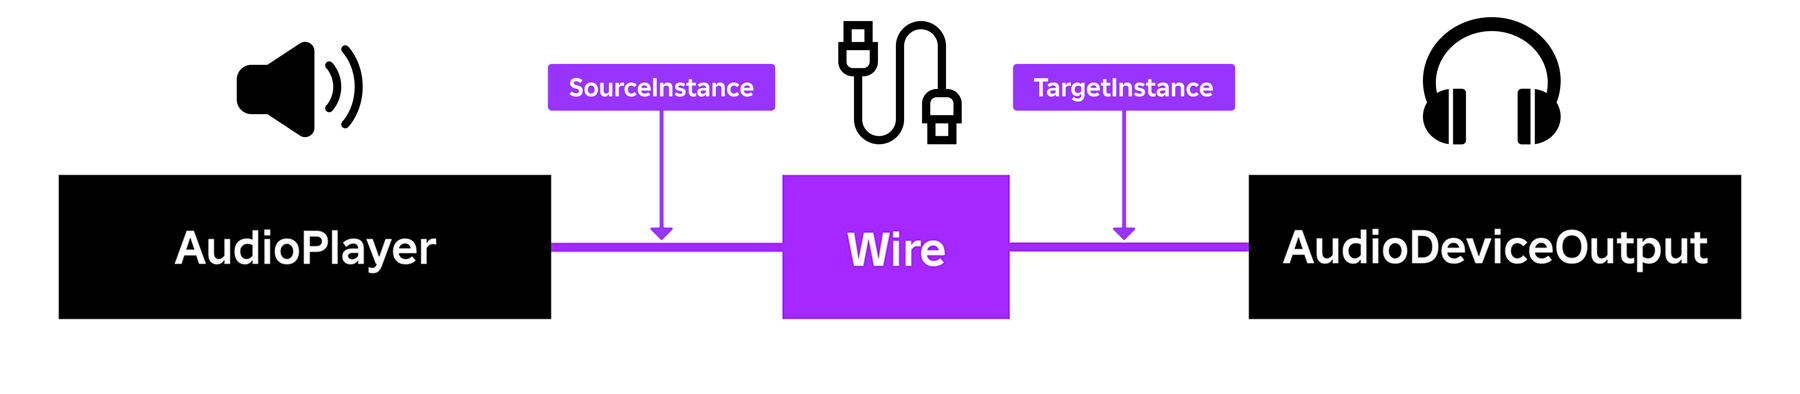
To demonstrate how to configure these audio objects in Studio for 2D audio, the following diagram compares each object with their real world audio device counterpart. In summary:
- The
AudioPlayerloads and plays your audio asset with specified settings. - The
AudioDeviceOutputallows the player to hear the audio through their speaker or headphones. - The
Wireconnects to the audio player with itsSourceInstanceproperty, and to the physical hardware device with itsTargetInstanceproperty. It then acts as a bridge to carry the audio stream from the audio player to the player's output device.
To play non-directional audio:
- In the Explorer window, go to SoundService and insert the following:
- An AudioPlayer object to create an audio source.
- An AudioDeviceOutput object to create a speaker that plays throughout the experience.
- A Wire object to connect the stream from the audio player to the speaker.
- In the Properties window of the AudioPlayer object:
- Set AssetID to a valid audio asset ID. If you don't have your own custom audio, you can find free-to-use audio assets in the Creator Store.
- Enable Looping if you want your audio to continuously repeat.
- Set Volume to the unit of amplitude you want to play your audio.
- In the Properties window of the Wire object:
- Set SourceInstance to the AudioPlayer to specify that you want to play the audio within this specific audio player.
- Set TargetInstance to the AudioDeviceOutput to specify that you want to play the audio from this specific speaker.
From here, you can trigger your non-directional audio with scripts to either play as players join the experience or as a result of a gameplay event or UI interaction. For code sample references for these use cases, see the Add 2D audio tutorial.
3D audio
3D audio is directional sound that plays from a particular location in the 3D space, increasing or decreasing in volume depending on the player's position and orientation to the sound. This type of audio requires six audio objects:
- An audio player to produce an audio stream.
- An audio emitter to emit the audio stream within the environment.
- A listener to pick up the audio stream from the environment.
- A physical hardware device to play the audio stream in the real world.
- Two wires: one to carry the audio stream from the audio player to the emitter, and another to carry it from the listener to the output device.
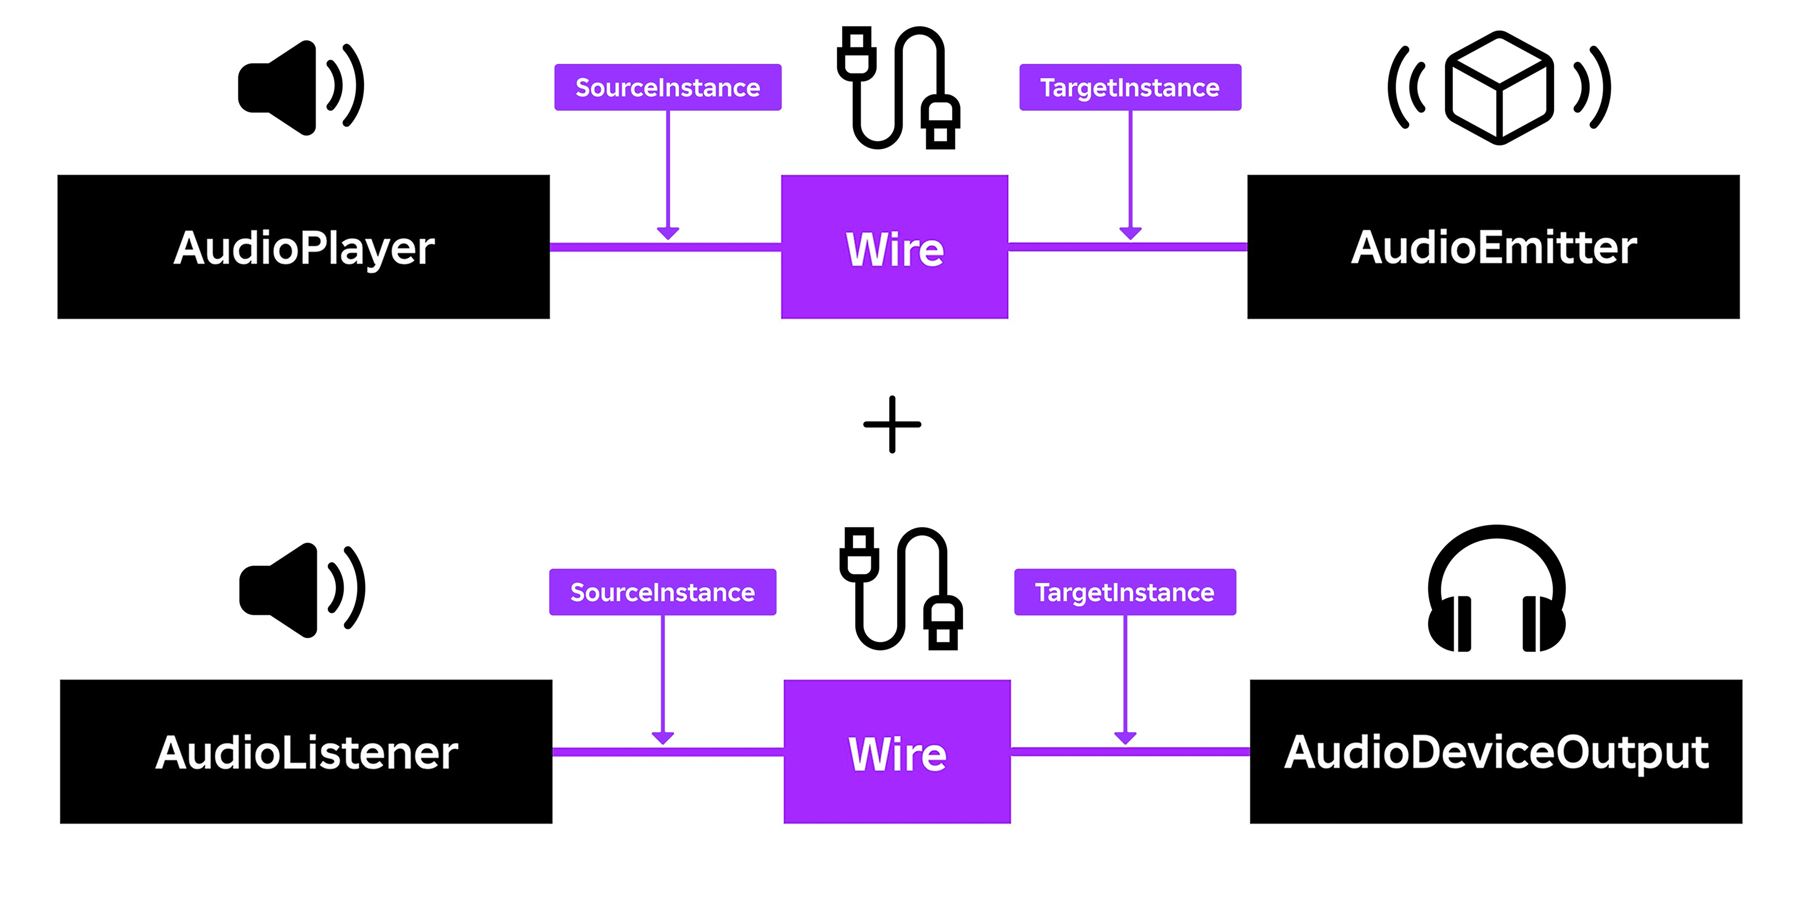
To demonstrate how to configure these audio objects in Studio for 3D audio, the following diagram compares each object with their real world audio device counterpart. In summary:
- The
AudioPlayerloads and plays your audio asset with specified settings. - The
AudioEmitter's parent position in the 3D space determines where that audio emits within the environment. - The
AudioListenereither picks up audio from the emitter from the local camera or within the player character'sHumanoid.RootPart, depending on where you set the default listener position. - The
AudioDeviceOutputallows the player to hear the audio through their speaker or headphones. - The first
Wireconnects to the audio player with itsSourceInstanceproperty, and to the emitter with itsTargetInstanceproperty. It then acts as a bridge to carry the audio stream from the audio player to the emitter. - The second
Wireconnects to the listener with itsSourceInstanceproperty, and to the physical hardware device with itsTargetInstanceproperty. It then acts as a bridge to carry the audio stream from the listener to the player's output device.
To play positional audio:
- Choose where you want to create an AudioListener when players spawn into the experience.
- In the Explorer window, select SoundService.
- In the Properties window, set ListenerLocation to one of the following:
- Default - Creates and parents the listener to
Workspace.CurrentCamerain experiences that enable voice chat. - None - Does not create a listener. This option is useful if you want to create a listener through a script.
- Character - Creates and parents a listener to the local player's character.
- Camera - Creates and parents the listener to
Workspace.CurrentCamera.
- Default - Creates and parents the listener to
Note
When you set ListenerLocation to either Character or Camera, the engine automatically creates an AudioDeviceOutput object under SoundService at runtime.
In the Explorer window, go to the 3D object that you want to emit audio and insert the following:
- An AudioPlayer object to create an audio source.
- An AudioEmitter object to emit a positional stream from the 3D object.
- A Wire object to connect the stream from the audio player to the audio emitter.
In the Properties window of the AudioPlayer object:
- Set AssetID to a valid audio asset ID. If you don't have your own custom audio, you can find free-to-use audio assets in the Creator Store.
- Enable Looping if you want your audio to continuously repeat.
- Set Volume to the unit of amplitude you want to play your audio.
In the Properties window of the AudioEmitter object, set DistanceAttenuation to a volume-over-distance curve that determines how loudly the listener hears the emitter according to the distance between them.
For example, the following curve decreases the audio's volume in half when the listener is 50 studs away from the emitter, then it sharply decreases the volume to zero when the listener is 70 studs away.

In the Properties window of the Wire object:
- Set SourceInstance to the AudioPlayer to specify that you want to play the audio within this specific audio player.
- Set TargetInstance to the AudioEmitter to specify that you want to play the audio from this specific audio emitter.
From here, you can trigger your directional audio with scripts to either play as players join the experience or as a result of a gameplay event or UI interaction. For code sample references for these use cases, see the Add 3D audio tutorial.
Text-to-speech
Note
All text for AudioTextToSpeech objects must adhere to Roblox's Community Standards and Terms of Use.
Text-to-speech (TTS) is a form of assistive technology that converts text strings into speech sounds using an artificial voice. This type of audio requires five audio objects:
- An audio speech generator to load and convert text into audio.
- An audio emitter to emit the audio stream within the environment.
- A listener to pick up the audio stream from the environment.
- A physical hardware device to play the audio stream in the real world.
- For 2D audio - A wire to carry the audio stream from the audio speech generator to the output device.
- For 3D audio - Two wires: one to carry the audio stream from the audio speech generator to the emitter, and another to carry it from the listener to the output device.
How you configure these objects depends on if you want to create 2D TTS audio or 3D TTS audio. For more details on either process, click between the following tabs.
2D Text-to-Speech
To demonstrate how to configure these audio objects in Studio for 2D TTS audio, the following diagram compares each object with their real world audio device counterpart. In summary:
- The
AudioTextToSpeechobject loads and converts text strings into speech sounds. - The
AudioDeviceOutputallows the player to hear the audio through their speaker or headphones. - The
Wireconnects to the audio speech generator with itsSourceInstanceproperty, and to the physical hardware device with itsTargetInstanceproperty. It then acts as a bridge to carry the audio stream from the audio speech generator to the player's output device.

To play 2D text-to-speech audio:
- In the Explorer window, go to SoundService and insert the following:
- An AudioTextToSpeech object to create an audio speech generator.
- An AudioDeviceOutput object to create a speaker that plays throughout the experience.
- A Wire object to connect the stream from the audio speech generator to the speaker.
- In the Properties window of the AudioTextToSpeech object:
- Set Text to anything you want the voice to say. There is a limit of 300 characters per request.
- Set VoiceId to the number of the artificial voice you want to use. For a full list of available voices, see the list of artificial voices.
- Set Volume to the unit of amplitude you want to play your audio.
- In the Properties window of the Wire object:
- Set SourceInstance to the AudioTextToSpeech to specify that you want to play the audio within this specific audio speech generator.
- Set TargetInstance to the AudioDeviceOutput to specify that you want to play the audio from this specific speaker.
3D Text-to-Speech
To demonstrate how to configure these audio objects in Studio for 3D TTS audio, the following diagram compares each object with their real world audio device counterpart. In summary:
- The
AudioTextToSpeechobject loads and converts text strings into speech sounds. - The
AudioEmitter's parent position in the 3D space determines where that audio emits within the environment. - The
AudioListenereither picks up audio from the emitter from the local camera or within the player character'sHumanoid.RootPart, depending on where you set the default listener position. - The
AudioDeviceOutputallows the player to hear the audio through their speaker or headphones. - The first
Wireconnects to the audio speech generator with itsSourceInstanceproperty, and to the emitter with itsTargetInstanceproperty. It then acts as a bridge to carry the audio stream from the audio speech generator to the emitter. - The second
Wireconnects to the listener with itsSourceInstanceproperty, and to the physical hardware device with itsTargetInstanceproperty. It then acts as a bridge to carry the audio stream from the listener to the player's output device.

To play 3D text-to-speech audio:
- Choose where you want to create an AudioListener when players spawn into the experience.
- In the Explorer window, select SoundService.
- In the Properties window, set ListenerLocation to one of the following:
- Default - Creates and parents the listener to
Workspace.CurrentCamerain experiences that enable voice chat. - None - Does not create a listener. This option is useful if you want to create a listener through a script.
- Character - Creates and parents a listener to the local player's character.
- Camera - Creates and parents the listener to
Workspace.CurrentCamera.
- Default - Creates and parents the listener to
Note
When you set ListenerLocation to either Character or Camera, the engine automatically creates an AudioDeviceOutput object under SoundService at runtime.
In the Explorer window, go to the 3D object that you want to emit audio and insert the following:
- Aan AudioTextToSpeech object to create an audio speech generator.
- An AudioEmitter object to emit a positional stream from the 3D object.
- A Wire object to connect the stream from the audio speech generator to the audio emitter.
In the Properties window of the AudioTextToSpeech object:
- Set Text to anything you want the voice to say. There is a limit of 300 characters per request.
- Set VoiceId to the number of the artificial voice you want to use. For a full list of available voices, see the list of artificial voices.
- Set Volume to the unit of amplitude you want to play your audio.
In the Properties window of the of the AudioEmitter, set DistanceAttenuation to a volume-over-distance curve that determines how loudly the listener hears the emitter according to the distance between them.
For example, the following curve decreases the audio's volume in half when the listener is 50 studs away from the emitter, then it sharply decreases the volume to zero when the listener is 70 studs away.
In the Properties window of the Wire object:
- Set SourceInstance to the AudioTextToSpeech to specify that you want to play the audio within this specific audio speech generator.
- Set TargetInstance to the AudioEmitter to specify that you want to play the audio from this specific audio emitter.
From here, you can trigger your TTS audio with scripts. For code sample references for TTS audio, including how to configure context-aware TTS that adapts in relation to the player, the state of their environment, or gameplay status, see the Add text-to-speech tutorial.
List of artificial voices
| VoiceID | Voice Description | Audio Example |
|---|---|---|
| 1 | British male | |
| 2 | British female | |
| 3 | United States male #1 | |
| 4 | United States female #1 | |
| 5 | United States male #2 | |
| 6 | United States female #2 | |
| 7 | Australian male | |
| 8 | Australian female | |
| 9 | Retro voice #1 | |
| 10 | Retro voice #2 | |
| 11 | Host voice | |
| 101 | Spanish male | |
| 102 | Spanish female | |
| 201 | German male | |
| 202 | German female | |
| 301 | Italian male | |
| 302 | Italian female | |
| 401 | French male | |
| 402 | French female | |
| 501 | Chinese (Mandarin) male | |
| 502 | Chinese (Mandarin) female | |
| 601 | Hindi male | |
| 602 | Hindi female | |
| 701 | Japanese male | |
| 702 | Japanese female | |
| 801 | Arabic male | |
| 802 | Arabic female | |
| 901 | Korean male | |
| 902 | Korean female | |
| 1001 | Portuguese male | |
| 1002 | Portuguese female |
Speech-to-text
Note
All audio for AudioSpeechToText objects must adhere to Roblox's Community Standards and Terms of Use.
Speech-to-text (STT) is a form of technology that automatically generates text strings from speech sounds. This type of audio requires three audio objects:
- A text generator to load and convert audio into text.
- A physical hardware device like a microphone to capture the audio input.
- A wire to carry the audio stream from the input device to the text generator.
All of these audio objects work together to generate STT text in response to player actions. For example, if the player is wearing a headset while playing an experience with their laptop:
- The
AudioDeviceInputcaptures the player's speech, as spoken into their microphone and as a stream of audio. - A
Wirecarries the audio stream from theAudioDeviceInputto theAudioSpeechToText. - The
AudioSpeechToTextconverts the player's speech into text. - The experience reads this text and performs an action, such as displaying the spoken text on the screen or opening a door at the player's command.

To implement speech-to-text in your experience:
- Enable the use of the latest API for voice.
- In the Explorer window, select the VoiceChatService.
- In the Properties window, set UseAudioApi to Enabled.
- In the Explorer window, go to SoundService and insert the following:
- An AudioDeviceInput to capture speech.
- An AudioSpeechToText to convert the speech into text.
- A Wire to carry the stream from the audio device input to the STT instance.
- In the Properties window of the AudioSpeechToText object, set the Enabled state to on.
- In the Properties window of the Wire object:
- Set SourceInstance to your new AudioDeviceInput to specify that you want the wire to carry audio from this specific audio instance.
- Set TargetInstance to your new AudioSpeechToText to specify that you want the wire to carry audio to this specific audio instance.
- Set the Player property of the audio device input to the local player at runtime with
audioDeviceInput.Player = game.Players.LocalPlayer. This tells Roblox which user's microphone to capture audio from.
Note
By default, enabling the microphone also enables spatial voice chat in your experience. If you want players to use speech-to-text without broadcasting their voice to other players, turn off the EnableDefaultVoice property under VoiceChatService.
After setting up STT in your experience, you can trigger it with scripts. For code sample references, see the Add speech-to-text tutorial.
Supported languages
No configuration is required to enable supported languages. Roblox automatically detects the spoken language from the audio and transcribes it.
STT supports the following languages:
- Arabic
- Chinese (Simplified)
- Chinese (Traditional)
- English
- French
- German
- Indonesian
- Italian
- Japanese
- Korean
- Polish
- Portuguese
- Spanish
- Russian
- Turkish
- Thai
- Vietnamese
Filter for similar words
When you implement STT in your experience, you might want to improve matching accuracy by filtering for words that sound similar to the words you actually want the player to say. To do this, you can compare the words recognized by AudioSpeechToText with known word lists:
- Sanitize and tokenize the
Textoutput ofAudioSpeechToTextto create a table of lowercase strings that can be parsed and compared.- Remove punctuation characters.
- Convert the entire string to lowercase.
- Split the string by whitespace to produce a table of words.
- Generate candidate tables to prepare your strings for comparison.
- Sanitize and tokenize each reference string.
- Store these processed words in a separate table.
- Compare and match the words in both tables to recognize the speech inputs that are close to your target phrases, even if they include small variations.
- For simple checks, check if the strings are the exact same.
- For more flexible matching, you can write custom logic to accept substitutions (like "colour" instead of "color") or match a subset of words and calculate a similarity score.
Customize audio
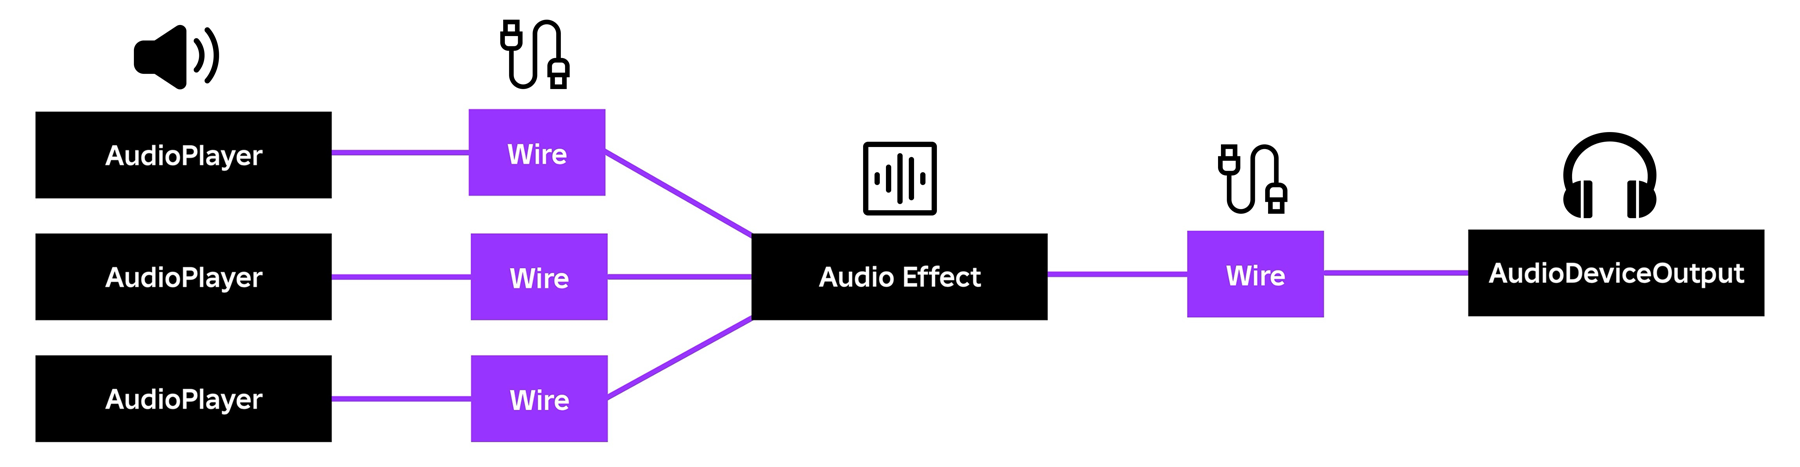
Audio effects allow you to non-destructively modify or enhance audio streams before they reach a player's ears. You can apply these effects to make your audio more immersive within experiences, such as using an AudioEqualizer object to make rain sound muffled, AudioCompressor object to control a sound's maximum volume, or AudioReverb to add more realistic reflections of sound in interior spaces.
For instructions on how to configure audio effects, as well as side-by-side comparisons of before and after you customize your audio, see Audio effects.

Trigger audio
You can trigger audio contextually from a script by calling Play() on an AudioPlayer object that's correctly wired up. For example, if you parent a script to an audio player, you can trigger the audio asset through something like this:
local audio = script.Parent
local something = ...
something.SomeEvent:Connect(function()
    audio:Play()
end)
For more complex code samples to trigger audio, such as for gameplay feedback, UI interactions, and looping background noise, see the Add 2D audio, Add 3D audio, and Add text-to-speech tutorials.