
Source: Roblox Creator Hub · CC BY 4.0 · View source · Code samples: MIT Imported 2026-10-03. Formatting adapted for this site.
Thumbnails
Thumbnails appear on Roblox's Home page and at the top of your game's detail page, allowing you to showcase your game's features and announce updates or events.
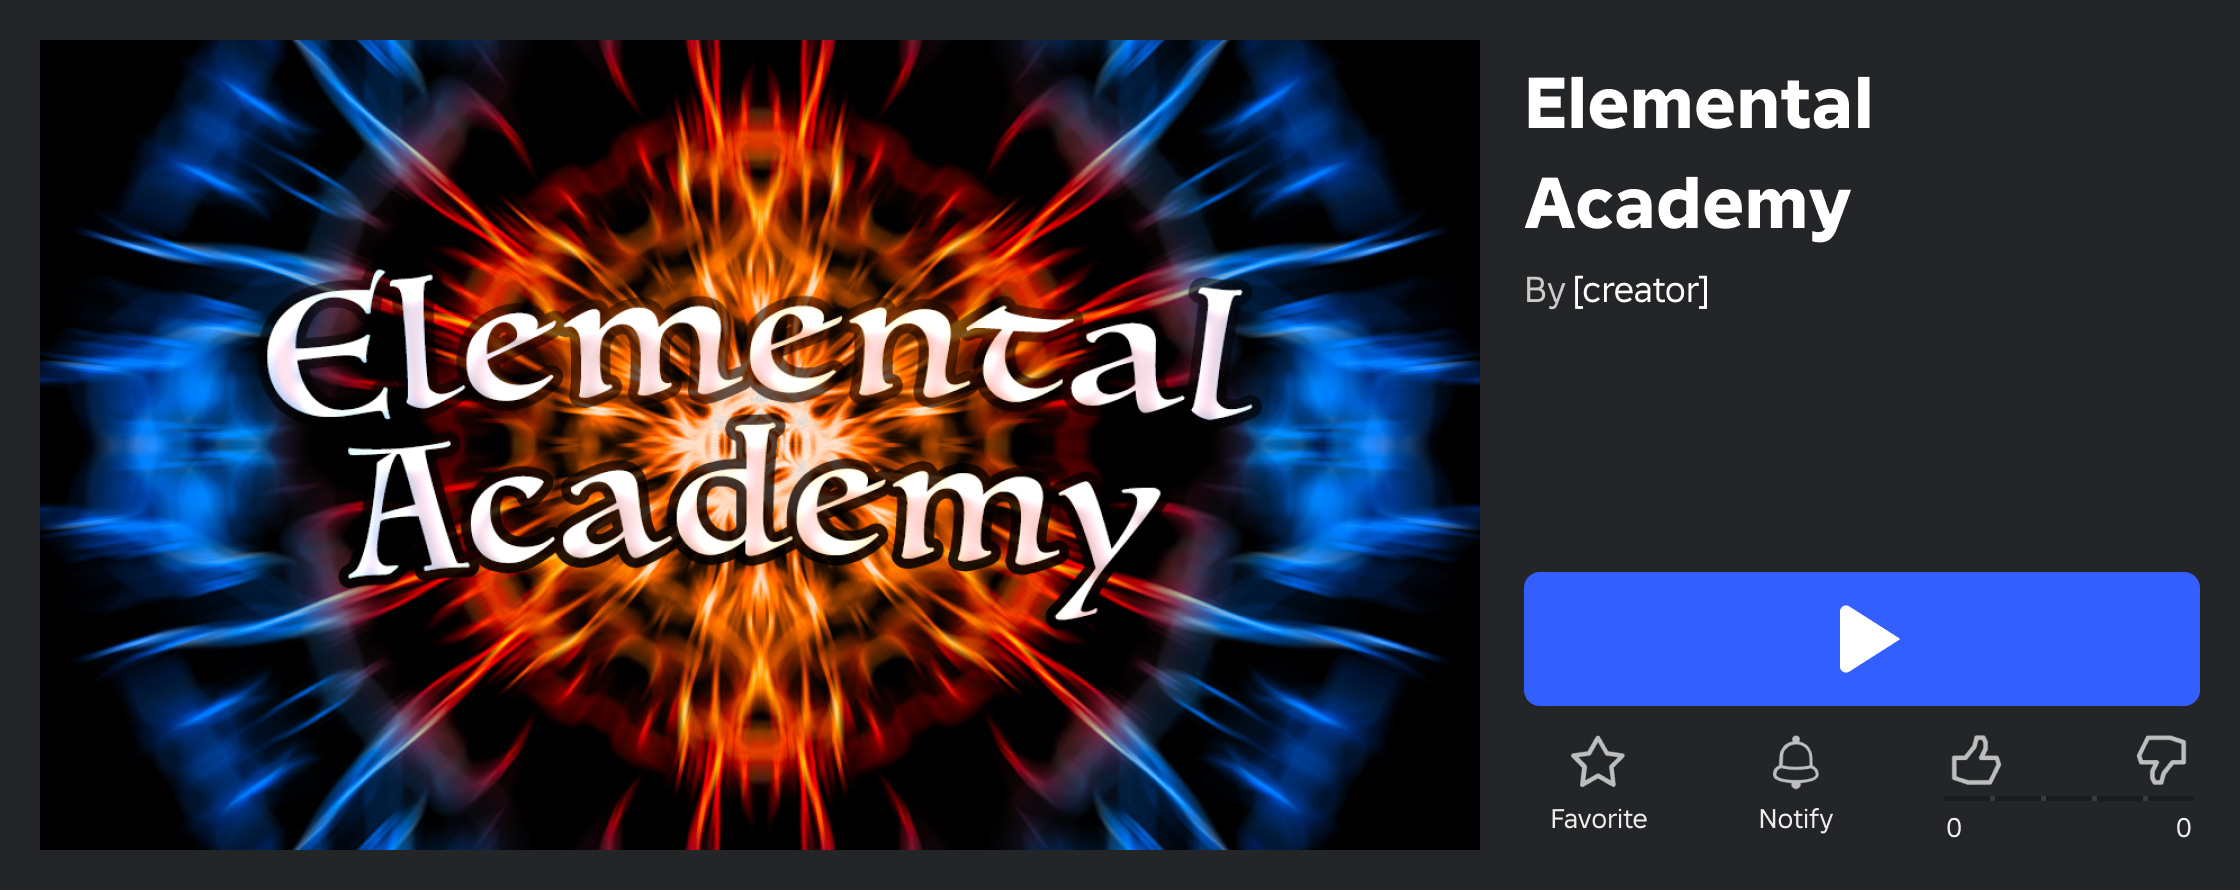
You can feature up to 10 images or videos for each of your games' detail pages. All uploaded images and videos are moderated to make sure they adhere to the Community Rules and Terms of Use.
| Type | Description | Cost / Quota |
|---|---|---|
| **Image** | An [uploaded image](#images) which supplements the game [icon](/docs/roblox-production-publishing-experience-icons) and helps players know what the game offers. | Free |
| **Uploaded Video** | An [uploaded authentic video](#videos), useful for displaying gameplay previews and other in-game features. | Free, with monthly quota of 3 uploads |
| **Auto‑Generated** | An auto‑generated image based on Studio's camera position for the most recent publish of the place. | Free |
Manage thumbnails
Uploaded thumbnails appear in the Experience Detail Page tab where they can be reordered, deleted, or given "alt" text for improved accessibility.

Images
A thumbnail image should be 16:9 aspect ratio and ideally 1920×1080 pixels so that it always displays in high resolution across the Roblox site and app. Supported formats include .jpg, .gif, .png, .tga, or .bmp. See best practices for additional design recommendations.
To upload an image thumbnail for your game:
- In the Creator Dashboard, select the game you want to upload an image thumbnail for.
- Go to Configure ⟩ Places and select a place.
- Click Thumbnails in the left nav, then use the Home Page tab and the Experience Detail Page tab to customize your game's thumbnails for these two spaces.
Videos
Note
Xbox , PlayStation, and VR headsets do not currently support video thumbnails.
To help users understand your game before they join, you can upload an authentic gameplay video. Once approved, the video will appear first on your game's detail page, and it can also be shown on the Home page.
To upload a video thumbnail for your game:
- In the Creator Dashboard, select the game you want to upload a video for.
- Go to Configure ⟩ Places and select a place.
- Click Videos in the left nav.
Video thumbnails should be authentic and accurately portray in-game content without misleading alterations. All videos will be reviewed to ensure they accurately reflect the game and do not violate the Community Rules or Terms of Use.
Certain modifications are acceptable, as long as they don't misrepresent the core game:
Note
Camera Work — Using varied camera angles for aesthetic or cinematic purposes is fine, as long as they showcase real gameplay. Studio's free camera mode is especially helpful for capturing different vantage points.
Note
Minor Post-Processing — Small adjustments like brightness, contrast, or minor visual effects are acceptable if they don't fundamentally alter the visual fidelity of the actual game. It's also acceptable to overlay your game's logo or branding in a video.
Note
Curated Sequences — You can showcase optimized or highlight-reel playthroughs. These sequences don't need to be strictly linear but they must display actual gameplay mechanics and interactions.
Note
In-game UI Text — Text that is part of your game's UI (character names, menus, notifications that appear to the player, etc.) is acceptable because it's part of the authentic game view.
Note
Music Tracks — Videos can contain music from Roblox's catalog as governed by Roblox's internal licensing arrangements.
To prevent misleading players, please adhere to the following policies. Videos which do not adhere to these policies will be rejected for distribution and count against the monthly quota of 3 video uploads.
Note
Misrepresented Gameplay — Do not display gameplay mechanics, UI elements, or interactions that are not actually available in your game. For instance, a roleplay game should not be marketed as a racing game. Also ensure the video accurately reflects the core themes, for example a horror game should depict horror elements and not misrepresent its theme.
Note
Artificial Visuals — Graphics shown must be representative of the actual in-game visuals. Avoid artificially enhancing graphics beyond what a player will experience.
Note
External Content & Overlays — Don't include real-life footage of people, places, or any other content external to your game.
Note
Spoken Audio — Added voice-overs, narration, voice chat conversations, and music with lyrics is not permitted.
Note
Text, Claims, and Advertisements — Overlay text sparingly and only to describe gameplay contexts such as "Collect coins to boost jumps." Do not include any text, visuals, or audio that is an advertisement, promotion, or subjective claim, for example "50% off" or "Free UGC!".
Free camera mode
The run-time free camera mode (freecam) allows you to manipulate the camera to vantage points which may not be possible through the default view camera, making it a useful tool for capturing cinematic screenshots and video. Press Left Shift + P during a solo playtest to toggle it on or off.
For the full list of controls, the config menu, and custom freecam post-processing effects, see free camera mode.
Home page personalization
Thumbnail personalization helps you attract more users to your game by showing the most relevant thumbnail to each user on their Home page. The goal of thumbnail personalization is to improve your qualified play through rate, which is the percentage of users that actively engage with your game for a significant amount of time.
Note
During testing, games using thumbnail personalization had an average increase of +8.5% in their qualified play through rate. Some games had an increase of +50%.
Thumbnail personalization only starts when you activate 2 or more thumbnails. If only one of your thumbnails is active, all users see that thumbnail for your game on their home page.
After you set up and activate thumbnail personalization, its algorithm shows each thumbnail to a random set of users to get data on the qualified play through rate for each user group. It then gives more impressions to the winning thumbnail for each group, but still gives the other thumbnails minimal traffic to continue exploration.
Set up thumbnail personalization
To set up thumbnail personalization:
- In the Home Page tab, click Edit active thumbnails.
- Upload new thumbnails or activate existing thumbnails.
- To upload new thumbnails, click Upload thumbnails and select and confirm the images you want to use. Make sure to keep these images under 3 MB and 1920×1080 pixels.
- To activate existing thumbnails, enable the Active checkbox next to 2-5 thumbnails.
- Click Save changes.
- In the Start new thumbnail personalization? dialog, click Start. The banner in the Home Page tab updates to indicate that thumbnail personalization is active.
Keep multiple thumbnails active
Note
To get the most out of thumbnail personalization, make sure to keep multiple thumbnails active instead of choosing one winner, as this allows personalization to adapt to changing user trends.
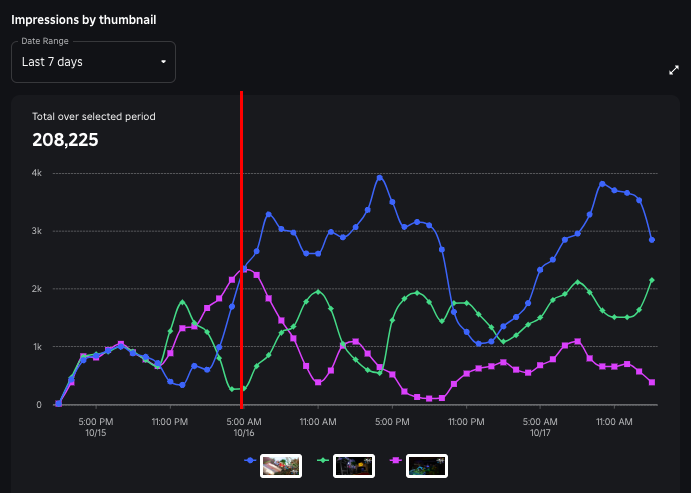
For example, if you had removed the thumbnail associated with the green line in the chart below too early, you would have missed future additional impressions for what ended up becoming your second-best performing thumbnail.
It's recommended to test multiple new thumbnails with any major game or content update, and then not make changes to your thumbnails until your game's next update.
Analyze thumbnail personalization performance
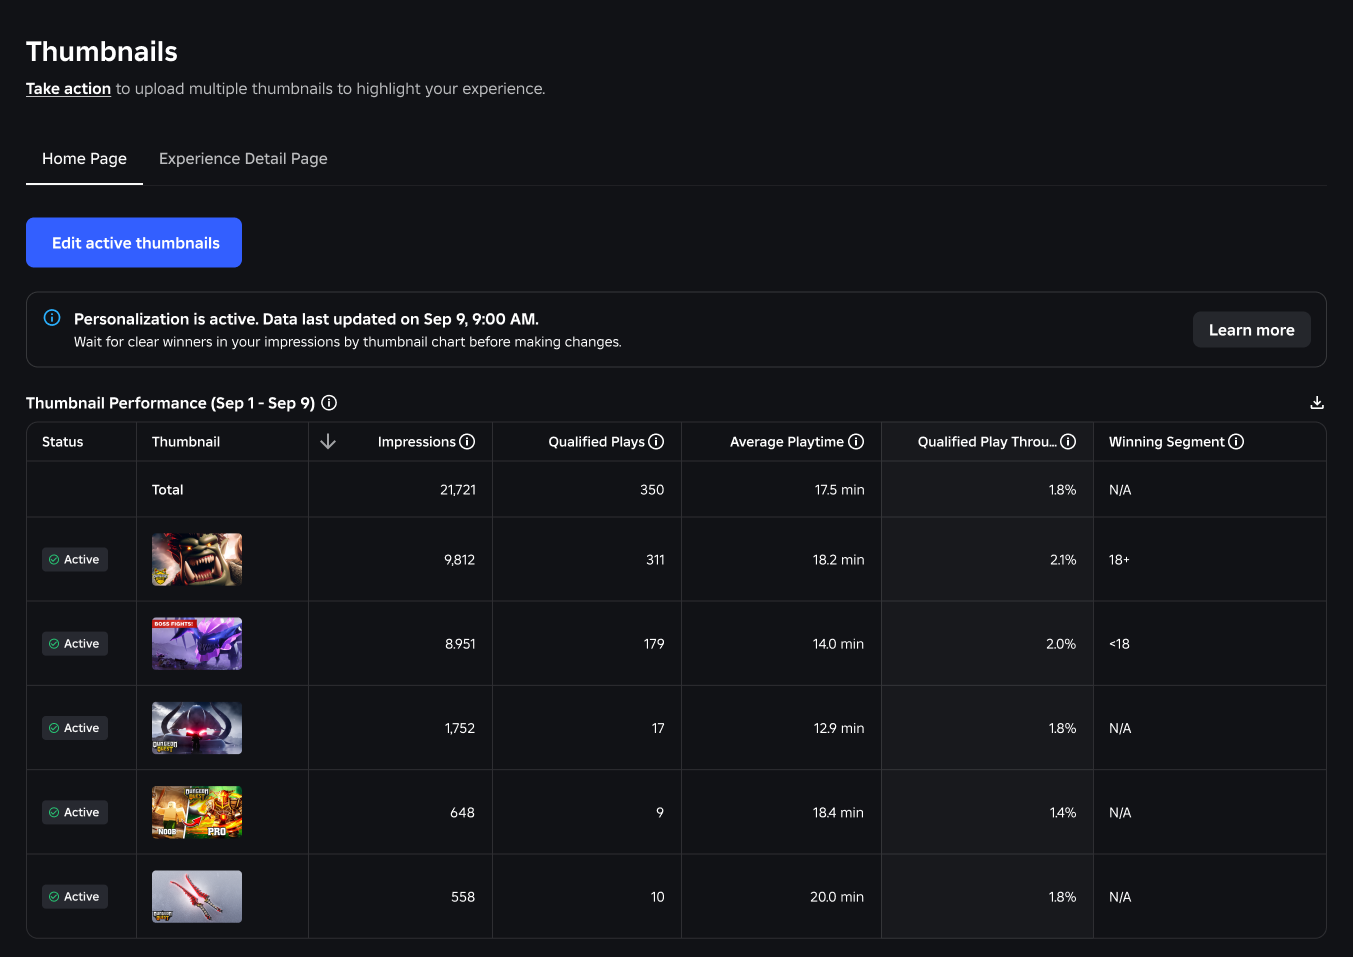
After a few hours, the Thumbnail Performance table in the Home Page tab populates with statistics related to each of your active thumbnails:
| Title | Description |
|---|---|
| **Status** | Indicates if the thumbnail is active for personalization. |
| **Impressions** | Number of impressions from home page recommendations. |
| **Qualified Plays** | Number of qualified plays from home page recommendations. |
| **Average Playtime** | The average session time in minutes per qualified play. |
| **Qualified Play Through Rate** | The percentage of qualified plays divided by impressions from home page recommendations. |
| **Winning Segment** | The thumbnail with the highest play through rate during the current thumbnail personalization process. |
You can also use the Impressions by thumbnail and the Qualified play through rate by thumbnail graphs to further analyze the performance of your personalized thumbnails over time.
Best practices
To create the most positive impact for players looking to play your game, consider the following best practices.
Note
In addition to the practices shown below, avoid placing any essential text or elements at the bottom of the thumbnail, as it may potentially be covered by metadata like the player count.
Quality and aspect ratio
A thumbnail image should be 16:9 aspect ratio and ideally 1920×1080 pixels so that it always displays in high resolution across the Roblox site and app. Displayed thumbnails will be stretched to 16:9 aspect ratio regardless of the upload's aspect ratio.
<img src="https://prod.docsiteassets.roblox.com/assets/publishing/experience-metadata/Thumbnail-High-Res.jpg" alt="High quality and sharp thumbnail" />Note
High quality and sharp; upload in 16:9 aspect ratio
<img src="https://prod.docsiteassets.roblox.com/assets/publishing/experience-metadata/Thumbnail-Not-16-9.jpg" alt="Non-16:9 thumbnail" />Note
Upload not in 16:9 aspect ratio; displayed thumbnail stretched
Relevant content
A thumbnail will have a higher impact if it's unique and provides relevant imagery on what players should expect when they join the game. Thumbnails with ambiguous imagery or graphics may lead to unnecessary confusion.
<img src="https://prod.docsiteassets.roblox.com/assets/publishing/experience-metadata/Thumbnail-Urban-Rush.jpg" alt="Thumbnail portraying a high-action urban racing game" />Note
Thumbnail portrays a high‑action urban racing game
<img src="https://prod.docsiteassets.roblox.com/assets/publishing/experience-metadata/Thumbnail-Unclear.jpg" alt="Thumbnail with unclear imagery and an ambiguous graphic in the top-right corner" />Note
Unclear imagery and ambiguous graphic in top‑right corner
Video accuracy
Video thumbnails should be authentic and portray actual in-game content without misleading alterations.
<video src="https://prod.docsiteassets.roblox.com/assets/publishing/experience-metadata/Thumbnail-Video-Accurate.mp4" controls width="800" alt="Video showing how separate volume controls for sounds and music can help players focus on what they need to"></video>Note
Video presents actual gameplay which gives players an accurate and honest expectation of the game
<video src="https://prod.docsiteassets.roblox.com/assets/publishing/experience-metadata/Thumbnail-Video-Inaccurate.mp4" controls width="800" alt="Video showing how separate volume controls for sounds and music can help players focus on what they need to"></video>Note
Video presents an exaggerated version of the game and gameplay which is misleading to players
Theme and color
You can express your game's theme through overall theme and colors to help players decide if it's suitable and appealing to them.
<img src="https://prod.docsiteassets.roblox.com/assets/publishing/experience-metadata/Thumbnail-Theme-Comical.jpg" alt="Thumbnail with a comical theme/character and bright colors" />Comical theme/character with bright colors
<img src="https://prod.docsiteassets.roblox.com/assets/publishing/experience-metadata/Thumbnail-Theme-Horror.jpg" alt="Thumbnail with a dark and stormy theme for a horror game" />Dark and stormy theme for a horror game