
Source: Roblox Creator Hub · CC BY 4.0 · View source · Code samples: MIT Imported 2026-10-03. Formatting adapted for this site.
Collisions
A collision occurs when two 3D objects come into contact within the 3D world. For customized collision handling, BasePart has a set of collision events and collision filtering techniques, so you can control which physical assemblies collide with others.
Collision events
Collision events occur when two BaseParts touch or stop touching in the 3D world. You can detect these collisions through the Touched and TouchEnded events which occur regardless of either part's CanCollide property value. When considering collision handling on parts, note the following:
- A part's
CanTouchproperty determines whether it triggers collision events. If set tofalse, neitherTouchednorTouchEndedwill fire. - A part's
CanCollideproperty affects whether it will physically collide with other parts and cause forces to act upon them. Even ifCanCollideis disabled for a part, you can detect touch and non‑touch throughTouchedandTouchEndedevents. - The
TouchedandTouchEndedevents only fire as a result of physical movement, not from aPositionorCFramechanges that cause a part to intersect or stop intersecting another part. - The top-level
Terrainclass inherits fromBasePart, so you can assign a collision group toTerrainto determine whether otherBasePartscollide with Terrain voxels.
Note
For performance optimization, set CanTouch to false for objects that don't require collisions.
Touched
The Touched event fires when a BasePart comes in contact with another, or with a Terrain voxel. It only fires as a result of physical simulation and will not fire when the part's Position or CFrame is explicitly set such that it intersects another part or voxel.
The following code pattern shows how the Touched event can be connected to a custom onTouched() function. Note that the event sends the otherPart argument to the function, indicating the other part involved in the collision.
local part = workspace.Part

local function onTouched(otherPart)
	print(part.Name .. " collided with " .. otherPart.Name)
end

part.Touched:Connect(onTouched)
Note that the Touched event can fire multiple times in quick succession based on subtle physical collisions, such as when a moving object "settles" into a resting position or when a collision involves a multi‑part model. To avoid triggering more Touched events than necessary, you can implement a simple debounce system which enforces a "cooldown" period through an instance attribute.
local part = workspace.Part

local COOLDOWN_TIME = 1

local function onTouched(otherPart)
	if not part:GetAttribute("Touched") then
		print(part.Name .. " collided with " .. otherPart.Name)

		part:SetAttribute("Touched", true)  -- Set attribute to true
		task.wait(COOLDOWN_TIME)  -- Wait for cooldown duration
		part:SetAttribute("Touched", false)  -- Reset attribute
	end
end

part.Touched:Connect(onTouched)
TouchEnded
The TouchEnded event fires when the entire collision bounds of a BasePart exits the bounds of another BasePart or a filled Terrain voxel. It only fires as a result of physical simulation and will not fire when the part's Position or CFrame is explicitly set such that it stops intersecting another part or voxel.
The following code pattern shows how the TouchEnded event can be connected to a custom onTouchEnded() function. Like Touched, the event sends the otherPart argument to the function, indicating the other part involved.
local part = workspace.Part

local function onTouchEnded(otherPart)
	print(part.Name .. " is no longer touching " .. otherPart.Name)
end

part.TouchEnded:Connect(onTouchEnded)
Collision filtering
Collision filtering defines which physical parts collide with others. You can configure filtering for numerous objects through collision groups or you can control collisions on a part‑to‑part basis with NoCollisionConstraint instances.
Collision groups
Collision groups let you assign BaseParts to dedicated groups and specify whether or not they collide with those in other groups. Parts within non‑colliding groups pass through each other completely, even if both parts have their CanCollide property set to true. Collision groups are created and configured on a Workspace or WorldModel basis.
In the video above, the spinning objects are in different collision groups such that they collide with objects of another color but not with objects of their own color
You can easily set up collision groups through Studio's Collision Groups editor, accessible through Studio's Window ⟩ 3D menu.
Register groups
Workspace stores its own configurable state of collision groups. Additionally, any WorldModel can opt to use its own collision groups for queries.
Studio Editor
The editor includes one Default collision group which cannot be renamed or deleted. All BaseParts automatically belong to this default group unless assigned to another group, meaning that they will collide with all other objects in the Default group.
To create a new collision group:
By default, groups are registered on
Workspace, but if you have at least oneWorldModelin your place, a selection dropdown will appear at the top of the collision groups editor. Use the dropdown to configure collision groups across differentWorldModelinstances.
For any
WorldModel, you can toggle on Use Workspace collision groups to make it useWorkspacecollision groups for its queries.
Click the Add Group button along the top of the editor panel, enter a new group name, and press Enter. The new group appears in both columns of list view, or in both the left column and upper row of table view.
List View

Table View

Repeat the process if necessary, choosing a unique and descriptive name for each group. Note that you can change a group's name during development by clicking in its field, or by selecting it and clicking the rename button.

Scripting
To create a new collision group through scripting, register the group with RegisterCollisionGroup(). It may be helpful to pre-declare your group names in local variables, as the same strings can be used for assigning objects and configuring groups within the same script.
local cubes = "Cubes"
local doors = "Doors"

-- Register two collision groups on Workspace
workspace:RegisterCollisionGroup(cubes)
workspace:RegisterCollisionGroup(doors)
If you have a WorldModel in your place, you can manage collision groups of a particular WorldModel by invoking collision group management methods on that model, separately from those on Workspace. You can also enable UseWorkspaceCollisionGroups to make the model use Workspace collision groups for its queries; however, calling collision group methods on that model will continue to read/write only to that model's group states, not back to Workspace.
local worldModel = workspace.WorldModel

-- Register two collision groups on Workspace
workspace:RegisterCollisionGroup("Projectile")
workspace:RegisterCollisionGroup("Wall")
workspace:CollisionGroupSetCollidable("Projectile", "Wall", false)

-- Register two collision groups on the WorldModel
worldModel:RegisterCollisionGroup("Projectile")
worldModel:RegisterCollisionGroup("Wall")
worldModel:CollisionGroupSetCollidable("Projectile", "Wall", true)

-- Confirm collision group states are distinct
workspace:CollisionGroupsAreCollidable("Projectile", "Wall")  --> false
worldModel:CollisionGroupsAreCollidable("Projectile", "Wall") --> true

-- Optionally set the WorldModel to use Workspace collision groups for queries
worldModel.UseWorkspaceCollisionGroups = true
Note
Since scripts are not guaranteed to execute in any particular order, it's highly recommended that you register collision groups in a single script. Abstracting group registration among multiple scripts may result in a race condition where a group is not yet registered at the time you configure groups or assign objects to them.
Configure group collisions
Studio Editor
Under default configuration, objects in all groups collide with each other. To prevent objects in one group from colliding with objects in another group, uncheck the box in the respective row/column.
In the following example, objects in the Cubes group will not collide with objects in the Doors group.
List View
<img src="https://prod.docsiteassets.roblox.com/assets/studio/collision-groups-editor/Configure-Groups-List-View.png" width="500" height="176" alt="Group configured in List View of Collision Groups Editor" />Table View
<img src="https://prod.docsiteassets.roblox.com/assets/studio/collision-groups-editor/Configure-Groups-Table-View.png" width="500" height="176" alt="Group configured in Table View of Collision Groups Editor" />Scripting
To configure how objects in two collision groups interact, call CollisionGroupSetCollidable() on Workspace or the target WorldModel, providing the two collision groups and a boolean true (collidable) or false (non‑collidable). If objects in the same group should or shouldn't collide with each other within that model, use that group name for both the first and second parameters.
local cubes = "Cubes"
local doors = "Doors"

-- Register two collision groups in Workspace
workspace:RegisterCollisionGroup(cubes)
workspace:RegisterCollisionGroup(doors)

-- Set cubes to be non-collidable with doors
workspace:CollisionGroupSetCollidable(cubes, doors, false)
Assign objects to groups
Studio Editor
To assign objects to groups you've registered through the Studio editor:
Select one or more
BasePartsthat qualify as part of a collision group.Assign them to the group by clicking the ⊕ button for its row. Objects can belong to only one collision group at a time, so placing them in a new group removes them from their current group.

Once assigned, the new group is reflected under the object's
CollisionGroupproperty.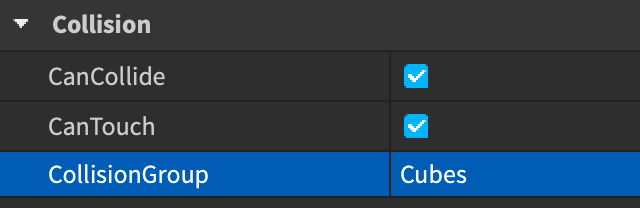
Scripting
To add a BasePart to a collision group through scripting, simply assign the group's string name, previously registered through RegisterCollisionGroup(), to the part's CollisionGroup property.
local cubes = "Cubes"
local doors = "Doors"

-- Register two collision groups in Workspace
workspace:RegisterCollisionGroup(cubes)
workspace:RegisterCollisionGroup(doors)

-- Set cubes to be non-collidable with doors
workspace:CollisionGroupSetCollidable(cubes, doors, false)

-- Assign an object to each group
workspace.Cube1.CollisionGroup = cubes
workspace.Cube1.CollisionGroup = cubes
workspace.Door1.CollisionGroup = doors
StudioSelectable group
Tools in Studio use the collision filtering system to determine which objects are candidates for selection when clicking in the 3D viewport. Objects whose assigned collision group does not collide with StudioSelectable will be ignored.
For example, if you have checkpoints in a racing game whose effective areas are defined by large transparent parts, you can assign them to a Checkpoints collision group and then make that group non‑collidable with StudioSelectable so that they don't get in the way when you're editing the underlying map geometry.
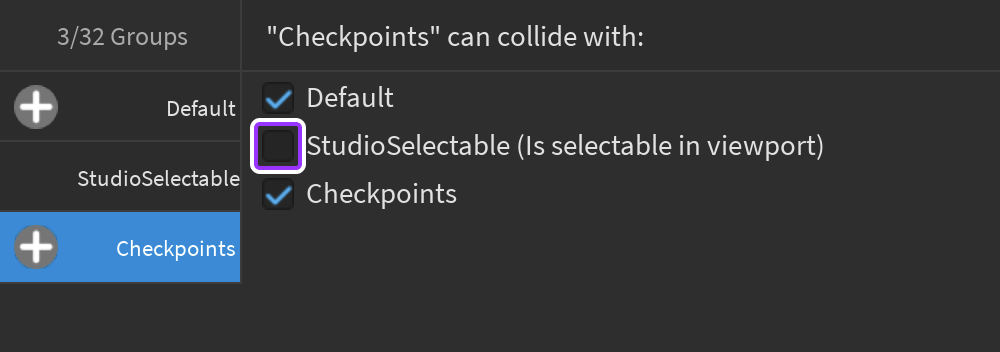
For plugin code, it's recommended that you assign "StudioSelectable" as the collision group filter of your RaycastParams when finding parts under the cursor. This allows your plugins to match the selection mechanics that creators have learned to expect from built‑in Studio tools.
local UserInputService = game:GetService("UserInputService")

local raycastParams = RaycastParams.new()
raycastParams.CollisionGroup = "StudioSelectable"  -- To follow the convention
raycastParams.BruteForceAllSlow = true  -- So that parts with CanQuery of "false" can be selected

local mouseLocation = UserInputService:GetMouseLocation()
local mouseRay = workspace.CurrentCamera:ViewportPointToRay(mouseLocation.X, mouseLocation.Y)
local filteredSelectionHit = workspace:Raycast(mouseRay.Origin, mouseRay.Direction * 10000, raycastParams)
Part-to-part filtering
To prevent collisions between two specific parts without setting up collision groups, such as between a vehicle's wheel and its chassis, consider the No Collision constraint. Advantages include:
- Collision groups and/or configuration scripts are not required, so you can easily create and share models with customized collision filtering.
- Connected parts will not collide with each other, but they can still collide with other objects.
Disable character collisions
Roblox player characters collide with each other by default. This can lead to interesting but unintended gameplay, such as characters jumping on top of each other to reach specific areas. If this behavior is undesirable, you can prevent it through the following Script in ServerScriptService.
local Players = game:GetService("Players")

workspace:RegisterCollisionGroup("Characters")
workspace:CollisionGroupSetCollidable("Characters", "Characters", false)

local function onDescendantAdded(descendant)
	-- Set collision group for any part descendant
	if descendant:IsA("BasePart") then
		descendant.CollisionGroup = "Characters"
	end
end

local function onCharacterAdded(character)
	-- Process existing and new descendants for physics setup
	for _, descendant in character:GetDescendants() do
		onDescendantAdded(descendant)
	end
	character.DescendantAdded:Connect(onDescendantAdded)
end

Players.PlayerAdded:Connect(function(player)
	-- Detect when the player's character is added
	player.CharacterAdded:Connect(onCharacterAdded)
end)
Model collisions
Model objects are containers for parts rather than inheriting from BasePart, so they can't directly connect to BasePart.Touched or BasePart.TouchEnded events. To determine whether a model triggers a collision events, you need to loop through its children and connect the custom onTouched() and onTouchEnded() functions to each child BasePart.
Note
For joined parts by solid modeling instead of Model objects, see mesh and solid model collisions.
The following code sample connects all BaseParts of a multi‑part model to collision events and tracks the total number of collisions with other parts.
local model = script.Parent

local numTouchingParts = 0

local function onTouched(otherPart)
	-- Ignore instances of the model intersecting with itself
	if otherPart:IsDescendantOf(model) then return end
	-- Increase count of model parts touching
	numTouchingParts += 1

	print(model.Name, "intersected with", otherPart.Name, "| Model parts touching:", numTouchingParts)
end

local function onTouchEnded(otherPart)
	-- Ignore instances of the model un-intersecting with itself
	if otherPart:IsDescendantOf(model) then return end
	-- Decrease count of model parts touching
	numTouchingParts -= 1

	print(model.Name, "un-intersected from", otherPart.Name, "| Model parts touching:", numTouchingParts)
end

for _, child in model:GetChildren() do
	if child:IsA("BasePart") then
		child.Touched:Connect(onTouched)
		child.TouchEnded:Connect(onTouchEnded)
	end
end
Mesh and solid model collisions
MeshPart and PartOperation (parts joined by solid modeling) are subclasses of BasePart, so meshes and solid modeled parts inherit the same collision events and collision filtering options as regular parts. However, since meshes and solid modeled parts usually have more complex geometries, they have a distinctive CollisionFidelity property which determines how precisely the physical bounds align with the visual representation for collision handling.
The CollisionFidelity property has the following options, in order of fidelity and performance impact from lowest to highest:
- Box — Creates a bounding collision box, ideal for small or non‑interactive objects.
- Hull — Generates a convex hull, suitable for objects with less pronounced indentations or cavities.
- Default — Produces an approximate collision shape that supports concavity, suitable for complex objects with semi-detailed interaction needs.
- PreciseConvexDecomposition — Offers the most precise fidelity but still not a 1:1 representation of the visual. This option has the most expensive performance cost and takes longer for the engine to compute.
Original Mesh
<img src="https://prod.docsiteassets.roblox.com/assets/physics/collisions/Collision-Fidelity-MeshPart.jpg" width="600" height="500" alt="Original mesh of castle tower" />Default
<img src="https://prod.docsiteassets.roblox.com/assets/physics/collisions/Collision-Fidelity-Default.jpg" width="600" height="500" alt="Collision fidelity of Default shown for mesh" />Box
<img src="https://prod.docsiteassets.roblox.com/assets/physics/collisions/Collision-Fidelity-Box.jpg" width="600" height="500" alt="Collision fidelity of Box shown for mesh"/>Hull
<img src="https://prod.docsiteassets.roblox.com/assets/physics/collisions/Collision-Fidelity-Hull.jpg" width="600" height="500" alt="Collision fidelity of Hull shown for mesh" />Precise
<img src="https://prod.docsiteassets.roblox.com/assets/physics/collisions/Collision-Fidelity-Precise.jpg" width="600" height="500" alt="Collision fidelity of PreciseConvexDecomposition shown for mesh" />Note
To view collision fidelity in Studio, toggle on Collision fidelity from the Visualization Options widget in the upper‑right corner of the 3D viewport.
For more information on the performance impact of collision fidelity options and how to mitigate them, see performance optimization.