
Source: Roblox Creator Hub · CC BY 4.0 · View source · Code samples: MIT Imported 2026-10-03. Formatting adapted for this site.
2D paths
The Path2D instance, along with its API methods and properties, lets you implement 2D splines and 2D curved lines, useful for UI effects like path‑based animations and graph editors.
Create a 2D path
To add a Path2D to the screen or an in-game object:
In the Explorer window, insert a
Path2Dinstance under a visibleScreenGuiorSurfaceGui(it does not need to be a direct child).
Select the new
Path2Dto reveal the in-viewport tooling widget. By default, the Add Point tool is selected.
Begin clicking on the screen to add a series of control points to form a path. The initial path will likely be imprecise but you can fine‑tune the position of any control point later.

Note
If you drag the mouse after clicking, tangents will be created on that point. Tangents can also be procedurally added to any control point.
- When finished, click the widget's Done button or press Enter.
Modify control points
With a Path2D selected in the Explorer hierarchy, you can modify its individual control points as well as their tangents.
Move points
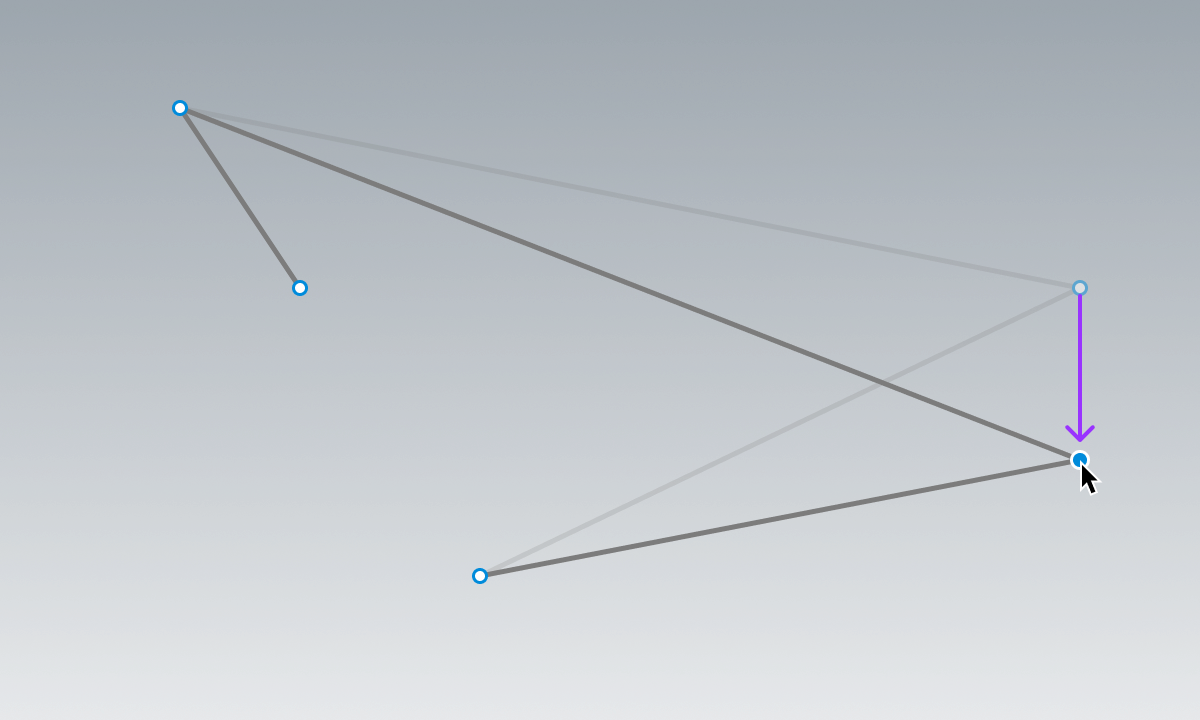
To move an individual control point on a path, enable the Select tool (V) and then click‑and‑drag it to a new position.

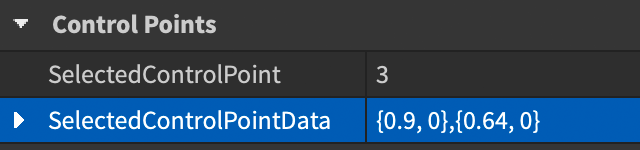
For very specific positioning, select the control point and then, in the Properties window, set a new position for the point's SelectedControlPointData property (UDim2).
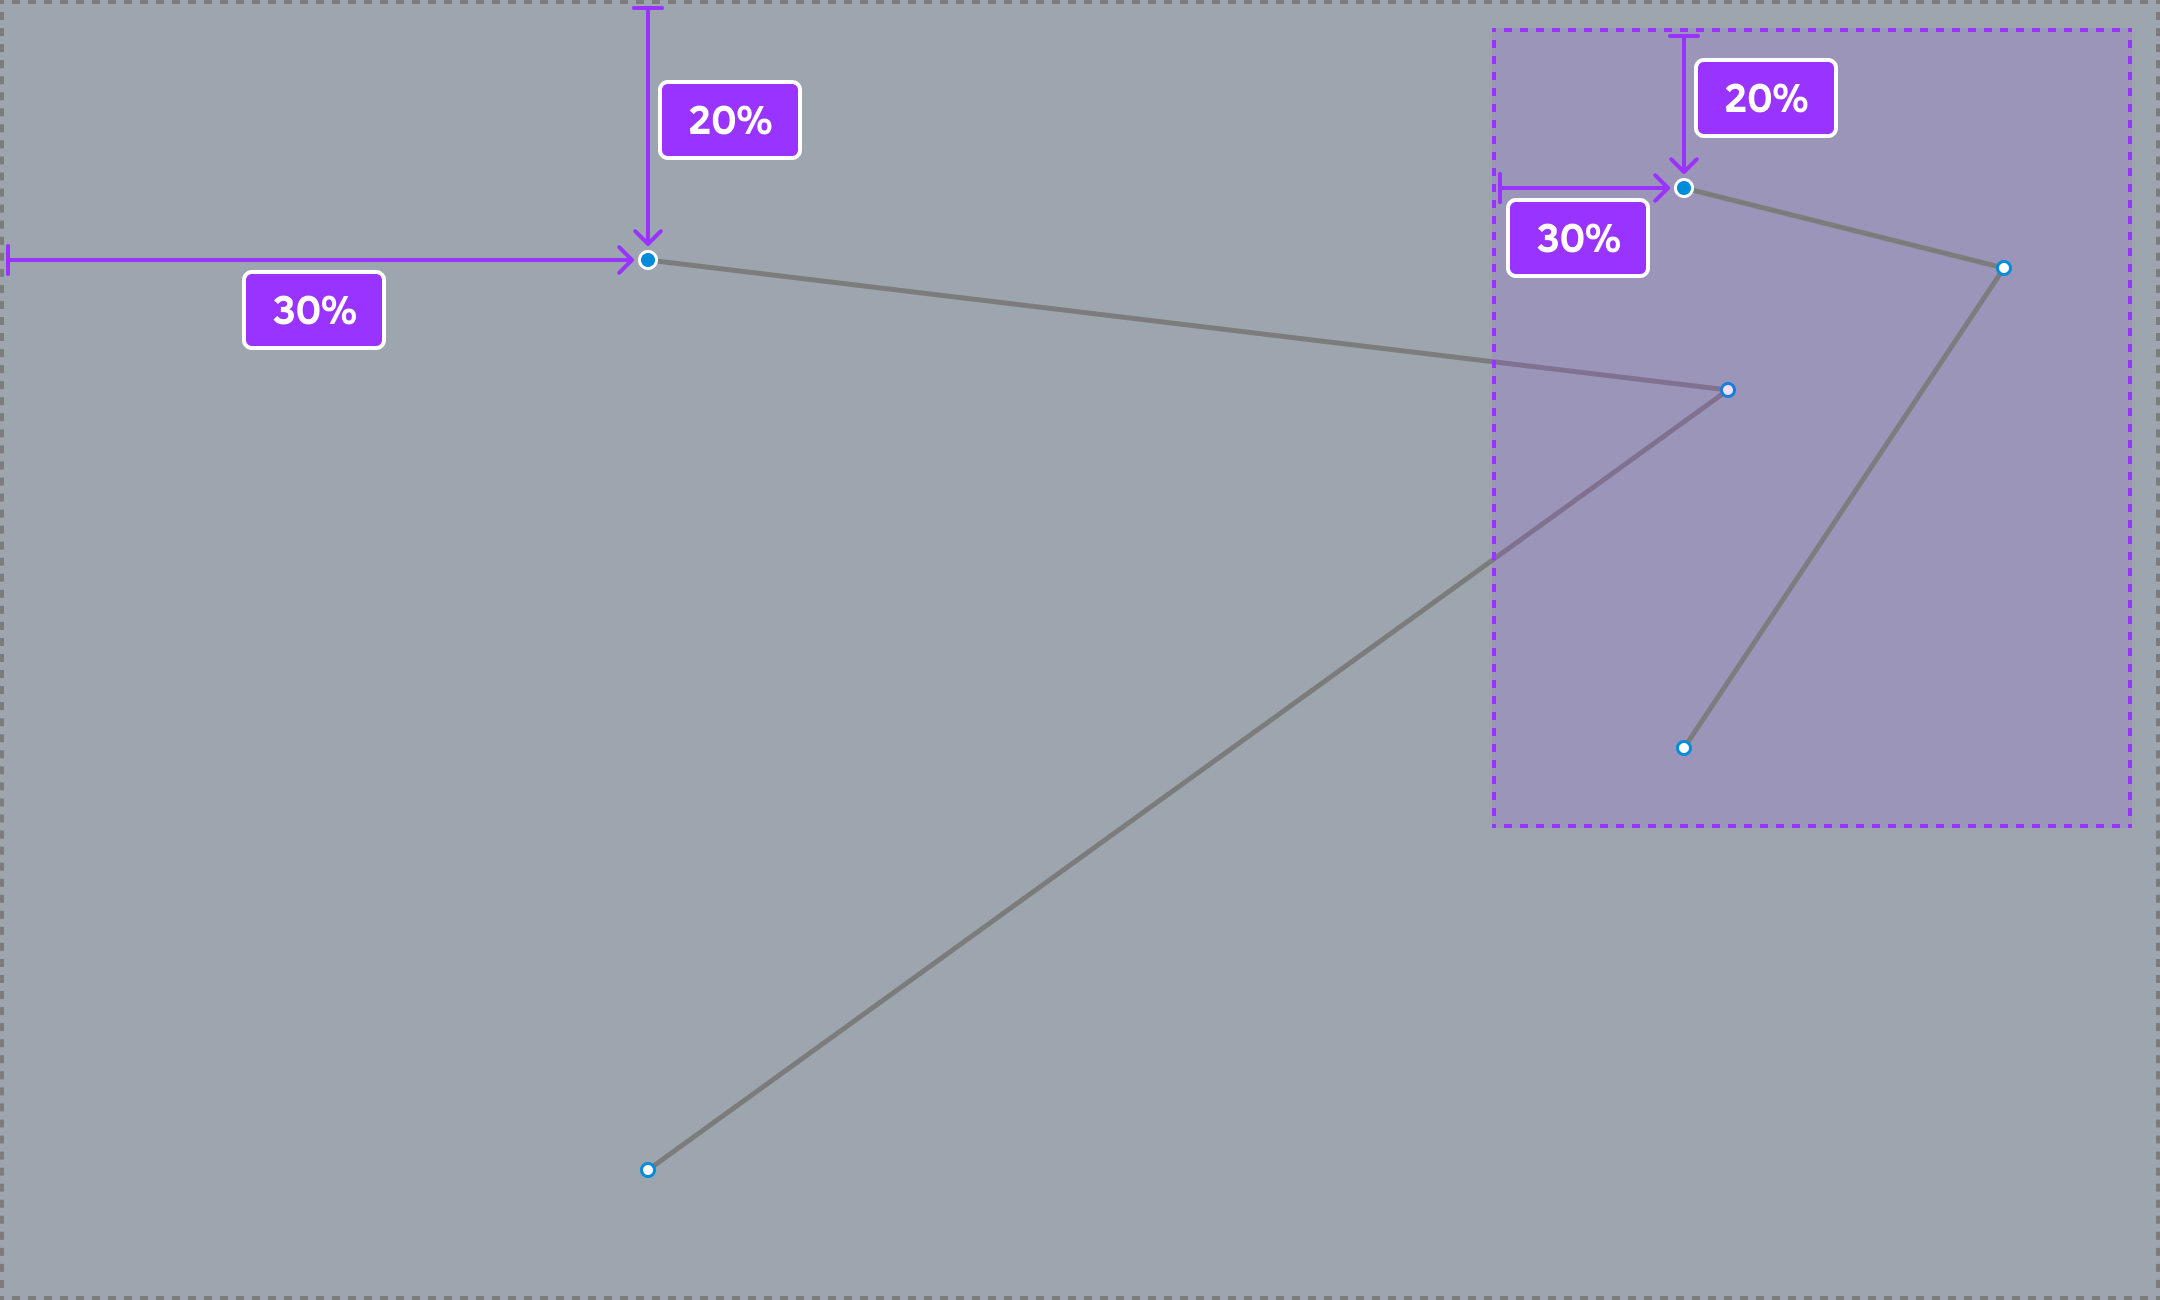
Note that a point's position is not absolute, but rather relative to the path's parent container. For example, compare a control point 30% from left and 20% from top for a path inside a ScreenGui, versus an identical path placed inside a Frame located in the upper‑right corner of the ScreenGui.
Add points
New control points can be added to a Path2D either between two existing points or from either end point using the Add Point tool (P).
<img src="https://prod.docsiteassets.roblox.com/assets/ui/2D-paths/Path-Example-Add-Point-Between.png" width="560" alt="Diagram illustrating how a control point is added between two existing points using the Add Point tool." />Hover anywhere over the path and click to add a control point between two existing points
<img src="https://prod.docsiteassets.roblox.com/assets/ui/2D-paths/Path-Example-Add-Point-From-End.png" width="560" alt="Diagram illustrating how a control point is added to the end of a path using the Add Point tool." />Click on an end point and then click again to add a control point from that end
Note
Remember that if you drag the mouse after clicking to add a new control point, tangents will be created on that point.
Delete points
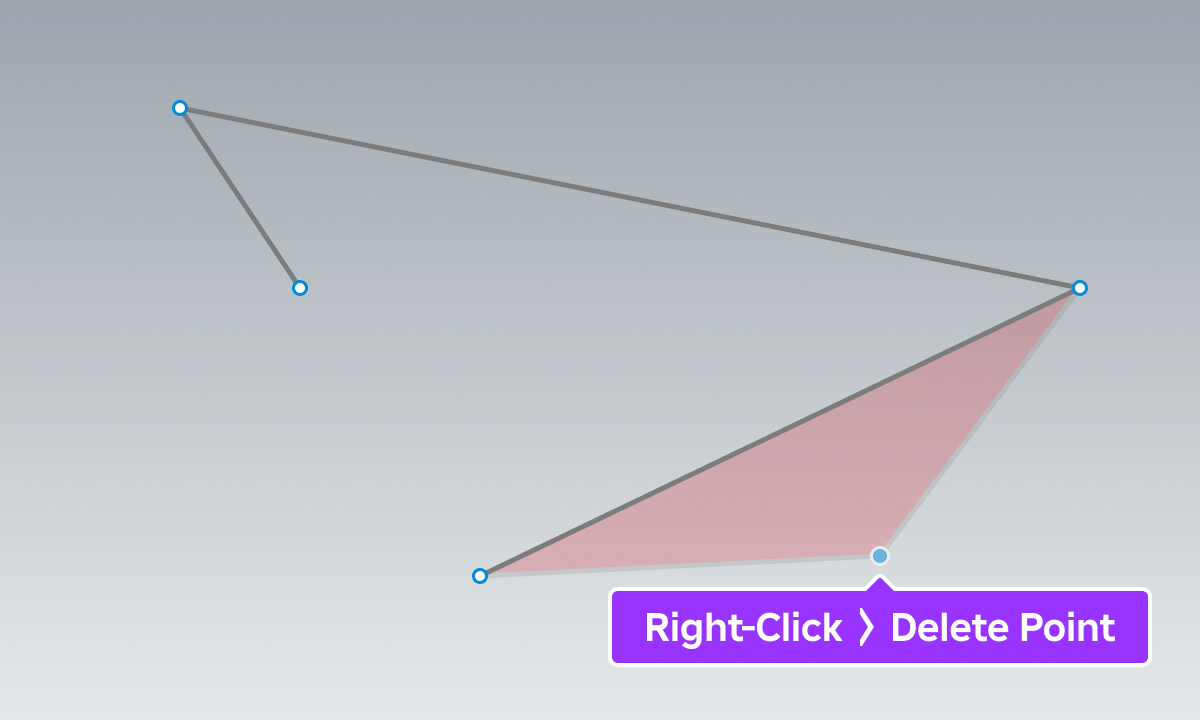
To delete a control point, hover over and right‑click it, then select Delete Point from the contextual popup menu.
Control point tangents
Control point tangents let you create and adjust curves on a path.
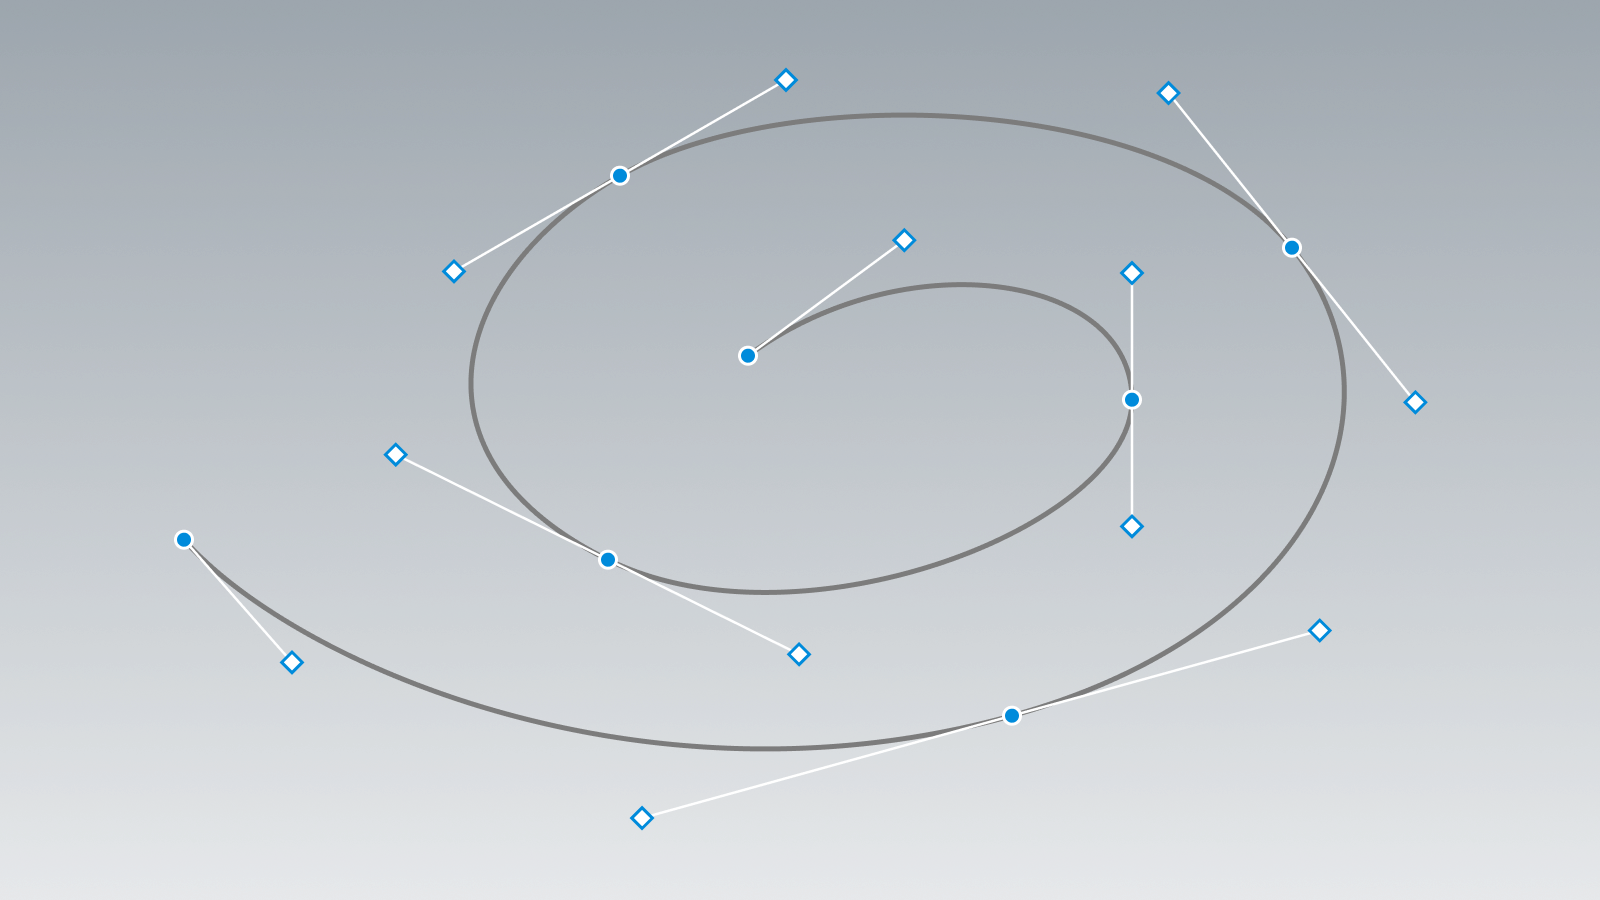
Add tangents
To add tangents to any control point that doesn't already have tangents:
Enable the Add Tangent tool in the tooling widget.

Hover over the desired control point, then click to add two mirrored tangents (optionally drag after clicking to adjust the new tangents).

Adjust tangents
To adjust existing tangents for an individual control point:
Enable the Select tool (V).
Hover over a tangent marker (not the control point), then click‑and‑drag it to a new position. If the tangents are mirrored, the paired tangent point will move in unison.
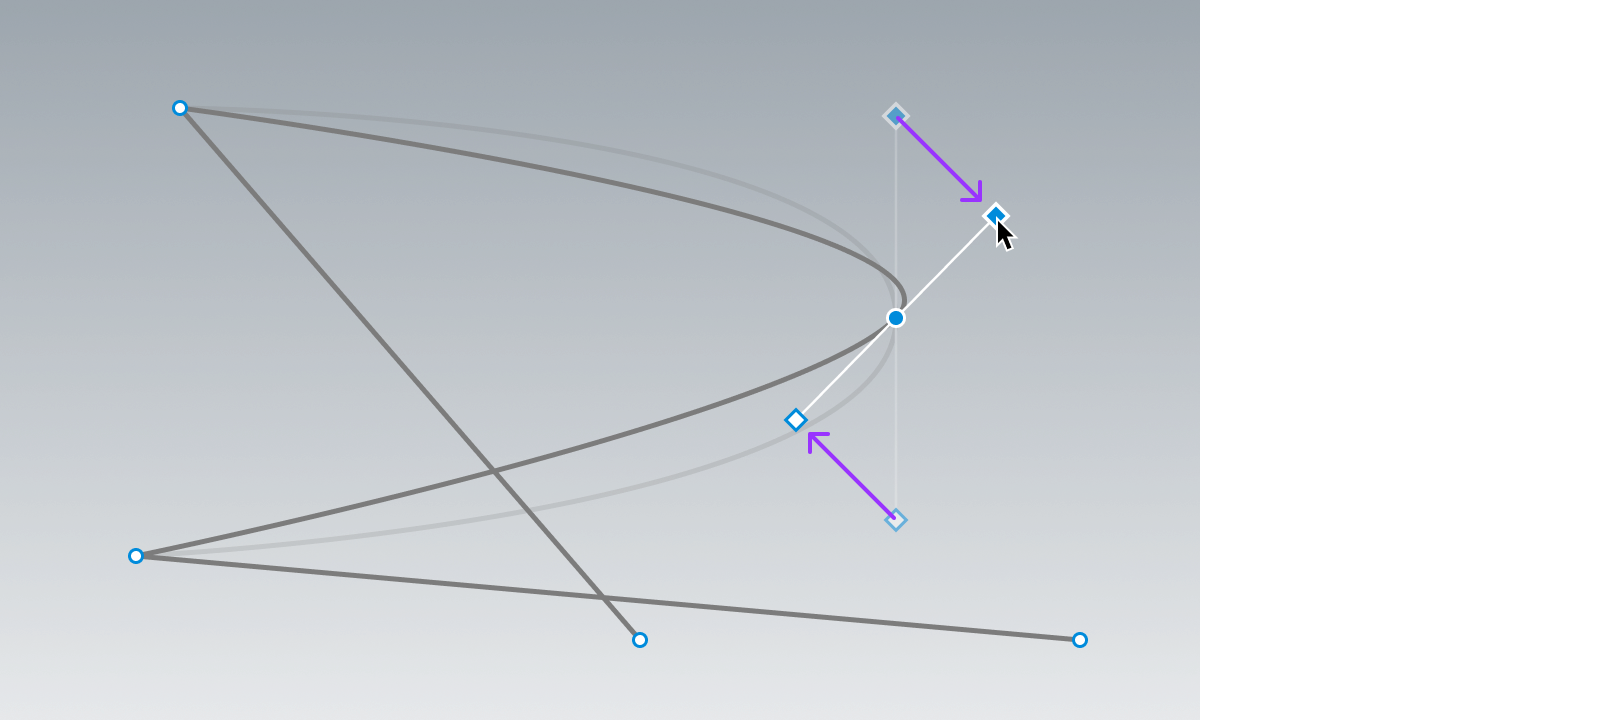
To manually set a specific UDim2 position for a tangent:
Enable the Select tool (V) and select the control point. In the Properties window, expand the
SelectedControlPointDatafield to expose theLeftTangentandRightTangentproperties.
Set the position for
LeftTangentand/orRightTangent. Note that this will break the mirrored behavior of the tangents.
Delete tangents
To delete both tangents from a control point, hover over and right-click that point, then select Clear Tangents from the contextual popup menu.
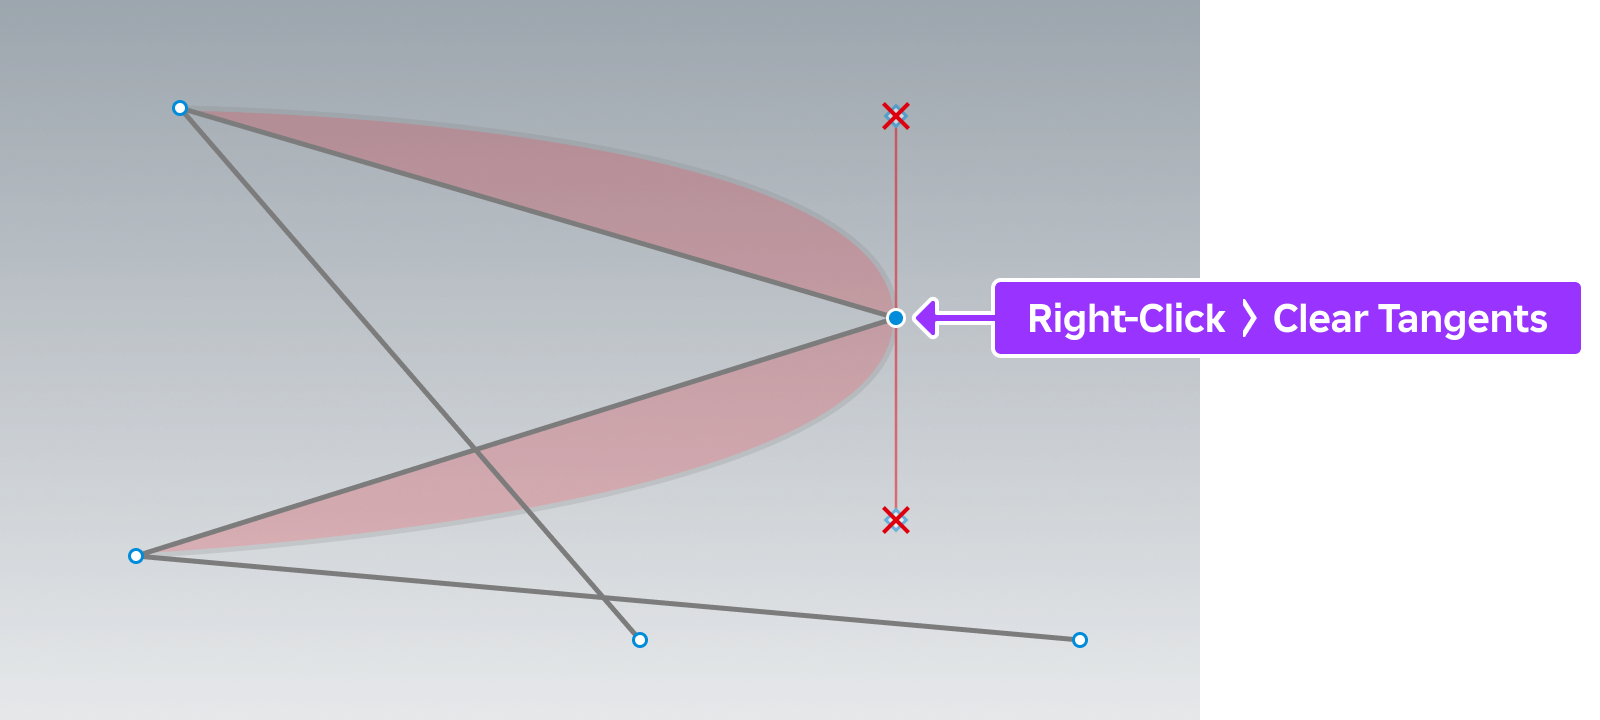
To delete just one of the tangents (left or right), hover over and right‑click that tangent's marker, then select Delete Tangent.
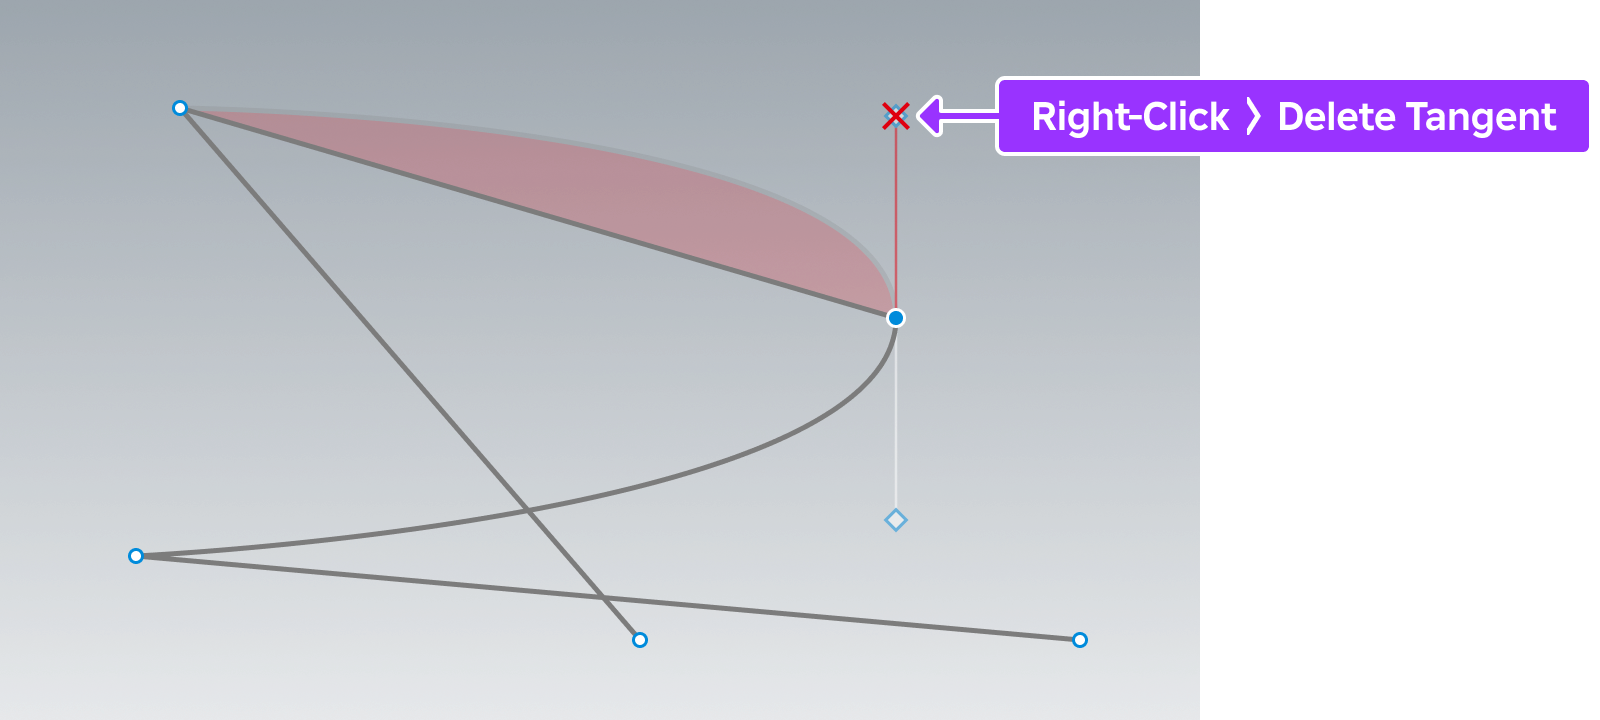
Break and mirror
By default, tangents mirror each other. When you drag to adjust one tangent marker, the paired tangent point will move in unison.
To "break" the tangents so that each can be moved independently of the other, hover over and right‑click the associated control point, then select Break Tangents from the contextual menu. Once broken, you can move each tangent marker without affecting the other.
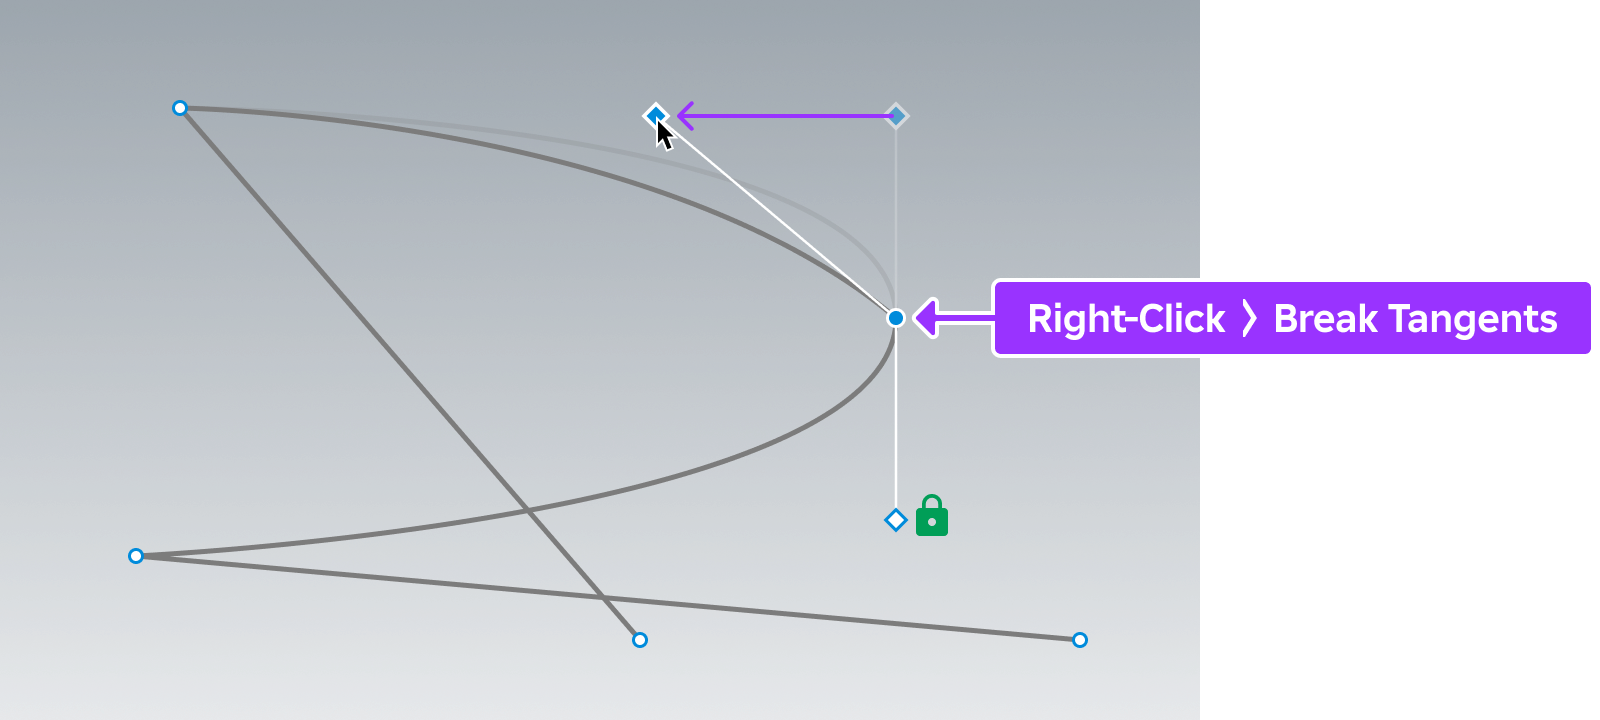
Note
To re-establish mirror behavior, hover over and right‑click the associated control point, then select Mirror Tangents from the contextual menu. Note that you will not see an immediate change in the path after re‑establishing mirror behavior, as the system cannot predict which tangent point you want to begin mirroring. Mirror behavior will resume only once you drag to adjust one of the tangent markers.
Path visual properties
You can customize the visual appearance of a Path2D with the following properties:
| Property | Description |
|---|---|
| [`Color3`](/docs/path2d#path2d-color3) | Sets the color of the path line. |
| [`Thickness`](/docs/path2d#path2d-thickness) | Sets the thickness of the path line, in pixels. |
| [`Visible`](/docs/path2d#path2d-visible) | Make the path visible or not in both edit and runtime. |
| [`ZIndex`](/docs/path2d#path2d-zindex) | Order in which a path renders relative to other GUIs. |
<img src="https://prod.docsiteassets.roblox.com/assets/ui/2D-paths/Path-Example-Thin-Grey.png" width="600" alt="Diagram illustrating a path with Thickness of 2 and Color3 of (125, 125, 125)." />Thickness = 2
Color3 = (125, 125, 125)
<img src="https://prod.docsiteassets.roblox.com/assets/ui/2D-paths/Path-Example-Thick-Red.png" width="600" alt="Diagram illustrating a path with Thickness of 10 and Color3 of (225, 0, 50)." />Thickness = 10
Color3 = (225, 0, 50)
<img src="https://prod.docsiteassets.roblox.com/assets/ui/2D-paths/Path-Example-ZIndex-Layering.png" width="600" alt="Diagram illustrating a path layered in front of another using the ZIndex property." />ZIndex layering
Path scripting
Scripting is useful for several path-related workflows. The following examples use methods such as GetControlPoints() which returns a table of Path2DControlPoints and GetPositionOnCurveArcLength() which returns the UDim2 position at a given t value along the spline.
local parent = script.Parent
local path = parent:FindFirstChildWhichIsA("Path2D")

local function arrangeChildren()
	local segmentCount = #path:GetControlPoints()
	local objectsToArrange = {}

	for _, child in parent:GetChildren() do
		if child:IsA("GuiObject") then
			table.insert(objectsToArrange, child)
		end
	end

	for idx, child in objectsToArrange do
		local t = idx / (#objectsToArrange + 1)
		child.Position = path:GetPositionOnCurveArcLength(t)
	end
end

-- Initially arrange child UI objects across path
arrangeChildren()

-- Listen for children being added/removed to adjust arrangement
parent.ChildAdded:Connect(arrangeChildren)
parent.ChildRemoved:Connect(arrangeChildren)
local Tweenservice = game:GetService("TweenService")
local parent = script.Parent
local path = parent:FindFirstChildWhichIsA("Path2D")
local objectToAnimate = parent:FindFirstChildWhichIsA("GuiObject")
local TWEEN_DURATION = 4
local TWEEN_EASING_STYLE = Enum.EasingStyle.Cubic
local TWEEN_EASING_DIRECTION = Enum.EasingDirection.InOut
local pathSampleValue = Instance.new("NumberValue")
local tweenInfo = TweenInfo.new(TWEEN_DURATION, TWEEN_EASING_STYLE, TWEEN_EASING_DIRECTION, 0, true, 2)
local tween = Tweenservice:Create(pathSampleValue, tweenInfo, {Value = 1})
local function onSampleValueChanged()
objectToAnimate.Position = path:GetPositionOnCurveArcLength(pathSampleValue.Value)
end
pathSampleValue.Changed:Connect(onSampleValueChanged)
tween:Play()