
Source: Roblox Creator Hub · CC BY 4.0 · View source · Code samples: MIT Imported 2026-10-03. Formatting adapted for this site.
Importer
The Importer allows you to import 3D models, images, sounds, and video files into Studio. 3D model import supports meshes with PBR textures, meshes with rigging, skinning, and animation data, and meshes designed as avatar items.
Import general 3D custom models into Studio.
Use the Importer to import assets with avatar item components.
To import an asset:
- From Studio's File menu, select Import.
- In the file browser, select the supported file type you intend to import.
- Configure your import settings and verify any warning or error messages.
- Click Import.
- After importing, you can right-click the imported asset in the importer and perform the following:
- Copy asset ID - Copies the uploaded asset ID to your clipboard. For models, this copies the asset ID of the
Model. - Find in Workspace (3D models only) - Automatically positions the camera to the location of the imported object in workspace.
- Copy asset ID - Copies the uploaded asset ID to your clipboard. For models, this copies the asset ID of the
Note
To directly import assets using HTTP requests, see the Open Cloud usage guide for assets.
Supported file types
Before importing a 3D object, ensure that the .fbx, .gltf or .obj meets Studio's mesh requirements to reduce errors or unexpected behavior.
| Asset Type | Details |
|---|---|
| **Image** | You can import images in `.png`, `.jpg`, `.gif`, `.tga`, or `.bmp` format for use as [textures/decals](/docs/roblox-parts-textures-decals) on parts, [image labels](/docs/roblox-ui-labels), [mesh textures](/docs/roblox-parts-meshes#texture), textures for [custom materials](/docs/roblox-parts-materials#custom-materials), textures for [special effects](/docs/roblox-effects), and more. |
| **Mesh** | You can import meshes in the `.fbx`, `.obj`, or `.gltf` format. The `.fbx` and `.gltf` formats support multiple mesh objects and hierachies, basic and [PBR textures](/docs/roblox-art-modeling-surface-appearance), cage mesh objects, [rigs](/docs/roblox-art-modeling-rigging), [avatar components](/docs/roblox-avatar), animation data, and [vertex colors](/docs/roblox-art-blender#vertex-painting). |
| **Audio** | You can import audio assets in either `.ogg`, `.mp3`, `.flac`, or `.wav` format. See [Audio Assets](/docs/roblox-audio-assets#import-audio) for details. |
| **Video** | You can import video assets in either `.mp4` or `.mov` format if all of the [requirements](/docs/roblox-ui-video-frames) are met. |
Import queue
If you selected multiple files with the Importer, you can use the import queue to bulk manage your various imports.
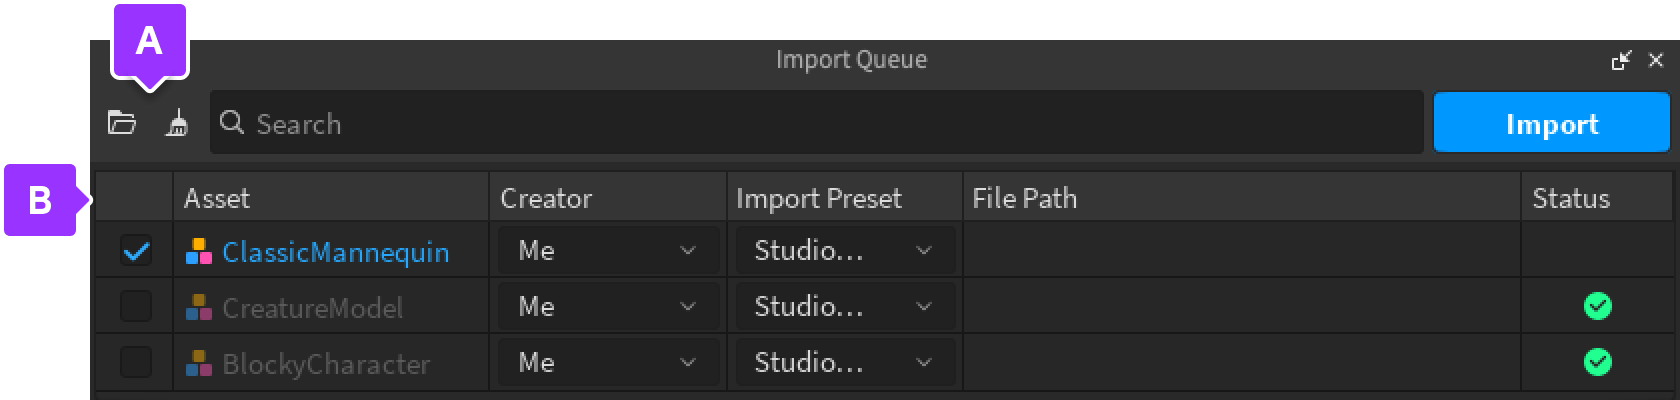

The top bar allows you to add new files, clear the queue, search and filter, and import all enabled assets.

The import queue lists all added files, with quick access dropdowns to change creator, presets, and file paths.
Add files to queue
To open a file browser and add additional files to the import queue, you can:
- Click the Add file button in the top bar of the import queue window.
- From Studio's File menu, select Import.
Remove files from queue
To remove all files from the queue, click the Clear queue button with the broom icon. To remove an individual file from the queue, right-click an item in the queue and select Delete from queue.
Apply preset settings
Use the Import Preset column to select a preset configuration to apply to your asset. For more information, see Presets.
You can also apply the settings of one item to all items by right-clicking an item with the desired settings and selecting Apply settings to all.
Access individual preview and settings
If you are importing a 3D model, click the individual Asset name of an unimported model to access the import preview for that item. Use the import preview to view and check your model, as well as set any individual import settings.
Import files
Ensure that each item you want to import has a checkbox enabled in the first column. By default, all items are selected if they are importable.
Press the Import button to start the import process.
Import preview (Models)
The import preview window appears if you are importing a single model file, or if you selected an individual asset from the import queue. This preview window provides individual controls for the various objects in your model.
The preview window is divided into multiple sections:
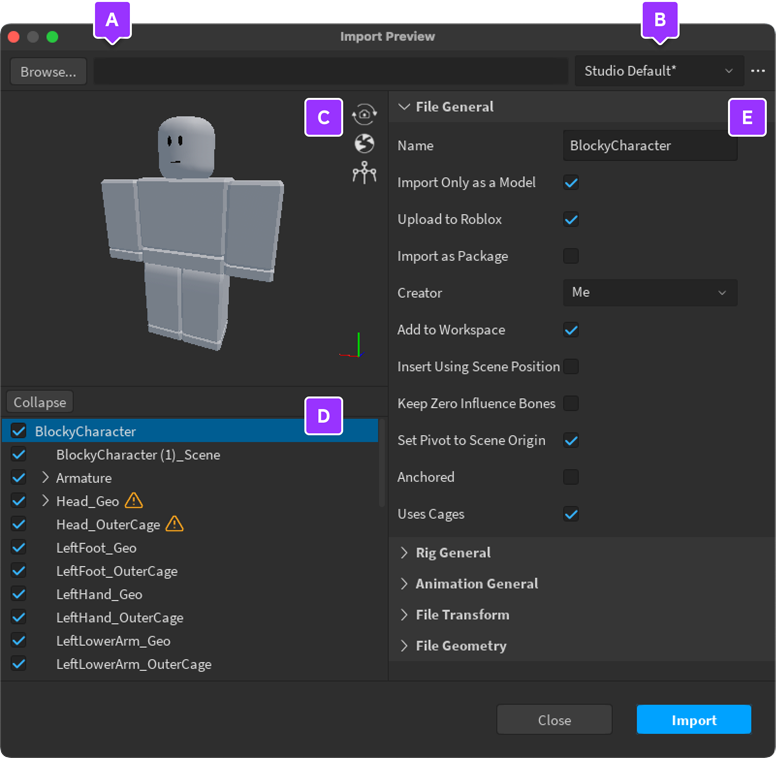
The file path of your model file. Click Browse to edit.
The preset applied to your import. Use the dropdown to select multiple presets, or the hamburger menu to set a new preset.

The 3D preview of your model. Use mouse buttons and top-right icons for various camera options and views.

The object hierarchy of the imported object. Includes mesh objects and other supported components.

The import settings for your import. For a complete list of settings, see Import settings.
Import settings
Depending on the object selected in the hierarchy panel, the inspector panel displays the following groups of settings:
- File General: Affects the entire imported file.
- Rig General: Affects the selected mesh object if rigging data is present.
- File Transform: Affects the transform properties of the imported file.
- File Geometry: Affects the geometry properties of the imported file.
- Object General: Affects the selected child object.
- Object Geometry: Affects the geometry of the selected child object.
File general
The Importer provides the following settings for all meshes:
| Setting | Description |
|---|---|
| Name | Sets the name of the imported asset as it will appear in your project. |
| Import Only As Model | If enabled, the Importer imports the model as a single asset even if the model contains multiple children. By default, this is **enabled**. If disabled, the Importer imports the model and all descendants, such as the multiple meshes, as individual assets. |
| Upload to Roblox | If enabled, the Importer adds the model to your **Toolbox** and **Asset Manager** inventory as a new asset. By default, this is **enabled**. If disabled, the Importer does not add the model to your inventory for later use. This is ideal when you want to test and iterate on a model's design without creating multiple copies in the Toolbox and Asset Manager. |
| Import as Package | Adds your asset to the workspace as a [package](/docs/roblox-projects-assets-packages), an auto-updating, scalable, and sharable format recommended for assets that are reused or commonly redistributed. By default, this is **disabled**. |
| Creator | Sets the creator, or creator group, for the asset. |
| Add to Workspace | If enabled, the Importer inserts the model into the [`Workspace`](/docs/workspace). If importing from a saved or published game, this setting also grants permission to the game to use the restricted asset. By default, this is **enabled**. If disabled, this setting only adds the model to your inventory and does **not** grant the game permission to use the asset. |
| Insert Using Scene Position | If enabled, the Importer uses the current scene position when inserting the model into the workspace. By default, this is **disabled**. |
| Keep Zero Influence Bones | If enabled, the importer keeps bones that do not influence the mesh. By default, this is **disabled**. If disabled, the importer removes zero influence bones. |
| Set Pivot to Scene Origin | If enabled, the Importer sets the pivot point of the entire model to the scene origin. By default, this is **enabled**. |
| Anchored | If enabled, the Importer sets the [`Anchored`](/docs/basepart#basepart-anchored) property to `true` on all the imported [`MeshParts`](/docs/meshpart). This is disabled for meshes with rig data / avatars. By default, this is **disabled**. |
| Uses Cage | If enabled, the Importer finds cage meshes in the model and converts them to `WrapInstance` objects, such as [`WrapLayer`](/docs/wraplayer) or [`WrapTarget`](/docs/wraptarget). If disabled, the Importer treats them as regular meshes. If the Importer initially detects cage meshes in the model, this is **enabled** by default. |
Rig general
The Importer provides the following settings for meshes with rigging data, typically character bodies or clothing accessories:
| Setting | Description |
|---|---|
| Rig Type | Sets the type of rig the mesh should be associated with. The options are: - **R15** - **Custom** - **No Rig** By default, the Importer attempts to select the most appropriate setting based on the detected rigging and skinning data of the mesh. |
| Validate UGC Body | After importing, Studio opens the assets in the [Avatar Setup](/docs/roblox-avatar-setup) tool, allowing you to quickly begin testing and uploading avatar assets to the Marketplace. |
| Rig Scale | If Rig Type is set to R15, the importer provides additional options to specify [body type scaling](/docs/roblox-avatar-character-bodies-specifications#body-scale). The options are: - **Default** - **Rthro** - **Rthro Narrow** |
File transform
The Importer provides the following settings for all meshes:
| Setting | Description |
|---|---|
| World Forward | Sets the forward facing axis of the object. By default, this is set to **Front**. |
| World Up | Sets the upward facing axis of the object. By default, this is set to **Top**. |
File geometry
File geometry includes information on the file dimensions and polycount of the entire model. You can edit the following settings for all meshes:
| Setting | Description |
|---|---|
| Scale Unit | Sets what units the file was modeled in so that it's sized appropriately when imported. By default, this is set to **Studs**. |
| Merge Meshes | If enabled, merges all MeshParts in the model into a single MeshPart and creates one MeshPart rather than a Model. By default, this is **disabled**. |
| Invert Negative Faces | Inverts the orientation of negative faces in the mesh. By default, this is **disabled**. |
Object general
When selecting a specific child object of your mesh, the Importer populates Object General settings. You can edit the following settings for the selected child objects:
| Setting | Description |
|---|---|
| Name | Sets the name of the selected child object within the model. |
| Anchored | If enabled, sets the [`Anchored`](/docs/basepart#basepart-anchored) property to `true` on the selected child object. By default, this is **disabled**. |
| Use Imported Pivot | If enabled, imports the object using the pivot point set within the child object. By default, this is **enabled**. |
Object geometry
Object Geometry includes information on the dimensions and polycount of the selected child object of the model. You can edit the following settings for the selected child objects:
| Setting | Description |
|---|---|
| Make Double Sided | If disabled, sets the vertices as one-sided. One-sided vertices means that you can see through them from one side. If enabled, sets the vertices as double-sided. Vertices that are double sided visually render on both sides. Double-sided is more performance intensive. By default, this is **disabled**. |
| Ignore Vertex Colors | If enabled, ignores the vertex color data in the child object. By default, this is **disabled**. |
Presets
You can save presets of various import settings to quickly apply later within the import preview or import queue.
By default, you can select between two presets:
- Studio Default: The default import behavior.
- Last Imported: Uses the settings applied to the most recent import.
You can use the ⋯ menu next to the Presets dropdown for additional options:
- Reset all: Removes any changes to the current configuration, putting settings back in the default state for the current preset.
- Save selection: Allows you to save any new changes to the importer settings into the currently selected preset.
- Save as new: Sets the current settings as a new preset. A dialogue box displays allowing you to set a name.
- Set as default: Sets the current preset as the default for all imports moving forward.
- Rename: Renames the current preset.
- Delete: Deletes the current preset. Resets to
Studio Defaultpreset.
Warnings and errors
If Studio detects any issues with your model, a small indicator displays in the hierarchy panel or the settings panel.
If you see a warning icon in the hierarchy, expand the hierarchy until you reach the specific child object to see more information about the issue. Warning and error messages display in the settings panel or as a tooltip.
<img src="https://prod.docsiteassets.roblox.com/assets/modeling/meshes/Warning-Settings-Panel.png" alt="A warning message in orange stating an error about cages mismatching."/>Warning and error messages display in the appropriate section in the inspector panel.
<img src="https://prod.docsiteassets.roblox.com/assets/modeling/meshes/Warning-Mouse-Over.png" alt="An error message in red with a pop-up message about missing textures."/>Some errors display a tooltip when hovering over the error icon.