
Source: Roblox Creator Hub · CC BY 4.0 · View source · Code samples: MIT Imported 2026-10-03. Formatting adapted for this site.
Solid modeling
Solid modeling is the process of joining BaseParts together in unique ways to form more complex shapes. This includes the boolean operations union, intersection, and subtraction which are commonly known as Constructive Solid Geometry (CSG). You can perform solid modeling in Studio, plugins, and in‑game on both the server and client.
In addition to boolean CSG, solid modeling also supports meshes, as long as they are watertight, and operations like sweep and fragment that let you and your players slice, cut, and shatter geometry for unique gameplay interactions.
<img src="https://prod.docsiteassets.roblox.com/assets/modeling/solid-modeling/SweepPart-Crinkle.jpg" />MeshPart created with SweepPartAsync()
<img src="https://prod.docsiteassets.roblox.com/assets/modeling/solid-modeling/Fragment-Bridge.jpg" />MeshPart broken with FragmentAsync()
Note
Performing CSG on meshes and using the sweep and fragment operations are only available by enabling the beta feature through File ⟩ Beta Features ⟩ Solid Modeling On Meshes.
Watertight geometry
Solid modeling operations can only work with watertight geometry. In technical terms, a mesh being watertight means that it's closed, manifold, and non-self-intersecting. These terms have strict definitions, but here are some simple rules:
- Each face must have an "inside" side and an "outside" side. These are determined by the face's winding order, which is the order of its three vertices.
- Each edge must be shared by exactly two triangles. This means there cannot be any holes in the mesh because the edges around the rim of a hole would only have one triangle.
- Faces cannot pass through other faces.
- Adjacent triangles must agree on which side is the "outside" side.
- Each vertex must have exactly one fan of adjacent triangles.
Each of the following examples is non-watertight for the noted reason:
<img src="https://prod.docsiteassets.roblox.com/assets/modeling/solid-modeling/Not-Watertight-A.png" />Note
		Mesh is not closed


		<img src="https://prod.docsiteassets.roblox.com/assets/modeling/solid-modeling/Not-Watertight-B.png" />
Note
		Self-intersecting


		<img src="https://prod.docsiteassets.roblox.com/assets/modeling/solid-modeling/Not-Watertight-C.png" />
Note
		Shares an edge


		<img src="https://prod.docsiteassets.roblox.com/assets/modeling/solid-modeling/Not-Watertight-D.png" />
Note
Shares a vertexRepairing non-watertight meshes
The solid modeling system is able to automatically repair specific small issues with a mesh, but in general, API calls will fail if the mesh is not watertight. There's no one-size-fits-all way to repair an existing non-watertight mesh, but there are several Blender plugins which can help, such as 3D Print Toolbox and Mesh Repair Tools. As another option, Meshlab also has very useful tools built-in to try and make the mesh manifold, which is the main requirement for a mesh being watertight.
One way to see that a mesh will be extremely difficult to make watertight is to look at it in Studio from all angles, then try enabling and disabling the mesh's MeshPart.DoubleSided property. If you can see any difference, then the mesh is just a shell and the tools mentioned above won't work because they cannot guess what space is inside versus outside the mesh. However, if all you want is a thin mesh and it isn't important to keep the mesh's dimensions exactly the same, you can use Blender's Solidify modifier to slightly thicken the shell into a watertight mesh.
<img src="https://prod.docsiteassets.roblox.com/assets/modeling/solid-modeling/DoubleSided-Diff-1.png" />DoubleSided = false
<img src="https://prod.docsiteassets.roblox.com/assets/modeling/solid-modeling/DoubleSided-Diff-2.png" />DoubleSided = true
Solid modeling in Studio
You can perform three basic boolean operations using four tools within the Model tab toolbar.

| Tool | Shortcut | Description |
|---|---|---|
| [Union](#union) | ShiftCtrlG (Windows) Shift⌘G (Mac) | Join two or more parts together to form a single solid union. |
| [Intersect](#intersect) | ShiftCtrlI (Windows) Shift⌘I (Mac) | Intersect overlapping parts into a single solid intersection. |
| [Separate](#separate) | ShiftCtrlU (Windows) Shift⌘U (Mac) | Separate the union or intersection back into its individual parts. |
| [Negate](#negate) | ShiftCtrlN (Windows) Shift⌘N (Mac) | Negate parts, useful for making holes and indentations. |
Union
The Union tool joins two or more parts together to form a single solid UnionOperation.
<img src="https://prod.docsiteassets.roblox.com/assets/modeling/solid-modeling/Union-Before.png" alt="A block and a cylinder." />Individual parts
<img src="https://prod.docsiteassets.roblox.com/assets/modeling/solid-modeling/Union-After.png" alt="A block and a cylinder combined into one object." />Union result
To combine parts together into a union:
- Select all parts that you want to join together.
- Click the Union button. All of the parts combine into one solid
UnionOperationwith the name Union.
Intersect
The Intersect tool intersects overlapping parts into a single solid IntersectOperation.
<img src="https://prod.docsiteassets.roblox.com/assets/modeling/solid-modeling/Intersect-Before.png" alt="A block and a cylinder." />Individual parts
<img src="https://prod.docsiteassets.roblox.com/assets/modeling/solid-modeling/Intersect-After.png" alt="A block and a cylinder combined into one object." />Intersect result
To intersect overlapping parts together:
- Select all parts that you want to intersect.
- Click the Intersect button. All of the parts combine into one solid
IntersectOperationwith the name Intersection.
Negate
The Negate tool negates a part so that when it's unioned with another part, the shape of the negated part is subtracted from the other part.
<img src="https://prod.docsiteassets.roblox.com/assets/modeling/solid-modeling/Subtract-Before.png" alt="A block and a cylinder." />Block and negated cylinder
<img src="https://prod.docsiteassets.roblox.com/assets/modeling/solid-modeling/Subtract-After.png" alt="A block and a cylinder combined into one object." />Subtract result
To subtract a part from other overlapping parts:
- Select the part you want to negate from other parts.
- Click Negate. The part becomes translucent with a reddish tint to indicate its state.
- Select both the negated part and the parts you want to subtract it from.
- Click Union. The negated part is cut out from the included overlapping parts.
Separate
The Separate tool separates a UnionOperation back into its individual parts, essentially serving as an "undo" tool for unions and intersections.
To separate a union or intersection back into individual parts:
- Select the union or intersection.
- Click Separate. The parts separate back into their original form.
In-game solid modeling
You can also perform solid modeling operations while a game is running or from a plugin through GeometryService methods.
Note
In-game solid modeling operations are asynchronous, meaning they can impact performance. For best results, you should not perform a large series of calls such as UnionAsync() in quick succession.
Core operations
Similar to Studio's built-in operation tools, you can use GeometryService methods like UnionAsync(), IntersectAsync(), and SubtractAsync()to perform basic boolean operations. For example, the following script uses SubtractAsync()to subtract the volume of one part from another.
local GeometryService = game:GetService("GeometryService")

local mainPart = Instance.new("Part")
local otherPart = Instance.new("Part")
otherPart.Position = Vector3.new(1, 0.5, 1)

local success, newParts = pcall(function()
	return GeometryService:SubtractAsync(mainPart, {otherPart})
end)
if success and newParts then
	for _, newPart in pairs(newParts) do
		newPart.Parent = workspace
	end
end
To further demonstrate, the next code sample combines the geometry of mainPart and the parts in the otherParts array, then it destroys the original parts involved in the operation. You can replace the call to UnionAsync() with IntersectAsync() or SubtractAsync() to perform the other boolean operations.
local GeometryService = game:GetService("GeometryService")

local mainPart = workspace.BlueBlock
local otherParts = { workspace.PurpleCylinder }

local options = {
	CollisionFidelity = Enum.CollisionFidelity.Default,
	RenderFidelity = Enum.RenderFidelity.Automatic,
	SplitApart = false
}

local success, newParts = pcall(function()
	return GeometryService:UnionAsync(mainPart, otherParts, options)
end)

if success and newParts then
	-- Loop through resulting parts to reparent/reposition
	for _, newPart in pairs(newParts) do
		newPart.Parent = mainPart.Parent
		newPart.CFrame = mainPart.CFrame
		newPart.Anchored = mainPart.Anchored
	end

	-- Destroy original parts
	mainPart.Parent = nil
	mainPart:Destroy()
	for _, otherPart in pairs(otherParts) do
		otherPart.Parent = nil
		otherPart:Destroy()
	end
end
While there is no engine-level method for part negation, you can add the rbxNegate tag within a script or plugin to perform negation equivalent to Studio's Negate toolbar button.
local CollectionService = game:GetService("CollectionService")

CollectionService:AddTag(workspace.Part, "rbxNegate")
Migrating from BasePart CSG Functions
Compared to BasePart:UnionAsync()/BasePart:IntersectAsync()/BasePart:SubtractAsync(), the GeometryService methods differ as follows:
- The output is an array of instances rather than a single instance.
- The input parts do not need to be parented to the scene, allowing for background operations.
- When the
SplitApartoption is set totrue(default), each distinct body will be returned in its ownPartOperation/MeshPart. - All the returned parts are in the coordinate space of the main part, so their
PVInstance.Originpositions are the same as the main part's. This keeps the vertices of the mesh in the same position relative to the object as before the operation, but it does also mean the(0, 0, 0)of a returned part is not necessarily at the center of its body.
Sweep part
Note
This workflow is only available by enabling the feature through File ⟩ Beta Features ⟩ Solid Modeling On Meshes.
The SweepPartAsync() method creates a MeshPart which has the shape of the input part dragged through a given set of CFrame positions. This method can be very useful for performing slicing and cutting interactions.
The input can be a Part, PartOperation, or MeshPart. The result's shape is defined as the union of the convex hulls of each adjacent pair of CFrames; if only a single CFrame is provided, the result will be a convex hull of the input part.
To demonstrate how this method works, the following code sample sweeps a ball through a set of CFrame positions to create a spiral:
local GeometryService = game:GetService("GeometryService")

local inputPart = Instance.new("Part")
inputPart.Shape = Enum.PartType.Ball

local cframeList = {}
for i = 1, 50 do
	local rotation = CFrame.Angles(0, i * 0.5, 0)
	local position = Vector3.new(0, i * 0.1, -1)
	table.insert(cframeList, rotation * CFrame.new(position))
end

local success, sweptPart = pcall(function()
	return GeometryService:SweepPartAsync(inputPart, cframeList)
end)
if success and sweptPart then
	sweptPart.Parent = workspace
end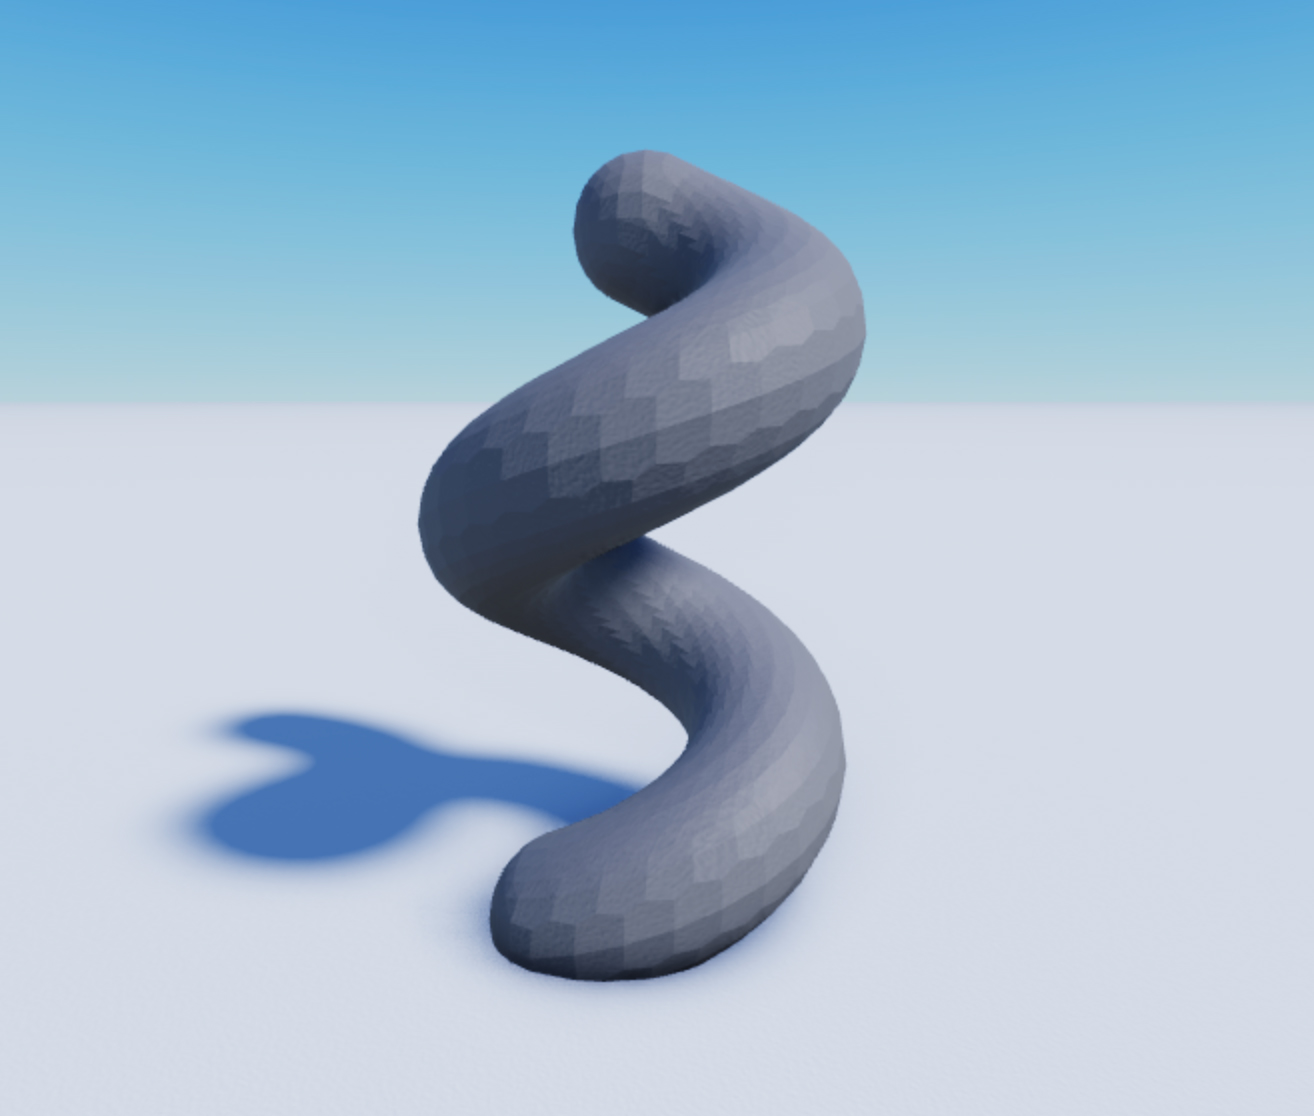
Slicing gameplay using sweep
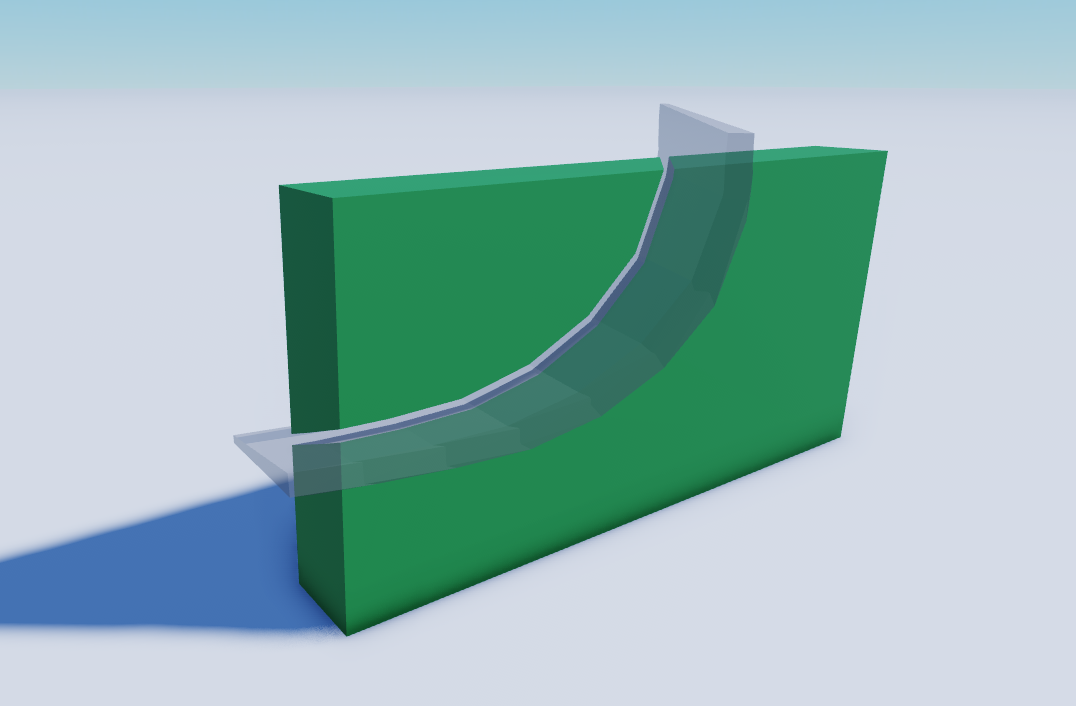
This examples uses SweepPartAsync() to achieve a sword or laser gun slice gameplay feature, where the movement of the sword is based on the player's mouse position. The user's mouse movement is recorded as a list of CFrames, SweepPartAsync() builds a slice mesh from this data, then the slice mesh is subtracted from the part which was hit.
To get this example running in Studio:
Create the following
ScriptinServerScriptServiceto perform all of the solid modeling operations.local ReplicatedStorage = game:GetService("ReplicatedStorage") local GeometryService = game:GetService("GeometryService") local DrawCurveEvent = ReplicatedStorage:WaitForChild("DrawCurveEvent") DrawCurveEvent.OnServerEvent:Connect(function(player, cframeList, hitInstance) local blade = Instance.new("Part") blade.Size = Vector3.new(0.2, 0.2, 15.0) local success, sweptPart = pcall(function() return GeometryService:SweepPartAsync(blade, cframeList) end) if success and sweptPart then -- Visualize the sweep sweptPart.Parent = workspace sweptPart.Transparency = 0.5 sweptPart.Anchored = true sweptPart.CanQuery = false -- Subtract the sweep from the hit instance local subtractSuccess, newParts = pcall(function() return GeometryService:SubtractAsync(hitInstance, {sweptPart}) end) if subtractSuccess and newParts then for _, newPart in pairs(newParts) do newPart.Parent = hitInstance.Parent newPart.Anchored = true end hitInstance:Destroy() end end end)Create the following
LocalScriptinStarterPlayerScriptsto handle user input.local ReplicatedStorage = game:GetService("ReplicatedStorage") local GeometryService = game:GetService("GeometryService") local DrawCurveEvent = ReplicatedStorage:WaitForChild("DrawCurveEvent") DrawCurveEvent.OnServerEvent:Connect(function(player, cframeList, hitInstance) local blade = Instance.new("Part") blade.Size = Vector3.new(0.2, 0.2, 15.0) local success, sweptPart = pcall(function() return GeometryService:SweepPartAsync(blade, cframeList) end) if success and sweptPart then -- Visualize the sweep sweptPart.Parent = workspace sweptPart.Transparency = 0.5 sweptPart.Anchored = true sweptPart.CanQuery = false -- Subtract the sweep from the hit instance local subtractSuccess, newParts = pcall(function() r eturn GeometryService:SubtractAsync(hitInstance, {sweptPart}) end) if subtractSuccess and newParts then for _, newPart in pairs(newParts) do newPart.Parent = hitInstance.Parent newPart.Anchored = true end hitInstance:Destroy() end end end)Create a
RemoteEventinReplicatedStoragenamedDrawCurveEvent.
Fragment
Note
This workflow is only available by enabling the feature through File ⟩ Beta Features ⟩ Solid Modeling On Meshes.
The FragmentAsync() and GenerateFragmentSites() methods let you shatter a part into pieces with natural-looking shapes. FragmentAsync() uses voronoi decomposition to divide a single part into multiple MeshPart instances according to the pattern of points passed in, while GenerateFragmentSites() is a helper method which generates points known as voronoi sites to pass into FragmentAsync().
The following code sample generates voronoi sites to fragment a block part:
local GeometryService = game:GetService("GeometryService")

local inputPart = Instance.new("Part")
inputPart.Position = Vector3.new(0, 0.7, 20)

local sites = GeometryService:GenerateFragmentSites(inputPart)

local success, fragments = pcall(function()
	return GeometryService:FragmentAsync(inputPart, sites)
end)
if success and fragments then
  for _, item in fragments do
		local instance = item.Instance
		instance.Parent = workspace
	end
end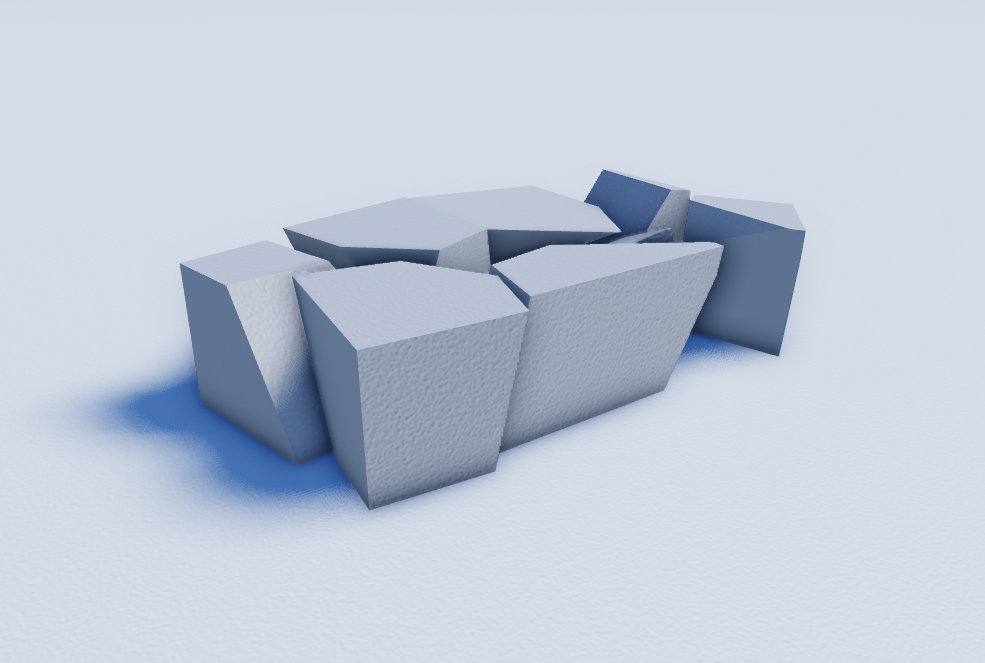
Note
Keep in mind that the number of small pieces created can be massive. If you give users the freedom to fragment objects, you need a system in place for cleaning up the pieces, such as removing them after some amount of time using the Debris service. In addition, you can create your own lists of sites manually rather than using GenerateFragmentSites(), but it can take 50+ lines of Luau to generate well-behaved points.
Localized fragment at a given position
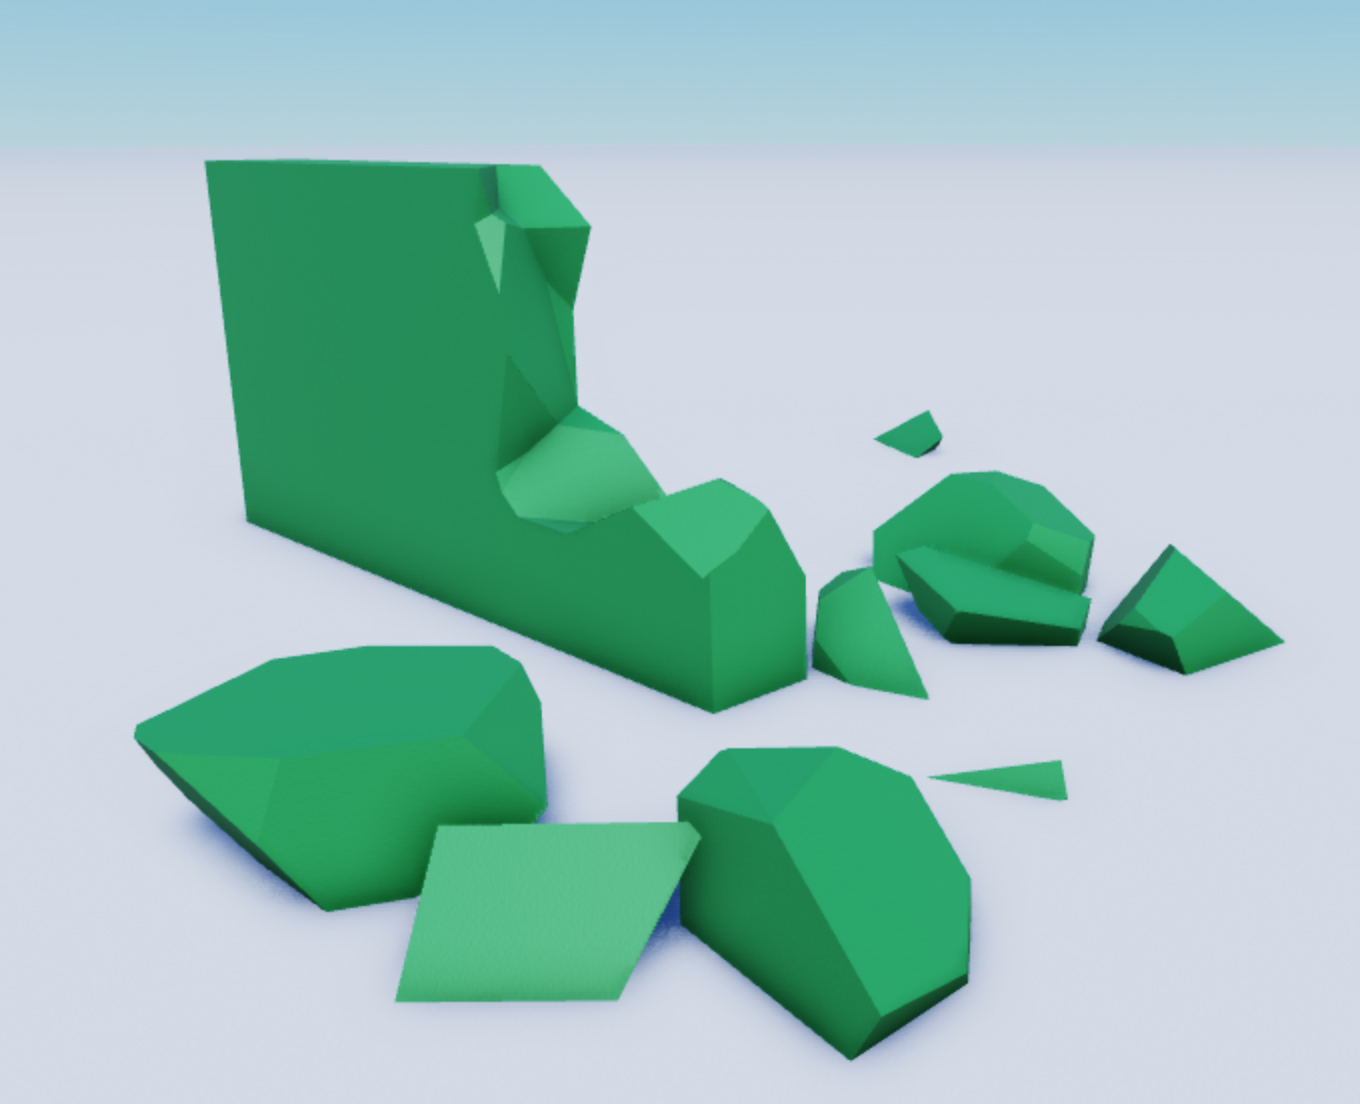
The following script fragments an area of a part, given by a position and radius. The position might commonly come from a physical collision or a raycast from a player.
The first element of the site array which GenerateFragmentSites() generates will be an inner array of all the sites which are outside the requested radius. If you want to do something specific to the remaining 'unshattered portion' of the part, you can find that portion by checking fragments[i].Index == 1 when looping over the results of FragmentAsync().
local GeometryService = game:GetService("GeometryService")

local function fragmentAtPosition(player, part, contactPoint, radius)
	local allSites = GeometryService:GenerateFragmentSites(part, {Origin = contactPoint, Radius = radius})

	local success, fragments = pcall(function()
		return GeometryService:FragmentAsync(part, allSites)
	end)
	if not success then
		warn("Failed to Fracture:"..tostring(fragments))
		return
	end

	local decals = {}
	for _,child in pairs(part:GetChildren()) do
		if child:IsA("Decal") or child:IsA("SurfaceAppearance") then
			table.insert(decals,child)
		end
	end

	for i = 1, #fragments do
		local fragment = fragments[i].Instance
		if fragment == nil then
			continue
		end

		for _,d in pairs(decals) do
			local d2 = d:Clone()
			d2.Parent = fragment
		end

		fragment.Anchored = false
		fragment.Parent = part.Parent
		fragment:SetNetworkOwner(player)
	end

	if #fragments ~= 0  then
		part:Destroy()
	end

	return fragments
end
Fragment within an area defined by another part
The following script breaks fragments off the first part within a shape defined by using a second part as a stencil. Only voronoi sites within the second part will result in separate pieces. All other sites will have their cells combined into a single part.
<img src="https://prod.docsiteassets.roblox.com/assets/modeling/solid-modeling/Fragment-Stencil-Before.jpg" alt="Stencil in the shape of the Roblox Studio logo" />Part (dark grey) and stencil part
<img src="https://prod.docsiteassets.roblox.com/assets/modeling/solid-modeling/Fragment-Stencil-After.jpg" alt="Results of a fragment in the shape of a stencil" />Fragment script result
local GeometryService = game:GetService("GeometryService")

local function fragmentWithinStencil(player, part)
	local overlapParams = OverlapParams.new()
	overlapParams.FilterType = Enum.RaycastFilterType.Include
	overlapParams.FilterDescendantsInstances = {workspace.Stencil}
	overlapParams.RespectCanCollide = false

	local sensor = Instance.new("Part")
	sensor.Size = Vector3.new(0.01, 0.01, 0.01)

	local allSites = GeometryService:GenerateFragmentSites(part, {SiteSpacing = 0.9})

	local fragmentSites = {}
	local mainPartSites = {}
	for _, site in ipairs(allSites) do
		sensor.CFrame = CFrame.new(site)
		local partsFound = workspace:GetPartsInPart(sensor, overlapParams)

		if #partsFound > 0 then
			table.insert(fragmentSites, site)
		else
			table.insert(mainPartSites, site)
		end
	end

	local sortedSites = fragmentSites
	table.insert(sortedSites, mainPartSites)

	workspace.Stencil:Destroy()

	local success, fragments = pcall(function()
		return GeometryService:FragmentAsync(part, sortedSites, {SplitApart = false})
	end)
	if not success then
		warn("Failed to Fracture:"..tostring(fragments))
		return
	end

	local decals = {}
	for _,child in pairs(part:GetChildren()) do
		if child:IsA("Decal") or child:IsA("SurfaceAppearance") then
			table.insert(decals,child)
		end
	end

	for i = 1, #fragments do
		local fragment = fragments[i].Instance
		if fragment == nil then
			continue
		end

		for _,d in pairs(decals) do
			local d2 = d:Clone()
			d2.Parent = fragment
		end

		fragment.Anchored = false
		fragment.Parent = part.Parent
		fragment:SetNetworkOwner(player)
	end

	if #fragments ~= 0  then
		part:Destroy()
	end

	return fragments
end
Fragment multiple parts and hide the original part boundaries
The following script is a much more niche use case, but it demonstrates the power of the index data which is returned from FragmentAsync().
For example, many places contain buildings formed from multiple non-unioned block parts. If a grenade, cannonball, or sledgehammer were to damage it, you would want all of the wall parts to be fragmented. This script fragments all of the nearby parts, then unions the fragments of different parts together to completely hide the seams.
This involves multiple Async() operations, so it may not be suitable for use in-game as an instant response to user input, such as a sledgehammer tool.
<img src="https://prod.docsiteassets.roblox.com/assets/modeling/solid-modeling/Fragment-Multiple-Before.jpg" alt="A row of blocks" />A row of blocks
<img src="https://prod.docsiteassets.roblox.com/assets/modeling/solid-modeling/Fragment-Multiple-After.jpg" alt="A row of blocks fragmented" />Each piece may originate from multiple input parts
local GeometryService = game:GetService("GeometryService")

local function fragmentCrossPart(player, part, contactPoint, radius)
	local allSites = GeometryService:GenerateFragmentSites(part, {Origin = contactPoint, Radius = radius})

	local fragmentsSorted = {}
	for i = 1, #allSites do
		fragmentsSorted[i] = {}
	end

	local partsFound = workspace:GetPartBoundsInRadius(contactPoint, radius)
	for i, part in ipairs(partsFound) do

		local success, fragments = pcall(function()
			return GeometryService:FragmentAsync(part, allSites)
		end)
		if not success then
			warn("Failed to Fracture:"..tostring(fragments))
			return
		end

		for i = 1, #fragments do
			local fragment = fragments[i].Instance
			local siteIndex = fragments[i].Index
			if fragment == nil or siteIndex == nil then
				continue
			end

			table.insert(fragmentsSorted[siteIndex], fragment)
		end
	end

	for i = 1, #fragmentsSorted do
		local fragmentList = fragmentsSorted[i]
		if #fragmentList == 0 then
			continue
		end

		if #fragmentList == 1 then
			local fragment = fragmentList[1]
			fragment.Anchored = false
			fragment.Parent = part.Parent
			fragment:SetNetworkOwner(player)
			continue
		end

		if i == #allSites then
			for j = 1, #fragmentList do
				local fragment = fragmentList[j]
				fragment.Parent = part.Parent
				fragment.Anchored = true
			end
			continue
		end

		local mainPart = fragmentList[1]
		local otherParts = {}
		for j = 2, #fragmentList do
			table.insert(otherParts, fragmentList[j])
		end

		local success, results = pcall(function()
			return GeometryService:UnionAsync(mainPart, otherParts)
		end)
		if not success then
			warn("Failed to Union:"..tostring(results))
			return
		end

		for j = 1, #results do
			results[j].Parent = part.Parent
			results[j].Anchored = false
			results[j]:SetNetworkOwner(player)
		end
	end

	for i, part in ipairs(partsFound) do
		part:Destroy()
	end
end
Customizable Luau GenerateFragmentSites()
The following script is a nearly identical Luau replacement for GenerateFragmentSites(). If you want similar behavior to GenerateFragmentSites() but want to make slight changes, you can use this as a starting point.
It uses a jittered grid of points, and guarantees that the fragmented area is well behaved, unlike fully random points.
local function generateFragmentSites(part: BasePart, siteSpacing: number?, origin: Vector3?, radius: number?): {Vector3}
	local RANDOMNESS_MULTIPLIER = 1.0 -- Use this to adjust the amount of jitter

	if (origin and not radius) or (radius and not origin) then
		warn("Either both origin and radius should be provided, or neither.")
		return {}
	end

	local isLocalized = (radius ~= nil) -- isLocalized means don't fracture the whole part, just a section.
	local partCFrame = part.ExtentsCFrame
	local gridDimensions: Vector3
	local localGridCenter: Vector3

	local spacing
	if siteSpacing then
		spacing = siteSpacing
	elseif isLocalized then
		spacing = radius * 0.5
	else
		local partSize = part.Size
		local volume = partSize.X * partSize.Y * partSize.Z
		spacing = (volume / 5) ^ (1/3)
	end

	if isLocalized then
		local localOrigin = partCFrame:PointToObjectSpace(origin)
		local gridSize = math.ceil(radius * 2 / spacing) + 3
		gridDimensions = Vector3.new(gridSize, gridSize, gridSize)
		localGridCenter = localOrigin
	else
		local partSize: Vector3 = part.Size
		local xCount = math.ceil(partSize.X / spacing)
		local yCount = math.ceil(partSize.Y / spacing)
		local zCount = math.ceil(partSize.Z / spacing)

		gridDimensions = Vector3.new(xCount, yCount, zCount)
		localGridCenter = Vector3.zero
	end

	local totalGridSize = gridDimensions * spacing
	local halfCell = Vector3.new(spacing, spacing, spacing) * 0.5
	local localStartOffset = localGridCenter - (totalGridSize * 0.5) + halfCell

	local innerJitter = spacing * 0.5 * RANDOMNESS_MULTIPLIER
	local outerJitter = math.min(spacing * 0.5 * 0.866, innerJitter)

	local sitesFlatList = {}

	for x = 0, gridDimensions.X - 1 do
		for y = 0, gridDimensions.Y - 1 do
			for z = 0, gridDimensions.Z - 1 do

				local isOuterShell =
					x == 0 or x == gridDimensions.X - 1 or
					y == 0 or y == gridDimensions.Y - 1 or
					z == 0 or z == gridDimensions.Z - 1
				local jitterAmount = if (isOuterShell and isLocalized) then outerJitter else innerJitter

				local jitterOffset = Vector3.new(
					(math.random() - 0.5) * 2 * jitterAmount,
					(math.random() - 0.5) * 2 * jitterAmount,
					(math.random() - 0.5) * 2 * jitterAmount
				)

				local offsetInGrid = Vector3.new(x, y, z) * spacing

				table.insert(sitesFlatList, localStartOffset + offsetInGrid + jitterOffset)
			end
		end
	end

	local sitesListFinal = {}

	if isLocalized then
		local mainPartSites = {}

		for _, localSite in ipairs(sitesFlatList) do
			local worldSite = partCFrame * localSite
			local distance = (worldSite - origin).Magnitude
			if distance < radius then
				table.insert(sitesListFinal, worldSite)
			else
				table.insert(mainPartSites, worldSite)
			end
		end

		table.insert(sitesListFinal, 1, mainPartSites)
	else
		for _, localSite in ipairs(sitesFlatList) do
			local worldSite = partCFrame * localSite
			table.insert(sitesListFinal, worldSite)
		end
	end

	return sitesListFinal
end
Preserve constraints
If an input part has constraints or attachments that you want to preserve, you can transfer them over to the resulting parts. It can be tedious to figure out which output part a constraint should be attached to, so it's recommended to use CalculateConstraintsToPreserve() to generate a table of recommendations which you can loop over and apply.
To demonstrate, the following code sample performs a subtract operation, loops through the resulting parts to reparent and reposition the resulting parts, then calculates a table of constraints and attachments to either preserve or drop before destroying all original parts.
local GeometryService = game:GetService("GeometryService")

local mainPart = workspace.PurpleBlock
local otherParts = { workspace.BlueBlock }

local options = {
	CollisionFidelity = Enum.CollisionFidelity.Default,
	RenderFidelity = Enum.RenderFidelity.Automatic,
	SplitApart = true,
}

local constraintOptions = {
	tolerance = 0.1,
	weldConstraintPreserve = Enum.WeldConstraintPreserve.All,
	dropAttachmentsWithoutConstraints = false,
}

-- Perform subtract operation in pcall() since it's asynchronous
local success, newParts = pcall(function()
	return GeometryService:SubtractAsync(mainPart, otherParts, options)
end)

if success and newParts then
	-- Loop through resulting parts to reparent/reposition
	for _, newPart in pairs(newParts) do
		newPart.Parent = mainPart.Parent
		newPart.CFrame = mainPart.CFrame
		newPart.Anchored = mainPart.Anchored
	end

	-- Calculate constraints/attachments to either preserve or drop
	local recommendedTable = GeometryService:CalculateConstraintsToPreserve(mainPart, newParts, constraintOptions)

	-- Preserve constraints/attachments based on recommended table
	for _, item in pairs(recommendedTable) do
		if item.Attachment then
			item.Attachment.Parent = item.AttachmentParent
			if item.Constraint then
				item.Constraint.Parent = item.ConstraintParent
			end
		elseif item.NoCollisionConstraint then
			local newNoCollision = Instance.new("NoCollisionConstraint")
			newNoCollision.Part0 = item.NoCollisionPart0
			newNoCollision.Part1 = item.NoCollisionPart1
			newNoCollision.Parent = item.NoCollisionParent
		elseif item.WeldConstraint then
			local newWeldConstraint = Instance.new("WeldConstraint")
			newWeldConstraint.Part0 = item.WeldConstraintPart0
			newWeldConstraint.Part1 = item.WeldConstraintPart1
			newWeldConstraint.Parent = item.WeldConstraintParent
		end
	end

	-- Destroy original parts
	mainPart.Parent = nil
	mainPart:Destroy()
	for _, otherPart in pairs(otherParts) do
		otherPart.Parent = nil
		otherPart:Destroy()
	end
end
Solid modeling results
Behavior details
Note
In this section, the term "main part" refers to either the first part you select while solid modeling in Studio, or the first argument while solid modeling in-game.
The original parts remain intact following a successful operation, and the returned parts have no set
Parent. In most cases, it's recommended to parent the returned part(s) to the same place as the main part, thenDestroy()the original parts.If the main part is moving during the calculation of the operation, you can set the resulting parts to the updated
CFrameof the main part, since the returned parts are in the same coordinate space as the main part.If a solid modeling operation would result in any parts with more than 20,000 triangles, they will be simplified to 20,000. If that cannot be done, usually in a case with thousands of non-overlapping components, the operation results in an error.
There are methods to swap out the mesh data of an instance, making it easier to utilize the geometry of the operation while maintaining properties, attributes, tags, and children of the main part, such as
Attachments,Constraints,ParticleEmitters, light objects, and decals. This approach also circumvents the potential "flicker" of completely replacing the originalPartOperationwith another.- If using this method with a
PartOperationas the main part and none of the other parts areMeshParts, you can substitute in the geometry of anotherPartOperationviaSubstituteGeometry(). - If the main part is a
MeshPart, you can useMeshPart:ApplyMesh().
- If using this method with a
It's possible to call these methods on the client, but with some limitations. First, it must be done with objects created on the client. Secondly, there is no replication available from client to the server.
The following properties from the main part are applied to the resulting
PartOperationsorMeshParts:
Colors and UVs
The colors of the resulting part(s) after solid modeling come from two places: the face colors and the part's Color.
- If the result is a
PartOperation, it will have theColorof the first part you selected in Studio, but Studio uses the face colors by default to keep each face the same color as it was before the operation. You can enable itsUsePartColorproperty in Studio to override this behavior and make the entire result a single color. - If the result is a
MeshPart, itsColorwill be white, and the face colors will always show through. You can adjust the tint of the resulting part(s) by changing theirColor, but it will be mixed (multiplied) with the face colors. This tints the result rather than overriding the face colors completely. If you want complete control over the color of the output, it's best to make the inputs white first.
UVs are also handled differently depending of the type of result:
PartOperationsalways have boxmapped UVs, which means each face will have the material/texture/decal from one direction (one of-x,+x,-y,+y,-z,+z) applied to it. This can stretch textures.MeshPartsare not boxmapped. The UVs of the main part's mesh are used. Since Roblox does not currently have multi-material support, the UVs of faces originating from the other parts are given UVs of(0, 0). For best results, ensure pixel(0, 0)of your texture has a reasonable color.
Smoothing angle
A solid modeled part's SmoothingAngle property smooths angles between adjacent surfaces of the same color. A higher value produces a smoother appearance while a lower value produces a rougher appearance with more sharp edges.
While a value between 30 and 70 degrees usually produces a good result, values between 90 and 180 are not recommended as they may cause a "shadowing" effect on unions and intersections with sharp edges.
<img src="https://prod.docsiteassets.roblox.com/assets/modeling/solid-modeling/SmoothingAngle-0.png" alt="Solid modeled part with SmoothingAngle of 0" />SmoothingAngle = 0
<img src="https://prod.docsiteassets.roblox.com/assets/modeling/solid-modeling/SmoothingAngle-45.png" alt="Solid modeled part with SmoothingAngle of 45" />SmoothingAngle = 45
Note
You can only adjust a solid modeled part's SmoothingAngle property in Studio, and it isn't currently possible to adjust the smoothing angle of a MeshPart.