
Source: Roblox Creator Hub · CC BY 4.0 · View source · Code samples: MIT Imported 2026-10-03. Formatting adapted for this site.
Highlighting objects
The Highlight instance is a visual effect which you can use to call attention to a specific object within a game. Every highlight effect has a silhouette outline that surrounds the object and a solid overlay interior that displays over the object. You can customize both of these components independently to modify the highlight's visual appearance.
<img src="https://prod.docsiteassets.roblox.com/assets/ui/highlighting-objects/OutlineTransparency-1.jpg" alt="A tree mesh against a grey background." />Base object
<img src="https://prod.docsiteassets.roblox.com/assets/ui/highlighting-objects/Overview-Yellow-Outline.jpg" alt="The same tree mesh with a yellow outline and a black highlight interior." />Yellow outline and black interior
<img src="https://prod.docsiteassets.roblox.com/assets/ui/highlighting-objects/Overview-Yellow-Interior.jpg" alt="The same tree mesh with a black outline and a yellow highlight interior." />Black outline and yellow interior
Useful applications of the highlight effect include:
- Providing visual feedback that an object is important and/or interactable.
- Making distant objects visible through objects that are closer to the user.
- Indicating the current position and status of other characters.
Add highlights
As a performance limit, Studio only displays 255 simultaneous Highlight instances on the client-side at a time. If you add more than this limit, the additional Highlight instances are silently ignored.
Note also that highlights on low-end devices may be more pixelated but will otherwise look the same as on other devices with any combination of settings.
Parent to objects
To add a highlight effect to an object, you can parent a new Highlight directly to the object.
In the Explorer window, hover over either a
Modelor aBasePart, then click the ⊕ button. A contextual menu displays.From the menu, insert a Highlight. The highlight displays on the object with its default property values that create a white outline and a red tint overlay.

Set the adornee
Alternatively, you can place the Highlight instance outside of a child/parent relationship either within the workspace, StarterPlayer, StarterGui, StarterPack, or ReplicatedStorage, then set its Adornee property to the Model or BasePart that you want to highlight.
Customize highlights
You can change the properties of a Highlight instance to create interesting visual effects that properly highlight objects in theme with your game.
OutlineColor
The OutlineColor property sets the Color3 value of the highlight's outline.
<img src="https://prod.docsiteassets.roblox.com/assets/ui/highlighting-objects/OutlineColor-Red.jpg" alt="A tree mesh with red outline." />OutlineColor = [255, 100, 50]
<img src="https://prod.docsiteassets.roblox.com/assets/ui/highlighting-objects/OutlineColor-Green.jpg" alt="A tree mesh with green outline." />OutlineColor = [0, 255, 125]
<img src="https://prod.docsiteassets.roblox.com/assets/ui/highlighting-objects/OutlineColor-Blue.jpg" alt="A tree mesh with blue outline." />OutlineColor = [75, 150, 255]
OutlineTransparency
The OutlineTransparency property sets the visibility of the highlight's outline to any value between the default value of 0 (opaque) and 1 (invisible).
<img src="https://prod.docsiteassets.roblox.com/assets/ui/highlighting-objects/OutlineTransparency-0.jpg" alt="A tree mesh with black opaque outline."/>OutlineTransparency = 0
<img src="https://prod.docsiteassets.roblox.com/assets/ui/highlighting-objects/OutlineTransparency-1.jpg" alt="A tree mesh with transparent outline." />OutlineTransparency = 1
FillColor
The FillColor property sets the Color3 value of the highlight's interior.
<img src="https://prod.docsiteassets.roblox.com/assets/ui/highlighting-objects/FillColor-Red.jpg" alt="A tree mesh with a red fill." />FillColor = [255, 100, 50]
<img src="https://prod.docsiteassets.roblox.com/assets/ui/highlighting-objects/FillColor-Green.jpg" alt="A tree mesh with a red fill." />FillColor = [0, 255, 125]
<img src="https://prod.docsiteassets.roblox.com/assets/ui/highlighting-objects/FillColor-Blue.jpg" alt="A tree mesh with a blue fill." />FillColor = [75, 150, 255]
FillTransparency
The FillTransparency property sets the visibility of the highlight's interior to any value between the default value of 0 (opaque) and 1 (invisible). You can use this property to determine how much of the object's existing color you want viewers to see.
<img src="https://prod.docsiteassets.roblox.com/assets/ui/highlighting-objects/FillTransparency-0.jpg" alt="A tree mesh with an opaque black fill." />FillTransparency = 0
<img src="https://prod.docsiteassets.roblox.com/assets/ui/highlighting-objects/FillTransparency-Half.jpg" alt="A tree mesh with a semi-transparent black fill." />FillTransparency = 0.5
<img src="https://prod.docsiteassets.roblox.com/assets/ui/highlighting-objects/FillTransparency-1.jpg" alt="A tree mesh with a transparent black fill." />FillTransparency = 1
DepthMode
The DepthMode property controls how the effect displays with respect to other objects in the world.
AlwaysOnTop— Allows the highlight to display regardless if there are objects between the camera and the highlighted object. This means the viewer is always able to see the highlight regardless of what is between the highlighted object and the camera.Occluded— Hides the highlight if there are objects between the camera and the highlighted object. This means the viewer is only able to see the object if there are no obstructing objects between the highlighted object and the camera's view.
AlwaysOnTop
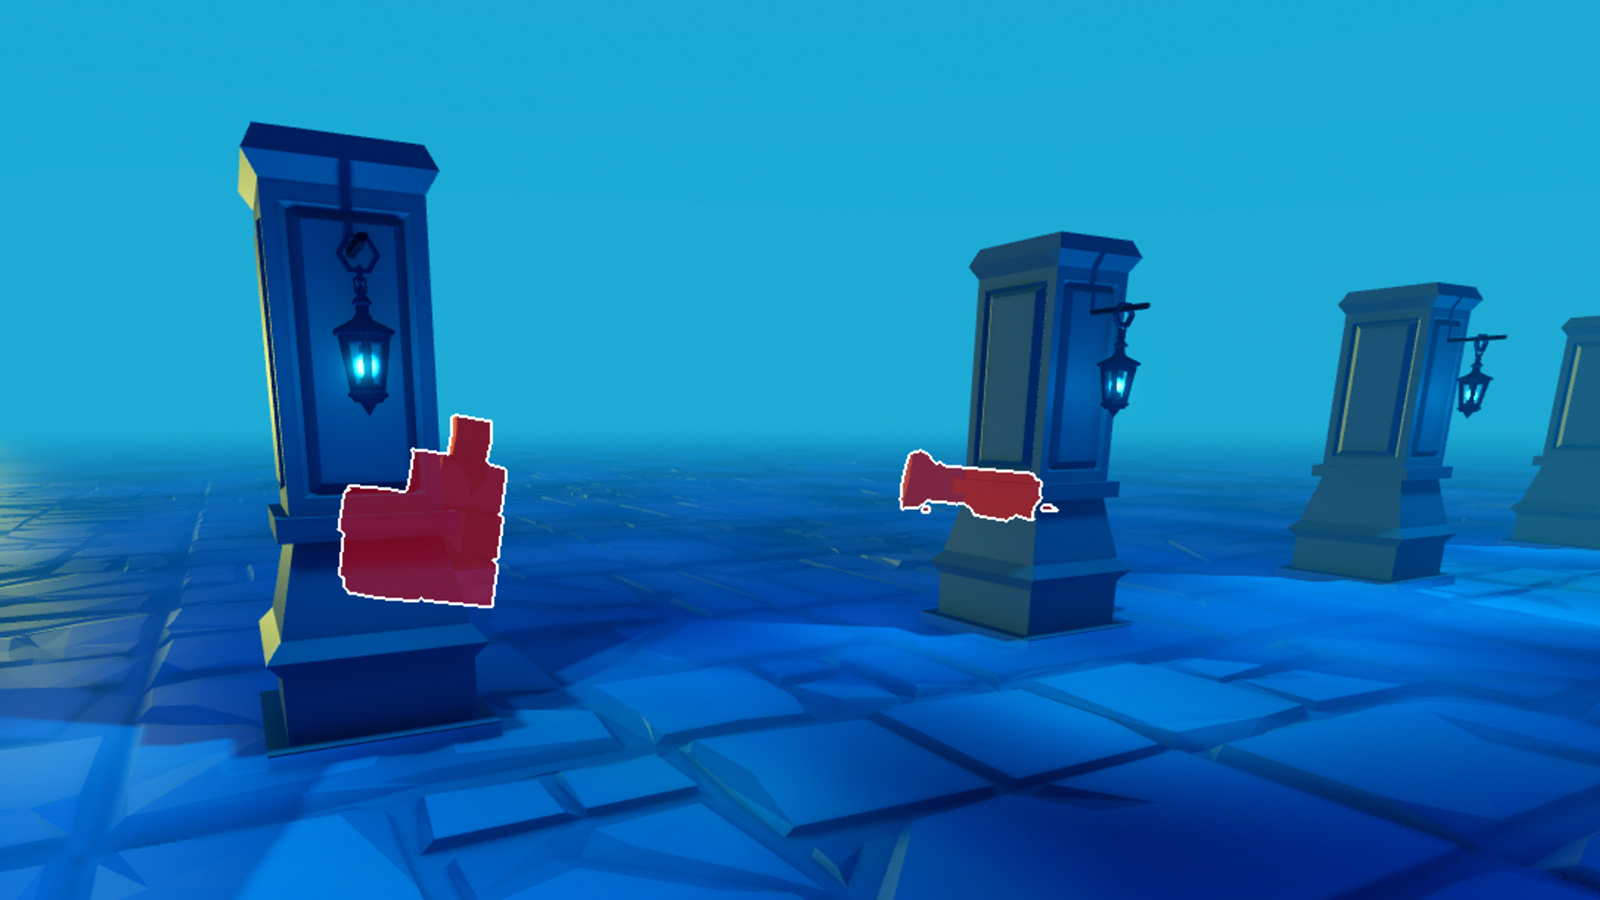
Occluded

Enabled
The Enabled property allows you to quickly enable or disable the highlight without any impact on performance.
Note
While a disabled Highlight doesn't display, it still takes one of the 255 available Highlight slots. If you plan to permanently disable a Highlight instance, it's best to delete the highlight rather than disable it.
Performance tips
While you have a lot of options to customize Highlight instances, the following tips are recommended to increase your game's performance on all devices:
Adding or removing a
Highlightcan cause a geometry rebuilding step that might lead to performance spikes and extra draw calls. If you want to change aHighlightinstance's appearance or temporarily hide/display it on an object, it's best to customize the properties of theHighlightinstance directly, as changing any property of theHighlightinstance is lightweight and doesn't impact performance.Roblox draws objects in a back to front order, which can cause problems if you embed objects with a child
Highlightinside other objects that also have childrenHighlightinstances. For this reason, it's best to keep objects withHighlightinstances outside of a parent/child relationship with other objects withHighlightinstances.The first
Highlightrendered on the screen incurs most of the performance cost (up to 1 millisecond of GPU time on mobile devices). For additional highlights beyond the first, you should not see a significant performance impact on any platform.On mobile devices, highlights are more costly on performance when they cover more of the screen. On other platforms, highlights have the same performance cost regardless of their screen coverage.
On all platforms, highlights that are not visible on the screen (whether disabled or fully transparent) incur no performance cost.