
Source: Roblox Creator Hub · CC BY 4.0 · View source · Code samples: MIT Imported 2026-10-03. Formatting adapted for this site.
Curve Editor
The Curve Editor is a curve-based animation editing interface within the Animation Editor that allows you to see and modify how a rig's position and orientation changes between keyframes through color‑coded curve graphs. It allows you to define independent tracks for the X, Y and Z angles, providing additional levels of control to make your animations more fluid and realistic.
Instead of using the default dope sheet editor's method of manually moving the scrubber from one frame to another to see how a rig's position and orientation change over time, the Curve Editor lets you quickly reference position and orientation values of your selected tracks through the position ruler on the left side of the timeline and the rotation ruler on the right side of the timeline.
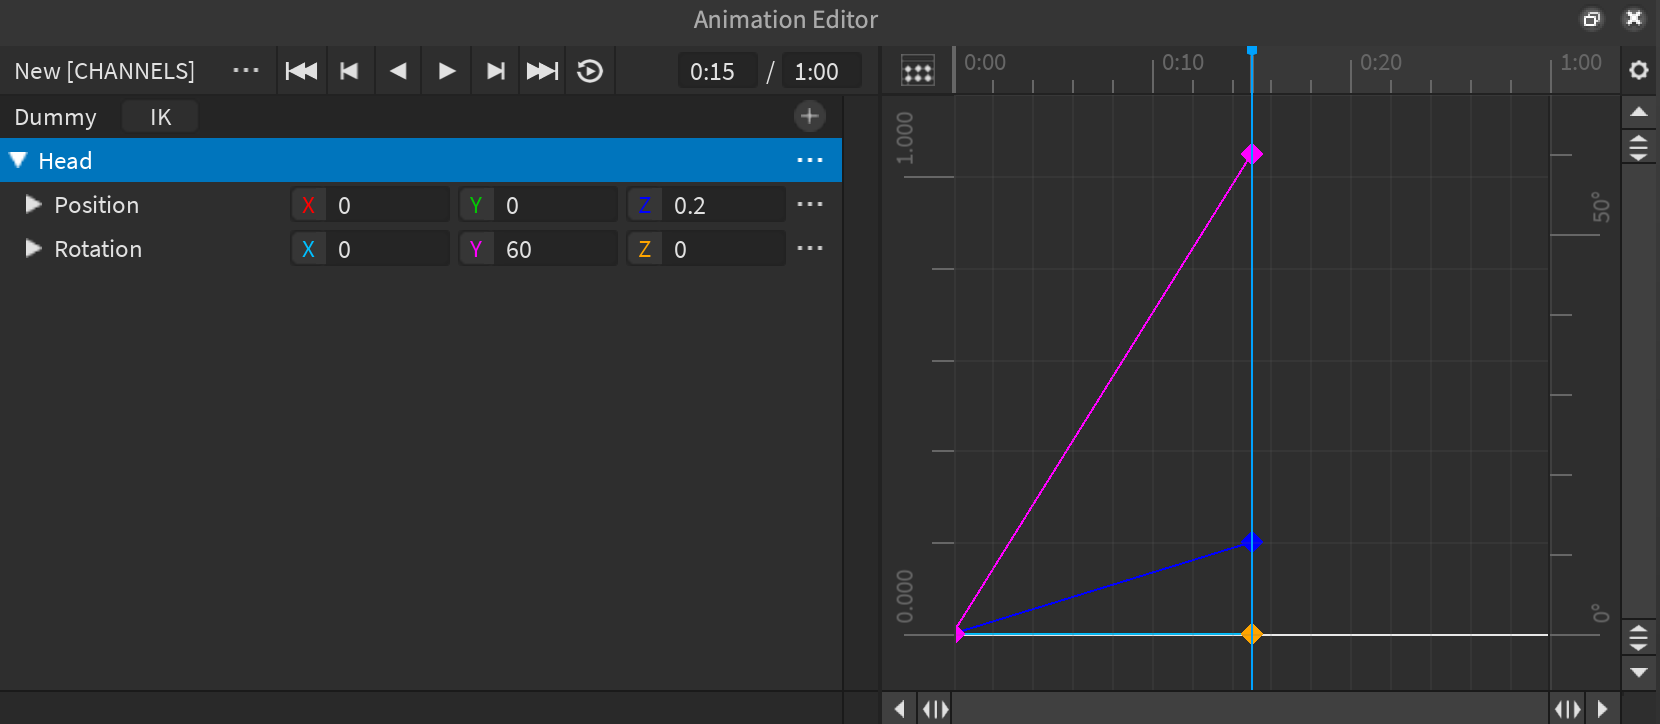
Open the Curve Editor
You can switch the editor's timeline between the dope sheet editor and the Curve Editor at any time.
Open the Animation Editor from Studio's Avatar tab or the Window ⟩ Avatar menu.

Studio automatically converts quaternions to Euler angles when you open the Curve Editor, so it's important that you verify your rotation type before you switch to the Curve Editor. Once you convert quaternions to Euler angle tracks, it's impossible to convert them back into quaternions.
In the top-right corner of the editor window, click the settings icon. A contextual menu displays.

Hover over Default Rotation Type, then select either Euler Angles or Quaternions. Your rotation type sets to your choice and becomes the default rotation type for future projects.
In the top-left corner of the timeline, click the Curve Editor icon. A popup window displays to confirm that your
KeyframeSequenceclip will convert to aCurveAnimationclip.
Note
	If you kept the default rotation type of Euler angles, Studio automatically converts any pre-existing quaternions to Euler angles following the [Euler angles order](#euler-angles-order) setting. Because [`KeyframeSequences`](/docs/keyframesequence) work with quaternions and curve animations work with Euler angles by default, your animation might appear slightly different between keyframes, especially if any of your Euler angles approach [Gimbal lock](https://en.wikipedia.org/wiki/Gimbal_lock).

	If you set the rotation type to quaternions, the conversion to curves preserves the quaternions and the animation remains the same.
Interpolation
Interpolation is Studio's process of "filling in" position and orientation values between your keyframes. This allows the rig to seamlessly animate from one orientation or position to another instead of disjointedly jumping between keyframes. While Euler angle curves interpolate between the values of each keyframe, quaternion curves interpolate from 0 to 1 over a set time. To illustrate this, the following images display the same KeyframeSequence after you open the Curve Editor with either a Euler angle or a quaternion rotation type:
<img src="https://prod.docsiteassets.roblox.com/assets/animation/curve-editor/Euler-Angle-Curve.png" width="400" />Euler Angle Curve
<img src="https://prod.docsiteassets.roblox.com/assets/animation/curve-editor/Quaternion-Curve-Interpolation.png" width="400" />Quaternion Curve
For Euler angle curves, the height of each keyframe represents its orientation value over time. For quaternion curves, each segment represents orientation changing between keyframes, and the line displays the interpolation between them.
You can modify how the Curve Editor handles interpolation for both Euler angle curves and quaternion curves by setting tangents, changing the interpolation mode, or by generating interpolation curves between two or more keyframes.
Tangents
The Curve Editor provides tangents, or handles, that let you quickly adjust the interpolation either before or after a keyframe. Euler angle curves have a tangent both before and after the keyframe while quaternion curves have one tangent at the beginning and another at the end of a segment. The initial tangent controls the interpolation after the keyframe and the secondary tangent controls the interpolation before the keyframe. For example:
<img src="https://prod.docsiteassets.roblox.com/assets/animation/curve-editor/Euler-Angle-Curve-Tangents.png" width="400" />Euler Angle Curve Tangents
<img src="https://prod.docsiteassets.roblox.com/assets/animation/curve-editor/Quaternion-Curve-Tangents.png" width="400" />Quaternion Curve Tangents
Note
For quaternion curve tangents, no matter how much you adjust each tangent, each segment always begins at 0 and ends at 1. Although each segment of a quaternion curve graph is disconnected from subsequent segments, the two keyframes within the same frame always represent the same orientation.
Tangents change appearance when you set them to a new position; an unset tangent displays as a clear circle, and a set tangent displays as a white circle. Studio automatically calculates the position for unset tangents based on the position of any set tangents. For instance, if you only set one tangent and leave the other unset, the unset tangent aligns with its opposite tangent.
Set
To set a tangent:
- Click and drag the tangent in the direction you want to pull the curve. The curve adjusts based on the location of your cursor.
- Release the tangent. The interpolation between keyframes adjusts accordingly.
If you set one tangent and want to align the unset tangent horizontally, right-click the unset tangent and select Set Tangent to Zero from the contextual menu.
Reset
If you ever set a tangent to a new position and the resulting interpolation is undesirable, you can always use "auto‑tangent mode" to clear a tangent's value and reset it back to its default interpolation behavior.
- Right-click on a tangent. A contextual menu displays.
- Select Set Tangent To Zero. The tangent resets to its default interpolation behavior.
Interpolation mode
Interpolation mode is the rate at which an animation moves between different keyframe positions within the animation. There are three interpolation modes available for curve animations:
- Linear (default) — Moves at a constant speed from one keyframe to another.
- Constant — Removes interpolation between the selected keyframe and next keyframe, causing the animation to "snap" from keyframe to keyframe.
- Cubic — Eases in and/or out of the animation. Cubic is the only mode that allows you to define tangents.
To change interpolation mode:
- Right-click a keyframe. A contextual menu displays.
- Hover over Interpolation Mode, then select either Linear, Constant, or Cubic. The interpolation mode changes the curve following the keyframe.
Generate interpolation curves
For curve animations, bounce and elastic easing styles are not available as standard interpolations like they are for KeyframeSequences. However, when you convert a KeyframeSequence to a curve animation, Studio automatically adds additional keyframes to your animation to keep the animation intact, and you can select two or more keyframes and generate an interpolation curve that removes and replaces any of their intermediate keyframes to mimic bounce and elastic easing behavior.
To generate interpolation curves:
Select two or more keyframes. Each keyframe you select highlights.
Right-click one of these keyframes. A contextual menu displays.
Hover over Generate Curve, then over Bounce or Elastic, and then select either In, Out, or InOut. An interpolation curve between your selected keyframes generates according to your settings.
- In — The motion is slower at the beginning and faster toward the end of the keyframe range.
- Out — The motion is faster at the beginning and slower toward the end of the keyframe range.
- InOut — In and Out on the same tween, with In at the beginning and Out taking effect halfway through the keyframe range.
Euler angles order
When you're working with Euler angles, Studio represents the X, Y, and Z axes through three channel values that follow a specific order to move your rig from its starting orientation to its next orientation. Each order is named after the matrix multiplications to get to the final orientation. For example, an XYZ order (X×Y×Z) means that the rig moves starting on the Z axis, then the Y axis, then the X axis.
How an animation changes when you set Euler angles order is dependent on when you change the order:
- If you load a
KeyframeSequenceor aCurveAnimationwith a set quaternion rotation type then change the order, the new order doesn't affect the animation. This is because Studio uses quaternions to configure changes in your rig's orientation using the shortest path possible between its starting orientation to its next orientation. However, this method does affect how the quaternions of each keyframe transform into X, Y, and Z angles in the track list, which might visually affect the values within the timeline without affecting the animation itself. - If you change the order of an existing Euler angle track, the animation might change since Studio preserves the values of each keyframe. This means that the ordered path Studio takes to change your rig's orientation from its starting orientation to its next orientation changes with the Euler angles order.
To set the Euler angles order:
In the top-right corner of the editor window, click the settings icon. A contextual menu displays.
Hover over Default Euler's Angles Order, then select either XYZ, XZY, YXZ, YZX, ZXY, or ZYX. Your Euler angles order changes accordingly.