
Source: Roblox Creator Hub · CC BY 4.0 · View source · Code samples: MIT Imported 2026-10-03. Formatting adapted for this site.
Blender
Blender is a free, open-source 3D creation suite with a broad range of modeling, sculpting, texturing, and animation tools. Running on Linux, macOS, and Windows systems, this cross-platform application is a popular choice for creators who want to make avatars, accessories, and 3D objects for Roblox games.
While this is by no means an exhaustive list, the following guide offers high-level information on essential Blender tools and features for 3D creation, as well as best practice guidance on designing 3D art between Blender and Studio.
Note
To download the latest version of Blender, visit Blender.org.
File setup
Before you begin creating 3D art on Blender for the Roblox platform, it's important to configure both Blender and Studio settings so that your 3D objects maintain the same position, orientation, and scale as you iterate and move them between the two applications.
Configure units
By default, Blender and Studio use different primary units to measure length: Blender defaults to the metric scale, and Studio defaults to studs. To ensure that your 3D objects retain the same measurements when you move or scale them in either application, you must configure Blender's units to be consistent with studs.
To set Blender units to be compatible with Roblox's stud units:
Navigate to the Properties editor, then in the left-hand navigation, select the Scene tab.

Click the Units dropdown menu to expand the container, then:
- Set Unit System to None.
- Set Rotation to Degrees.
Import settings
3D software and applications use coordinate systems to represent the position and orientation of objects in the 3D space. These coordinate systems typically consist of three axes:
- One axis represents horizontal position (left and right movement).
- One axis represents vertical position (up and down movement).
- One axis represents depth (forward and backward movement).
Blender and Studio use different coordinate systems, specifically for the axis that represents the "up" direction. Like other modeling software, Blender uses the Z axis because 3D objects move up out of the 2D plane to become a 3D object; conversely, like other engines, Studio uses the Y axis because characters move on the ground plane and jump up for vertical movement.
This difference is important to keep in mind as you import your 3D art into Blender or Studio because you must make adjustments to the import settings to ensure your object maintains the correct orientation in either application.
<img src="https://prod.docsiteassets.roblox.com/assets/art/3p-software/blender/NavigationGizmo.jpg" width = "35%" />Blender's Navigation Gizmo
<img src="https://prod.docsiteassets.roblox.com/assets/art/3p-software/blender/ViewSelector.jpg" width = "35%" />Studio's View Selector
Studio to Blender
To set Blender import settings for 3D objects from Studio:
In the top left-hand corner, click the hamburger menu. A popup menu displays.
Navigate to File > Import > Wavefront (.obj), FBX (.fbx), or glTF 2.0 (.glb/.gltf). The Blender File View window displays.
Select one or multiple
.obj,.fbx, or.gltffiles that you want to import.In the right-hand panel, navigate to the General section:
- Set Scale to 1 to keep the same scale from Studio.
- Set Forward Axis to Z to keep the same "forward" axis as Studio.
- Set Up Axis to Y to keep the same "up" axis as Studio.

In the bottom right-hand corner, click the Import button.
Blender to Studio
To set Studio import settings for 3D objects from Blender:
Navigate to File > Import. Your local file browser displays.
Select and then confirm the 3D object's
.obj,.fbx, or.gltffile(s) you want to import from your local system. The Importer's Import Preview window displays.In the right-hand panel, navigate to the File General section, then:
- Enable Import Only as a Model if you have multiple objects that you want to group into a
Modelobject. - Enable Upload to Roblox if you want to create an asset with an asset ID that you can reference across projects.
- Set Creator to Me if you are the only one who needs to access the object, or to the group that owns the project you're working on. This latter setting ensures all eligible group members have permission to use the 3D object within the project.
- Enable Insert Using Scene Position so that the object retains the position you set in Blender.

- Enable Import Only as a Model if you have multiple objects that you want to group into a
Navigate to the File Transform section, then set the following settings so that the object retains the same orientation from Blender:
- Set World Forward to Front to keep the same "forward" axis as Blender.
- Set World Up to Top to keep the same "up" axis as Blender.
Navigate to the File Geometry section, then set Scale Unit to Stud to keep the same scale from Blender.
At the bottom of the window, click the Import button. Your 3D object imports with the same scale and orientation from Blender.
Export settings
Similar to the previous file setup section, it's important to consider Blender and Studio's different coordinate systems when you are ready to export your 3D art from Blender. By taking a little extra time in configuring your export settings, you can ensure your 3D objects maintain the correct orientation, scale, and position when you import them into Studio.
Note
Avatar items, or other assets using specialized components, require unique export settings. See the following links for additional information:
- For rigid accessories, see [accessory specifications](/docs/roblox-avatar-rigid-accessories-specifications) and [accessory export settings](/docs/roblox-avatar-rigid-accessories-export).
- For layered accessories, see [layered accessory specifications](/docs/roblox-avatar-layered-accessories) and [layered export settings](/docs/roblox-avatar-layered-accessories-export).
- For avatar characters, see [avatar specifications](/docs/roblox-avatar-character-bodies-specifications) and [avatar export settings](/docs/roblox-avatar-character-bodies-export).
To set Blender settings for exporting 3D objects for Studio:
In the top left-hand corner, click the hamburger menu. A popup menu displays.
Navigate to File > Export > Wavefront (.obj), FBX (.fbx), or glTF 2.0 (.glb/.gltf). The Blender File View window displays.
In the right-hand panel, navigate to the Include section, then enable Limit to Selected Objects to only export your selected objects.

In the Transform section
- If exporting
.fbx, set Apply Scalings to FBX Unit Scale so that your object(s) keep the same scale in Studio. For more scaling information, see Adjust scale. - Set Forward to Z Forward to keep the same "forward" axis as Blender.
- Set Up to Y Up to keep the same "up" axis as Blender.
- If exporting
In the bottom right-hand corner, click the Export button. Your 3D object is now ready to import into Studio.
Adjust scale (FBX)
The FBX (.fbx) file format is widely used in 3D workflows due to its broad support across modeling tools and engines. However, when exporting from Blender using its default .fbx settings, models often import at an unexpectedly large scale in Roblox Studio.
Note
Roblox Studio also supports GLTF (.gltf) formats which do not require these additional scaling configurations.
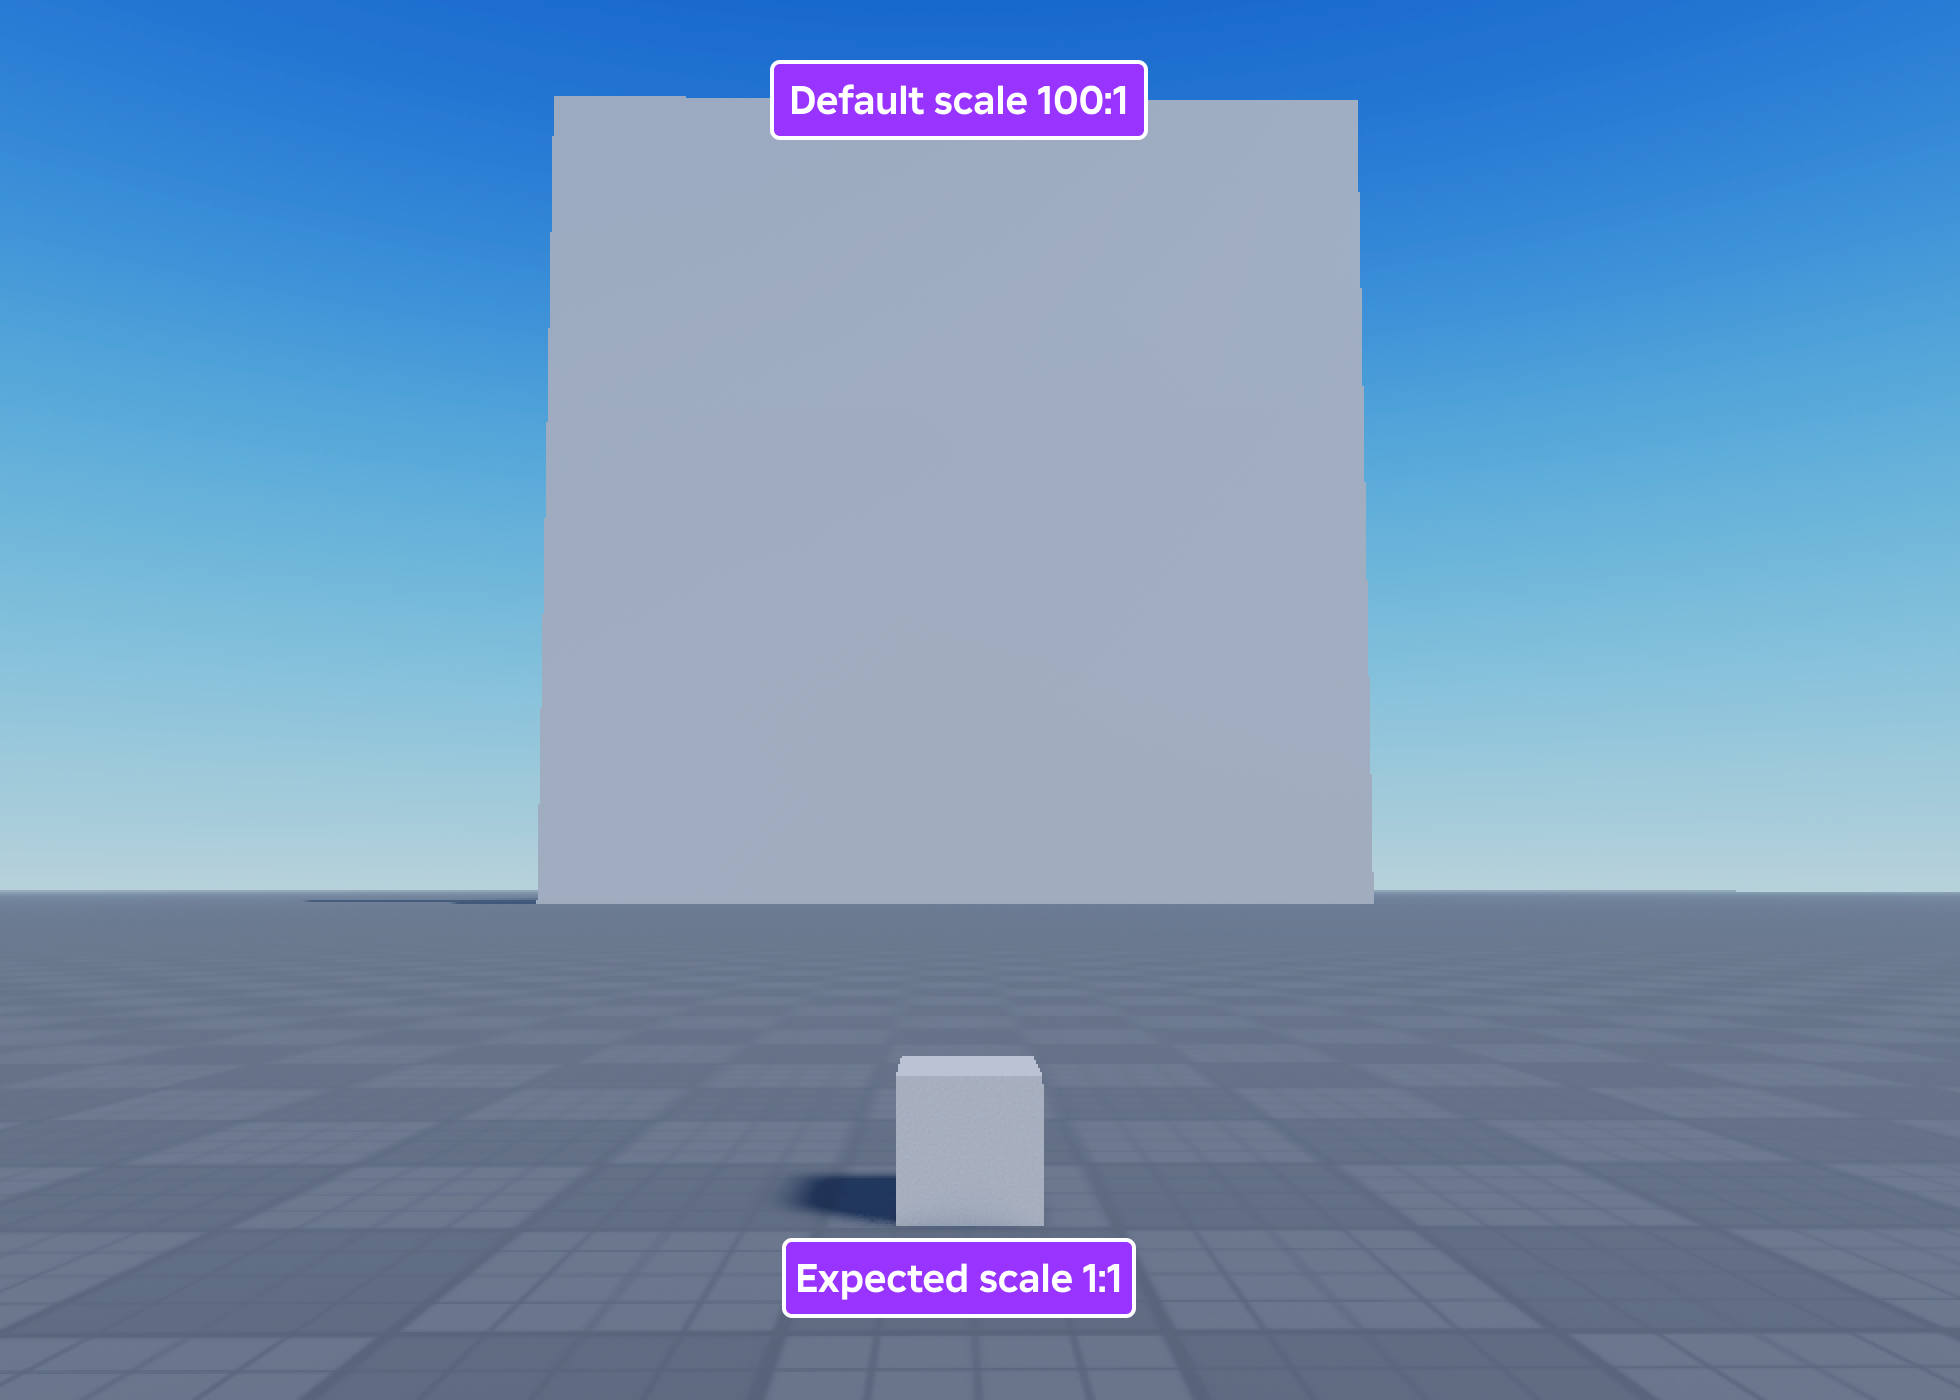
If you rely on .fbx in your workflow, proper export settings or project settings are essential to ensure that your models appear at the correct size and maintain their intended proportions across platforms.
There are many ways to configure your model so your .fbx model scales as expected in Studio. See the following popular settings to manage scaling:
| Blender setting | UI | Description |
|---|---|---|
| During export, set **Transform** > **Apply Scaling** to **FBX Unit Scale**. |  | Models exported with this setting import into Studio or back into Blender at the same scale. Make sure all other scaling values in project or export settings are set to default (`1.0`). This is the recommended way to export `.fbx` files at the same scale. |
| During export, set **Transform** > **Scale** to **.01**. | 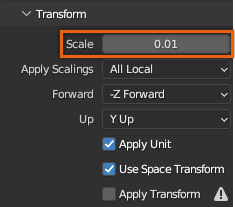 | This scales down your export so that the model imports into Studio at the expected scale. If you intend on importing this model back in Blender or any non-Studio tool, you might need to scale up the model on import, otherwise the model will import unexpectedly small. |
| In the **Scene Properties** panel, set **Units** > **Unit Scale** to .**01**. |  | This scales down your entire scene so that the model imports into Studio at the expected scale. If you adjusted your scene units, you can export models using default settings into Studio. Working on models at `.01` scale can cause unexpected Blender issues, such as camera difficulties, issues with modifiers, or other complications. If you intend on importing this model back in Blender, you might need to scale up the model on import, otherwise the model will import unexpectedly small. |
Note
Note on existing resources
Many reference files, demo projects, and downloadable assets may use older or inconsistent scale settings. Likewise, tutorials and guides might recommend different approaches for handling scale between Blender and Studio.
Always test and validate any external resources to ensure they work correctly with your current export workflow.
Fundamentals
Before you take a look at all of the common modeling, sculpting, and texturing tools for making 3D art for Studio, let's review Blender's fundamental interface elements that are important for navigating through the application and finding the appropriate menus and controls for your specific 3D creation task.
Workspaces
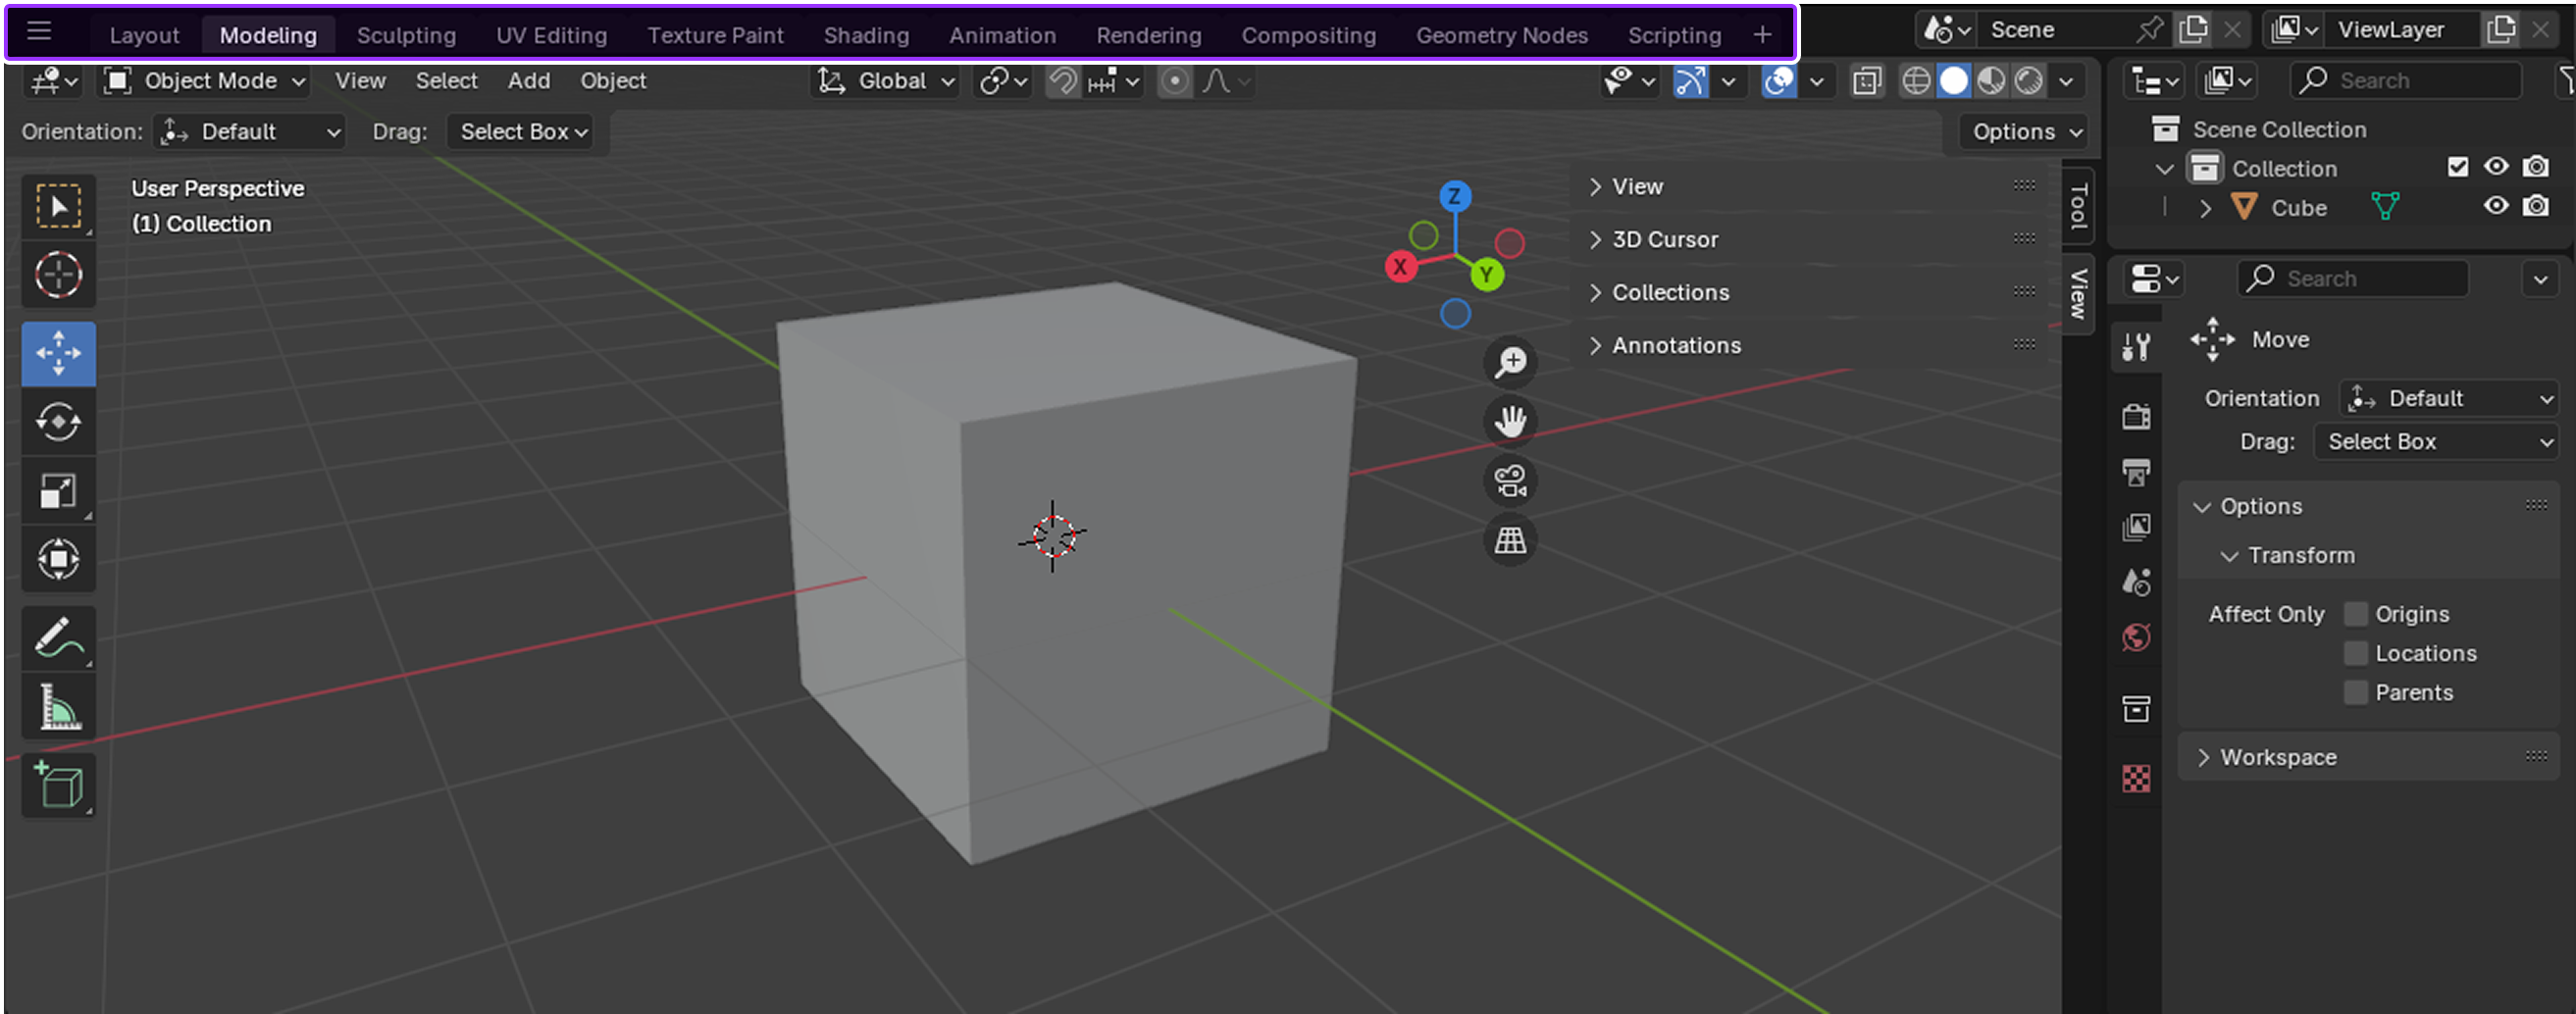
Workspaces are preset window layouts with specialized UI configurations and tooling for different 3D creation work like modeling, sculpting, or texturing. You can use these workspace configurations as-is, or you can customize them to work for you as you quickly swap between different tasks.
Note
For information on additional workspaces, see Blender's official Workspaces documentation.
There are many default workspaces, but the following are the most common for creating 3D art for the Roblox platform.
Layout

The Layout workspace is the default workspace when you load a Blender file, and it provides basic tools for previewing and transforming your 3D objects, such as the Move, Scale, and Rotate tools. The default layout of this workspace includes the following UI for easy access as you set up your 3D art:
- 3D Viewport - Displays the entire scene.
- Outliner - Displays all objects in the scene, comparable to Studio's Explorer window.
- Properties Editor - Displays editable data for the active object, comparable to Studio's Properties window.
- Timeline Editor - Displays all animation keyframes, comparable to the Animation Editor timeline.
Modeling

The Modeling workspace is very similar to the Layout workspace, but it offers more space for the 3D viewport so that you can focus on modifying the geometry of your 3D objects. If you swap between the Modeling and Layout workspaces, you can see the Properties Editor expand, the Outliner shrink in size, and the Timeline Editor disappear altogether.
The default layout of this workspace includes the following UI for modeling your 3D art:
- 3D Viewport - Displays the entire scene.
- Outliner - Displays all objects in the scene, comparable to Studio's Explorer window.
- Properties Editor - Displays editable data for the active object, comparable to Studio's Properties window.
The most common Roblox creator use case for this workspace is to create the geometrical shape of the 3D art before texturing or animating the geometry.
Sculpting

The Sculpting workspace provides sculpting tools for modifying meshes with over 20 unique brush types, such as Clay, Inflate, Smooth, and Flatten. Like other common sculpting software, this workspace also provides tooling to mask specific geometry so you can focus on sculpting specific areas without affecting the rest of the mesh.
The default layout of this workspace includes the following UI for sculpting your 3D art:
- 3D Viewport - Displays the entire scene.
- Outliner - Displays all objects in the scene, comparable to Studio's Explorer window.
- Properties Editor - Displays editable data for the active object, comparable to Studio's Properties window.
The most common Roblox creator use case for this workspace is to create organic 3D art like humans, animals, and plants.
UV Editing

The UV Editing workspace provides tools for UV mapping texture coordinates to 3D surfaces. The most striking visual change in this workspace is the addition of the UV Editor to allow you to view both your texture and your object on the same screen as you unwrap and adjust UVs.
The default layout of this workspace includes the following UI for UV mapping your 3D art:
- UV Editor - Displays the image texture that you're mapping onto your 3D object.
- 3D Viewport - Displays the entire scene.
- Outliner - Displays all objects in the scene, comparable to Studio's Explorer window.
- Properties Editor - Displays editable data for the active object, comparable to Studio's Properties window.
The most common Roblox creator use case for this workspace is to create and use trim sheets that you can apply to multiple 3D objects at once. This allows you to add significantly more visual complexity to your games without having to import additional textures, saving you a negative impact on memory. For more information on this process, see Develop polished assets - Trim sheets in the Environmental art curriculum.
Note
For more information on UV unwrapping, see Blender's official Unwrapping Introduction documentation.
Texture Paint

The Texture Paint workspace provides tools for coloring image textures onto geometry. Similar to the UV Editing workspace, the most striking visual change in this workspace is the addition of the Image Editor in Paint mode to allow you to view both your texture and your object on the same screen as you paint.
The default layout of this workspace includes the following UI for texture painting your 3D art:
- Image Editor - Displays tools to create, view, and edit images that you can apply to the active object.
- 3D Viewport - Displays the entire scene.
- Outliner - Displays all objects in the scene, comparable to Studio's Explorer window.
- Properties Editor - Displays editable data for the active object, comparable to Studio's Properties window.
The most common Roblox creator use case for this workspace is to create a unique texture for characters, accessories, or important 3D objects that players regualarly interact with in games.
Note
For more information on texture painting, see Blender's official Texture Paint Introduction documentation.
3D Viewport
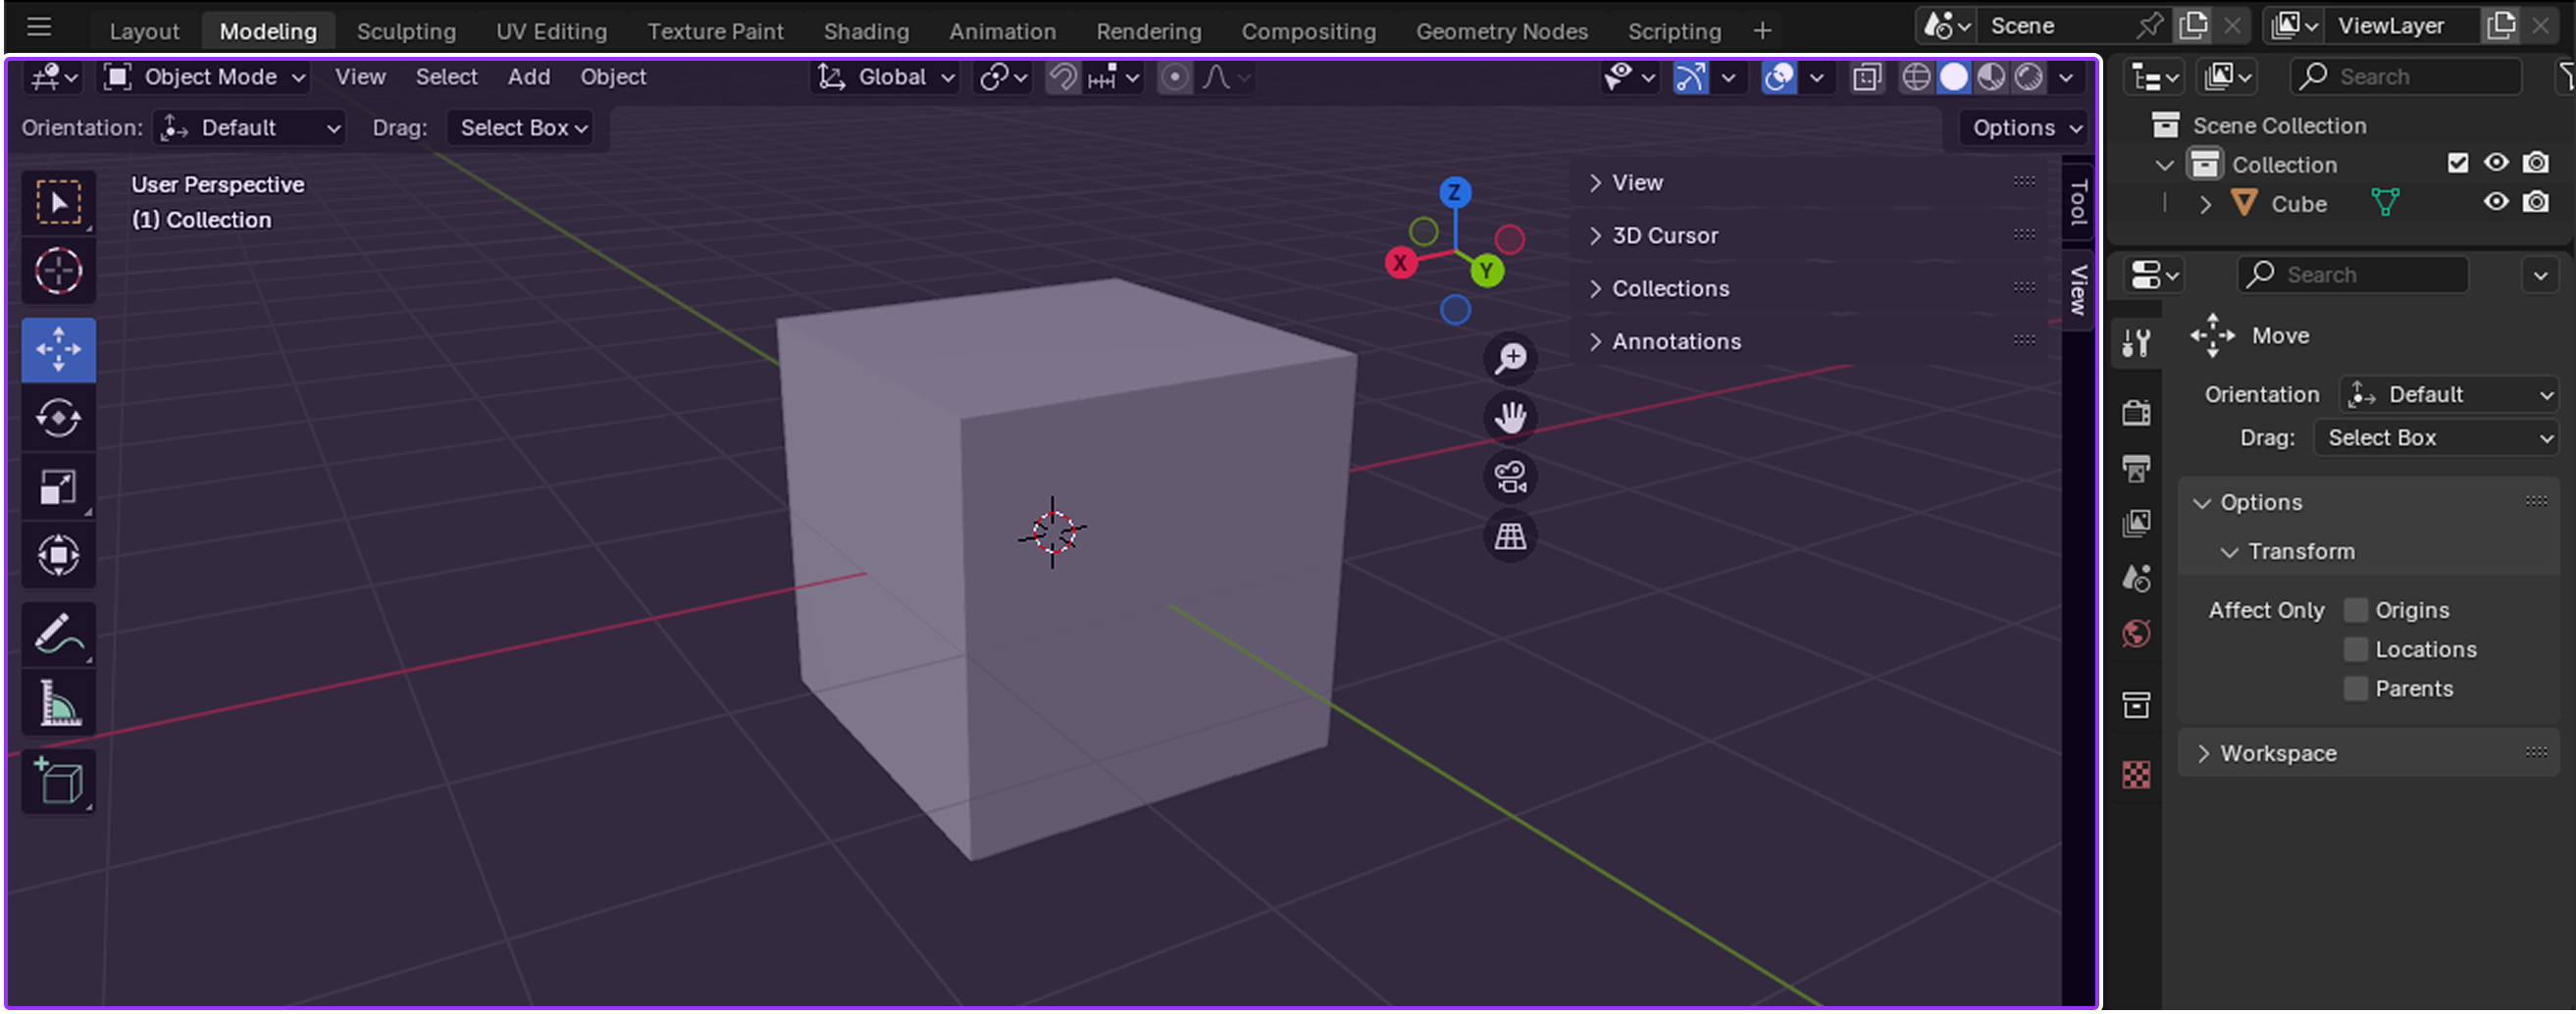
Comparable to Studio's viewport, the 3D Viewport lets you view and interact with your 3D objects as they exist in the 3D space. You can navigate through the scene, transform objects with your mouse, and see your changes in real time as you design your 3D art.
Note
For more information, see Blender's official 3D Viewport documentation.
Modes
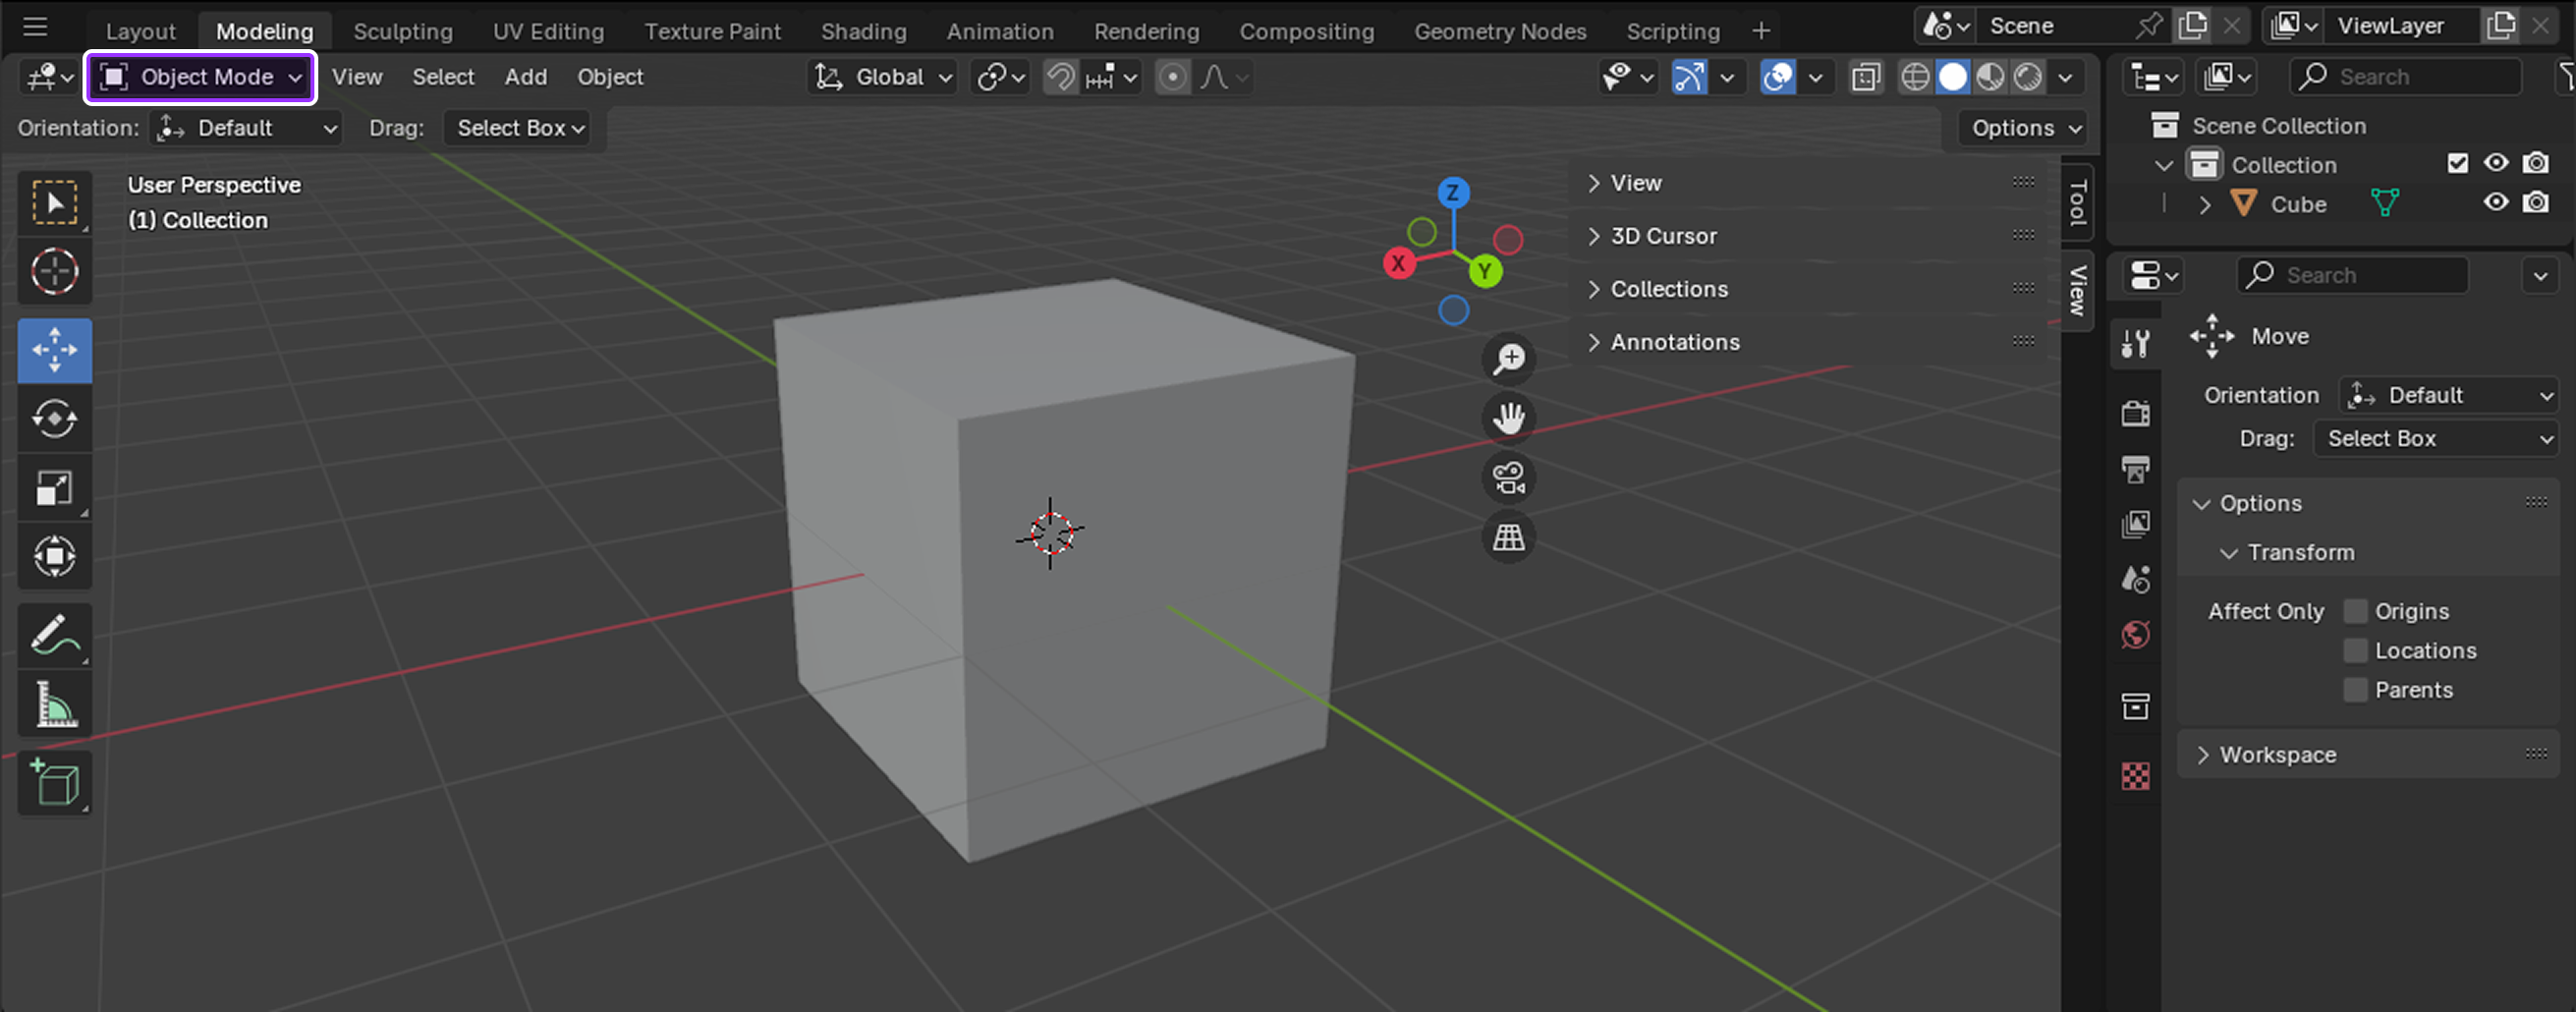
Modes offer additional tooling for editing 3D objects in the 3D Viewport. When you select a new mode from the Modes selector:
- The Header displays new menu options.
- The Toolbar displays a new set of tools.
- Editors and their buttons and panels enable or disable appropriately.
Depending on which mode is active, your cursor can change into a brush, such as in paint or sculpt modes, and the 3D Viewport can change how it displays objects for that particular task, such as darkening an object so you can more easily see your paint strokes. As you learn Blender, it's useful to experiment with different modes to see what tools are available for your particular 3D creation task.
Note
For more information on modes, see Blender's official Object Modes documentation.
Object
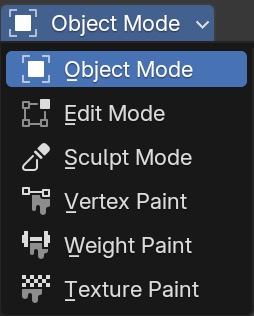
Object mode is the default mode, and it provides tooling that's available for all object types, such as positioning vertices, edges, and faces, rotating and scaling objects, and measuring distance and angles. This mode is useful for high-level object transformations.
Edit

Edit mode provides tooling for editing an object's shape. This mode is useful for more detailed object transformations, such as insetting faces, extruding regions, creating loop cuts, and beveling.
Sculpt

Sculpt mode provides tooling for editing a mesh's shape. This mode is useful for creating more organic 3D art, such as humans, animals, and plants.
Vertex Paint

Vertex Paint mode provides tooling to set a mesh's vertices to specific colors. This mode is useful for when you want to paint the object itself instead of applying a texture onto the geometry.
Weight Paint

Weight Paint mode provides tooling for vertex group weight painting. This mode is useful when you're creating avatars because it allows you to specify which parts of their body are influenced by parts of their armature.
Texture Paint

Texture Paint mode provides tooling to paint a texture directly on a 3D object. This mode is useful for when you want to apply a texture onto the geometry instead of painting the object's vertices.
Toolbar
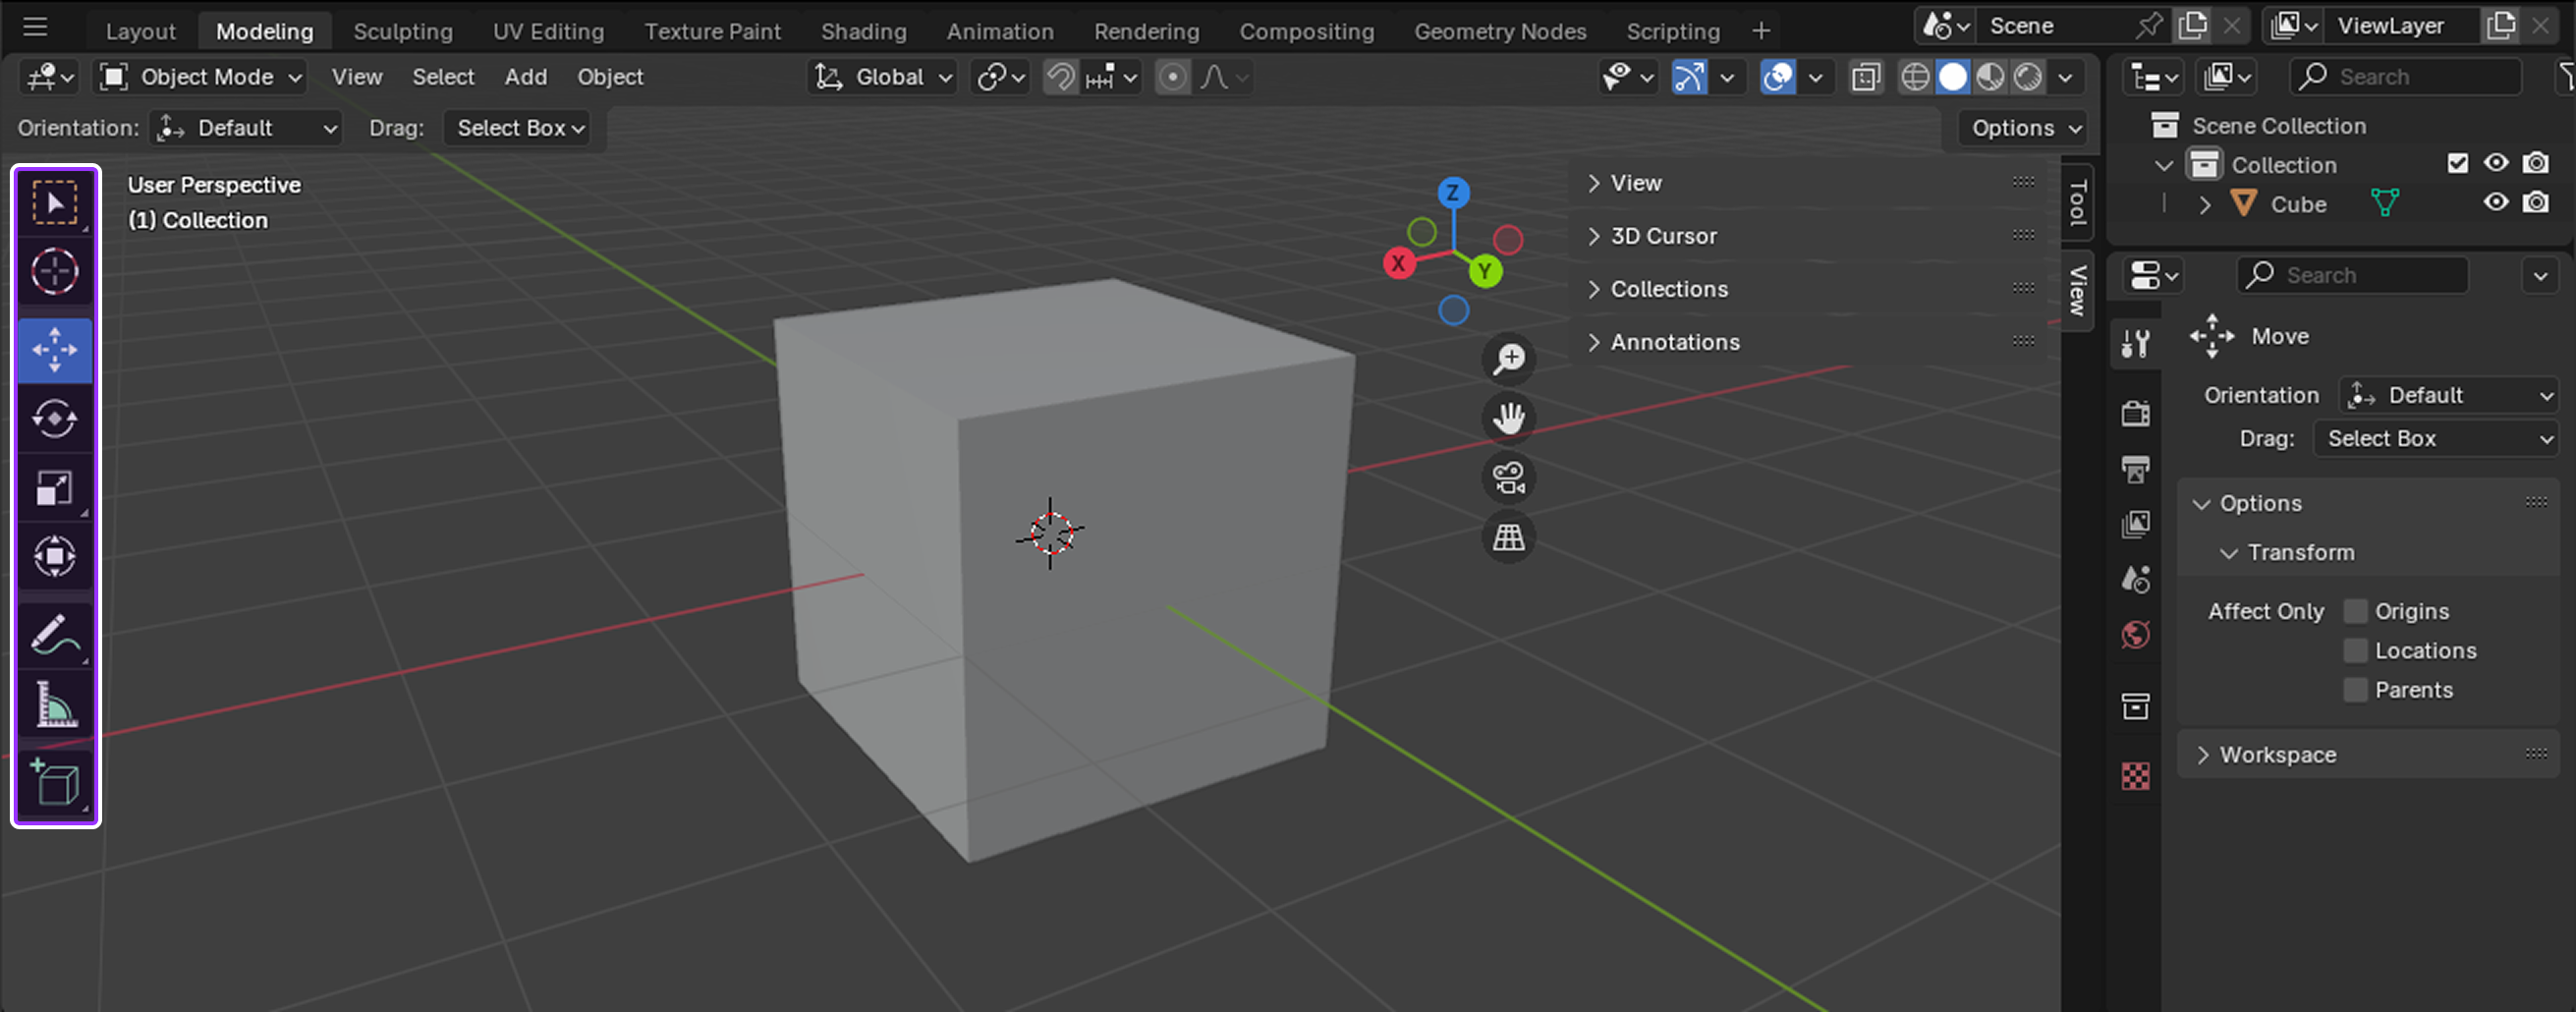
The Toolbar is a vertical menu of tools on the left-hand side of the 3D Viewport. Each time you switch modes, the Toolbar responds by displaying a new unique set of tools for that particular mode.
Note
For more information on the Toolbar, see Blender's official Toolbar documentation.
3D Cursor
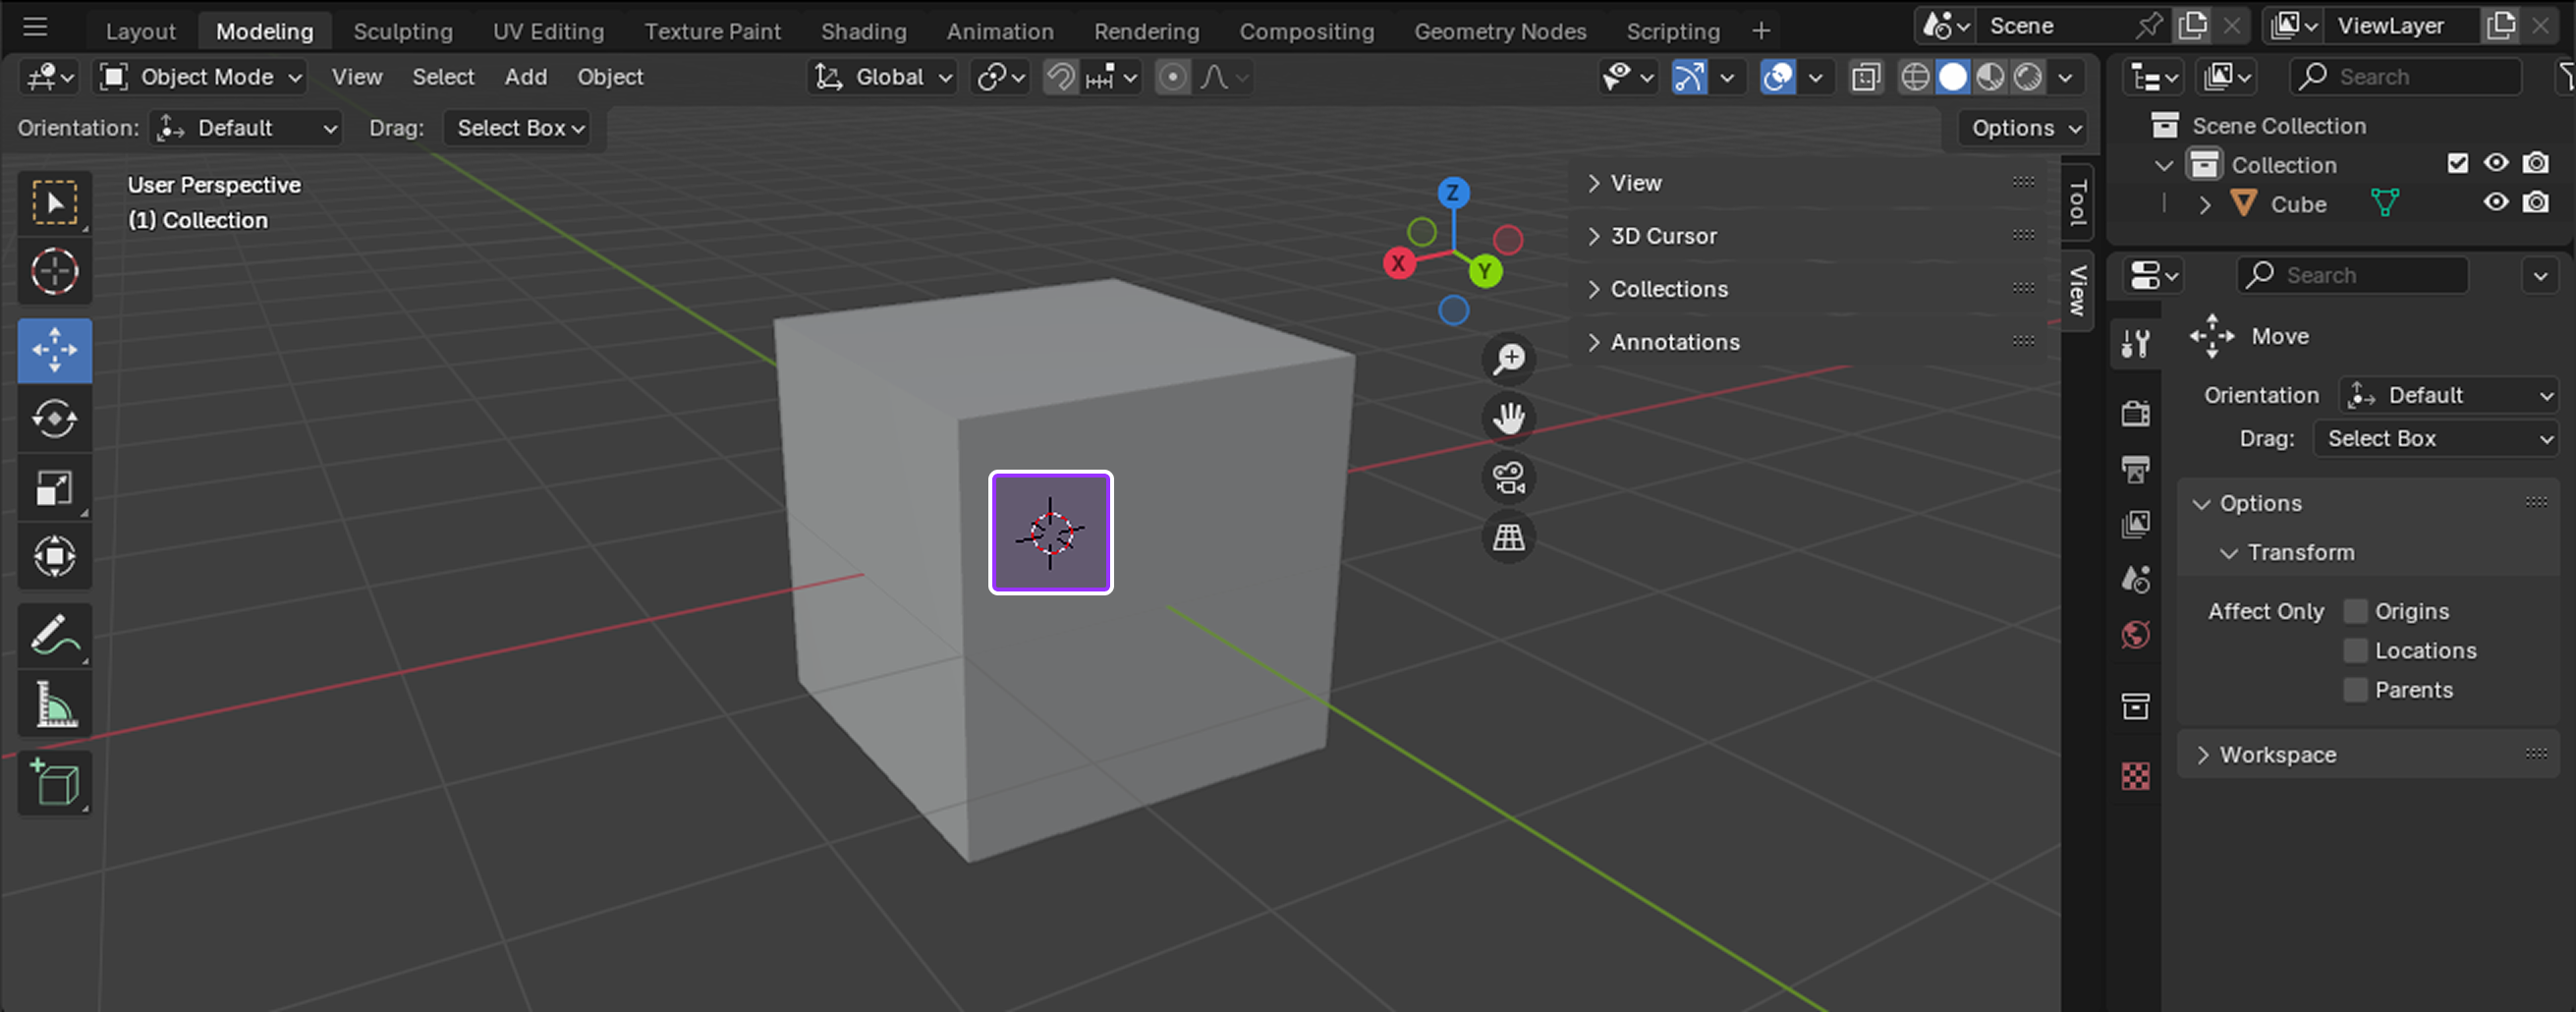
The 3D Cursor is a movable reference point in the 3D space that has both location and rotation data. While this tool has many different uses, the most common are using its position and orientation to:
- Create precise transformations.
- Place new objects into the scene.
- Move objects or their vertices to new points in the 3D space.
- Reposition pivot point locations.
Note
For more information on the 3D Cursor, see Blender's official 3D Cursor documentation.
Modeling tools
Now that you know how to navigate the user interface and change tools according to your specific 3D creation task, let's take a closer look at the most common modeling tools that allow you to change the shape of 3D objects by either impacting the entire mesh or one of the three basic elements of meshes:
- Vertex - A single point on the mesh.
- Edge - A line that connects two vertices.
- Face - A surface area between three or more vertices.
Each of the following sections details how you can use each tool for objects and/or mesh elements, the hotkeys you can use to activate the tool, and their most common use cases for creating 3D art for the Roblox platform.
<img src="https://prod.docsiteassets.roblox.com/assets/art/3p-software/blender/Vertex.png" alt="A single active vertex on a cube mesh." />Vertex
<img src="https://prod.docsiteassets.roblox.com/assets/art/3p-software/blender/Edge.png"alt="A single active edge on a cube mesh."/>Edge
<img src="https://prod.docsiteassets.roblox.com/assets/art/3p-software/blender/Face.png" alt="A single active face on a cube mesh." />Face
Note
For more information on any of these mesh elements, see Blender's official Mesh Structure documentation.
Grab
The Grab tool lets you move objects, vertices, edges, and faces from the 3D space, and it's one of the most essential tools for positioning objects or mesh elements in a scene. Many Roblox creators use this tool for editing purposes, such as positioning vertices, edges, and faces to a particular stud unit in the 3D space.
To use the Grab tool:
- In either Object or Edit mode, select one or multiple objects, vertices, edges, or faces.
- Press G to activate the tool.
- Move the mouse to reposition your selection. For further precision:
- Press X, Y, or Z after you press G to constrain movement to the X, Y, or Z axis, respectively.
- Double-press an axis key to slide vertices or edges along their natural path.
- Hold Shift while moving your mouse to slow down movement for fine adjustments.
- Left-click or press Enter to confirm the new position.
Note
For more information on this tool, see Blender's official Move documentation.
Snap
The Snap tool lets you align objects and mesh elements by snapping them to other objects, mesh elements, or the 3D space's grid. Many Roblox creators use this tool to precisely position multiple objects together in the scene so that they can evaluate how they work together in an environment, particularly in regard to position, orientation, and scale.
To use the Snap tool:
- In Object or Edit mode, navigate to the header, then click the Snapping button. A contextual menu displays.
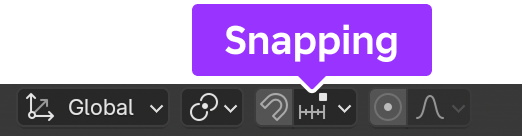
- In the contextual menu,
- Set Snap Base to one of the following:
- Closest - Snaps using the vertex that's closest to the target.
- Center - Snaps using the pivot point.
- Median - Snaps using the median of the selection.
- Active - In Object mode, this setting snaps using the origin of the active element; in Edit mode, this setting snaps using the center of the active element.
- Set Snap Target to one of the following:
- Increment - Snaps to grid points from the selection's location.
- Grid - Snaps to the grid in the 3D viewport.
- Vertex - Snaps to the vertex that's closest to the mouse cursor.
- Edge - Snaps to the edge that's closest to the mouse cursor.
- Face - Snaps to the face that's closest to the mouse cursor.
- Volume - Snaps the selection to a depth that's centered inside the object under the cursor.
- Edge Center - Snaps to the centerpoint of the edge that's closest to the mouse cursor.
- Edge Perpendicular - Snaps to a specific point on the edge so that the line from the selection's original location to its new location is perpendicular to that edge.
- Set Affect to one of the following:
- Move - Snaps while moving the selection.
- Rotate - Snaps while rotating the selection.
- Scale - Snaps while scaling the selection.
- Set Snap Base to one of the following:
- Press ShiftTab to activate the tool.
- For further precision, hold Shift to snap the selection in finer increments.
- Move, rotate, or scale an object or mesh element according to your settings.
Note
For more information on this tool, see Blender's official Snapping documentation.
Inset
The Inset tool lets you create an inset with adjustable thickness and depth from a face or group of faces. Many Roblox creators use this tool to create uniform fine details in their meshes while maintaining a clean edge flow for their topology.
To use the Inset tool:
- In Edit mode, select one or multiple faces.
- Press I to activate the tool.
- Move the mouse to adjust your inset's size. For further precision:
- Hold Ctrl to adjust the depth of the inset.
- Hold Shift while moving your mouse to slow down movement for fine adjustments.
- Press I again to inset each active face.
- Left-click or press Enter to confirm your inset(s).
Note
For more information on this tool, see Blender's official Inset Faces documentation.
Extrude
The Extrude tool lets you create new geometry by pulling out new faces, edges, or vertices from existing geometry. Many Roblox creators use this tool to create depth, volume, and complex shapes from Blender's primitive meshes.
To use the Extrude tool:
- In Edit mode, select one or multiple vertices, edges, or faces.
- Press E to activate the tool.
- Move the mouse to adjust your extrusion's length. For further precision, press X, Y, or Z after you press E to constrain movement to the X, Y, or Z axis, respectively.
- Left-click or press Enter to confirm your extrusion(s).
Note
For more information on this tool, see the following official Blender documentation:
Subdivide
The Subdivide tool lets you cut edges or faces into smaller divisions, a process that adds new vertices and resolution to your meshes. Many Roblox creators use this tool to create smooth curves, add fine details to surfaces, and prepare meshes before applying additional modifiers.
To use the Subdivide tool:
In Edit mode, select one or edges or faces.
Right-click to display a contextual menu for your active edges or faces, then select Subdivide to activate the tool. The Subdivide panel displays.
Set Number of Cuts to the number of subdivisions you want for your edges or faces.

Left-click to confirm your subdivision(s).
Note
For more information on this tool, see Blender's official Subdivide documentation.
Bridge Edge Loops
The Bridge Edge Loops tool lets you connect multiple edge loops with faces. Many creators use this tool to fill gaps without manually creating new faces, merge complex sections of their meshes, and maintain clean topology for smooth deformations.
To use the Bridge Edge Loops tool:
- In Edit mode, select two or more edge loops that you want to connect.
- Press CtrlE/⌘E to display a contextual menu for your active edge loops, then select Bridge Edge Loops to activate the tool.The Bridge Edge Loops panel displays.
- Set Number of Cuts to the number of subdivisions you want for your new bridge.
For further precision for curved bridges, increase Smoothness to create a more rounded bridge.
- Left-click to confirm your bridge.
Note
For more information on this tool, see Blender's official Bridge Edge Loops documentation.
Fill
The Fill tool lets you create triangular faces between any active edges or vertices, as long as they form one or more complete perimeters. Many Roblox creators use this tool to close gaps in their meshes so that they're watertight, or without exposed holes.
To use the Fill tool:
- In Edit mode, select at least three vertices or two or more edges that form at least one complete perimeter.
- Press AltF/⌥F to activate the tool.
In the Fill panel, enable Beauty to arrange the triangles nicely.
- Left-click to confirm your new face.
Note
For more information on this tool, see Blender's official Fill documentation.
New Faces from Edges
The New Faces from Edges tool lets you either create an edge if only two vertices are active, otherwise it creates a face between the active mesh elements. Many Roblox creators use this tool to close many gaps at once in their meshes so that the meshes are watertight, or to create geometry between many solitary vertices.
To use the New Faces from Edges tool:
- In Edit mode, select at least three vertices, or two or more edges that form one or more complete perimeters.
- Press F to activate the tool.
- Left-click to confirm your new face.
Note
For more information on this tool, see Blender's official New Edge/Face from Vertices documentation.
Dissolve
The Dissolve tool lets you remove geometry without leaving holes in your meshes. Many Roblox creators use this tool to optimize their 3D art, merge geometry, or remove unnecessary mesh elements while retaining the overall structure of the mesh.
To use the Dissolve tool:
- In Edit mode, select the vertices, edges, or faces that you want to remove from your mesh.
- Right-click to display a contextual menu for your active mesh elements, then:
- If your selection is made up of vertices, select Dissolve Vertices to remove the active vertices and merge their neighboring edges.
- If your selection is made up of edges, select Dissolve Edges to remove the active edges and join the surrounding faces to maintain the edge's outline.
- If your selection is made up of faces, select Dissolve Faces to remove the active face(s) and fill the gap with a new face, if necessary.
Note
For more information on this tool, see Blender's official Deleting & Dissolving documentation.
Delete
The Delete tool lets you completely remove geometry from your meshes, leaving one or many holes wherever geometry was removed. Many Roblox creators use this tool instead of the Dissolve tool whenever they want to restructure their meshes during the iteration process.
To use the Delete tool:
- In Edit mode, select the vertices, edges, or faces that you want to remove from your mesh.
- Press X to display a contextual menu for your selection.
- Choose one of the following menu items:
- Select Vertices to delete all active vertices, removing any faces or edges they are connected to.
- Select Edges to delete all active edges, removing any faces that the edge shares with it.
- Select Faces to remove all active faces, removing any edges they are connected to.
- Select Only Edges and Faces to remove only the active edges and adjacent faces.
- Select Only Faces to remove all active faces without also affecting active edges in the selection.
Note
For more information on this tool, see Blender's official Deleting & Dissolving documentation.
Mirror Modifier
The Mirror modifier lets you mirror geometry across one or multiple axes so that you can create symmetrical 3D art with minimal effort. Many Roblox creators use this tool while modeling avatars or architectural objects that are important to be perfectly symmetrical.
To use the Mirror modifier:
In Object mode, select the object that you want to mirror.
Navigate to the Properties editor, then in the lefthand navigation, select the Modifiers tab.

Click the Add Modifier button, then insert the Mirror modifier.
Set Axis to X, Y, and/or Z to mirror along one or many axes.
In Edit mode, modify your object or any of its mesh elements to see your modifications mirror along an axis or multiple axes.
Texturing tools
After you finish modeling your 3D object, it's time to apply a texture to your mesh so that it has additional visual characteristics, such as color, depth, and roughness through a texture map. These are details that modeling alone can't provide, transforming your object from a blank shape to something that looks either realistic or stylized according to your game's art requirements.
<img src="https://prod.docsiteassets.roblox.com/assets/art/3p-software/blender/NoTexture.png" width = "60%" />Model without a texture
<img src="https://prod.docsiteassets.roblox.com/assets/art/3p-software/blender/WithTexture.png" width = "60%" />Model with a texture
Each of the following sections details how you can use each tool for either UV editing or vertex painting objects, the hotkeys you can use to activate the tool, and their most common use cases for texturing 3D art for the Roblox platform.
UV editing
UV editing is the process of unwrapping your 3D object's faces and mapping them onto a 2D image texture. This process allows you to use a single texture to apply visual characteristics to multiple objects in Blender, saving you a negative impact on memory in Studio. For example, the following door frame, ceiling, and card reader meshes in the Laser Tag template all use the same UV map to add metal adornments.
<img src="https://prod.docsiteassets.roblox.com/assets/tutorials/environmental-art-curriculum/Section2/TrimSheets-Doorway.jpg" alt="An doorway with trim sheet textures applied." width="100%"/>


<img src="https://prod.docsiteassets.roblox.com/assets/tutorials/environmental-art-curriculum/Section2/TrimSheets-Ceiling.jpg" alt="A group of ceiling tiles with trim sheet textures applied." width="100%"/>


<img src="https://prod.docsiteassets.roblox.com/assets/tutorials/environmental-art-curriculum/Section2/TrimSheets-Reader.jpg" alt="A futuristic card reader with trim sheet textures applied." width="100%"/>
The "UV" in UV editing stands for the axes on the 2D image map that you use during the mapping process:
- U axis - The horizontal position (left and right movement).
- V axis - The vertical position (up and down movement).
Because 3D objects use the X, Y, and Z axes in the 3D space, 3D creation applications typically use U and V to avoid confusion when referring to coordinates in 2D image space. That being said, many Blender UI workflows still use X and Y, so it's helpful to know the 2D space equivalent axis.
When you unwrap a 3D object, all active faces flatten into the 2D space in the UV Editor to make up the UV map, and different sections of the model split into separate groupings, commonly referred to as UV islands. For example, if you were to unwrap a standard Blender cube, each face would become its own UV island in the UV map.
<img src="https://prod.docsiteassets.roblox.com/assets/art/3p-software/blender/CubeMap.png" alt="A UV map of a 3D cube." width="60%"/>UV map in the UV Editor
<img src="https://prod.docsiteassets.roblox.com/assets/art/3p-software/blender/UV-Cube.png" alt="The 3D cube that is being unwrapped." width="60%"/>Cube in the 3D Viewport
Every point, line, and face in the UV map corresponds to a vertex, edge, and face in the mesh. This means that when you move UV islands to different parts of the texture, their corresponding vertices, edges, and faces update to reflect the area of the texture that they now overlap.
Blender often creates UV islands along seams, or connected edges, to minimize distortion and make it easier for you to apply your texture. While this default UV island configuration is a great place to start, it's almost always necessary to modify each island's position, orientation, and scale to overlap the area of the texture you want to project, or mark your own seams to focus on texturing specific areas at a time.
By investing the time to unwrap, arrange, and map your UV islands, you can improve your texture quality and reduce stretching or distortion on all of your 3D art. The following subsections highlight the most common tools for this process, specifically in regards to unwrapping and mapping your objects.
Note
For more high-level information on this process, see Blender's official UV Editor and Getting Started with UVs documentation.
Mark Seam
The Mark Seam tool lets you manually break up a 3D object's UV map into smaller, manageable sections. While this step in the unwrapping process is technically optional, many Roblox creators find it useful for concentrating on collections of related faces for complex objects that require a lot of detailed texture work.
For example, the following rivet gun requires a metal texture for the barrel, and a leather texture for the grip. To make it easier to texture this object, you can mark the seams of the grip, unwrap just the faces between those seams, then map it to a leather texture image.
<img src="https://prod.docsiteassets.roblox.com/assets/art/3p-software/blender/MS-UVMap-Gun.png" alt="A UV map of a grip on a rivet gun." width="84%"/>Grip UV map in the UV Editor
<img src="https://prod.docsiteassets.roblox.com/assets/art/3p-software/blender/MS-Seams-Gun.png" alt="The marked seams and enclosed faces on the rivet gun that are being unwrapped." width="60%"/>Marked seams in the 3D Viewport
To use the Mark Seam tool:
- Open the UV Editing workspace. The UV Editor displays on the lefthand side of the screen, and the 3D viewport displays on the righthand side of the screen in Edit mode.
- In the 3D Viewport, navigate to your 3D object, then select the edges where you want to create seams.
- Press CtrlE/⌘E to open the Edge contextual menu.
- Select Mark Seam. The seam turns red and is ready for the Unwrap tool.
When you are ready to unwrap your object, Blender will unwrap the enclosed faces of the seam as its own island.
Note
For more information on this tool, see Blender's official Seams documentation.
Unwrap
The Unwrap tool lets you unwrap and clean up the UV map of any marked seams or active faces of a 3D object so that you have a solid foundation of UV islands to work with. This can quickly take UV coordinates from being a complete mess to something more manageable.
Many Roblox creators use this tool for complex shapes that they need full control over when applying textures, such as characters, clothes, and curvy objects, because it works quickly and avoids stretching and distortion.
<img src="https://prod.docsiteassets.roblox.com/assets/art/3p-software/blender/Before-Unwrap.png" alt="A chaotic with disorganized islands." width="75%"/>Before using the Unwrap tool
<img src="https://prod.docsiteassets.roblox.com/assets/art/3p-software/blender/After-Unwrap.png" alt="A clean UV map with organized islands." width="70%"/>After using the Unwrap tool
To use the Unwrap tool:
- Open the UV Editing workspace. The UV Editor displays on the lefthand side of the screen, and the 3D viewport displays on the righthand side of the screen in Edit mode.
- In the 3D Viewport, navigate to your 3D object, then either use the Mark Seam tool to create seams, and/or select the specific faces you want to texture.
- Press U to open the UV Mapping contextual menu.
- Select Unwrap. Your selection's UV islands display neatly in the UV Editor.
- In the UV Editor, move, scale, or rotate UV islands to the appropriate position, orientation, and scale on your texture.
Note
For more information on this tool, see Blender's official UV Operators - Unwrap documentation.
Follow Active Quads
The Follow Active Quads tool lets you generate clean and organized UV islands according to the UV coordinates of a previously unwrapped active face. This is particularly useful for grid-like topology, such as when you're unwrapping walls, floors, or mechanical parts using trim sheets.
Many Roblox creators use this tool to apply a consistent texture to curved 3D objects, such as sidewalks for games or belts for accessories.
To use the Follow Active Quads tool:
- Open the UV Editing workspace. The UV Editor displays on the lefthand side of the screen, and the 3D viewport displays on the righthand side of the screen in Edit mode.
- In the 3D Viewport, navigate to your 3D object, then unwrap every face you want to texture using an active face.
Configure your active face.
- In the UV Editor, select the face you want to be your active face, then press AltM/⌥M to open the Split contextual menu.
- Select Selection. The active face separates from the UV island.
- Move, scale, or rotate your active face to the appropriate position, orientation, and scale that you want other faces in the UV map to follow.
- In the UV Editor, select all faces you want to follow the active face. Make sure to select your active face last so that Blender knows to use its layout as the guide.
- Press U to open the Unwrap contextual menu, then select Follow Active Quads. Blender aligns your selection's UV coordinates to match the active face's shape and orientation.
Note
For more information on this tool, see Blender's official UV Operators - Follow Active Quads documentation.
Projection
Projection tools are tools that project a 3D object's surface onto the 2D image texture plane. Each projection tool controls how the object's shape unwraps and maps onto the 2D texture:
- Cube Projection - Projects the object's faces onto all six sides of a cube; useful for boxy shapes like crates.
- Sphere Projection - Projects the object's surface onto a sphere; useful for round shapes like eyes.
- Cylinder Projection - Projects the object onto a cylindrical shape; useful for tubes, pipes, and limbs.
- Project from View - Projects the object's selected faces according to the current camera or viewport angle; useful for flat surfaces and decals.
- Smart UV Project - Automatically unwraps the model and generates islands according to a set angle between faces.
It's useful to consider how you can utilize projection tools to save time in the texturing process, especially for simple objects that require repetitive textures. For example, many Roblox creators strategically use these tools to efficiently create UV islands for basic geometric shapes without needing to mark seams from edges.
<img src="https://prod.docsiteassets.roblox.com/assets/art/3p-software/blender/SmartUVProject.png" alt="A UV map using Smart UV Project." width="73%"/>A UV map using Smart UV Project.
<img src="https://prod.docsiteassets.roblox.com/assets/art/3p-software/blender/CubeProjection.png" alt="A UV map using Cube Projection." width="70%"/>A UV map using Cube Projection.
To use a projection tool:
- Open the UV Editing workspace. The UV Editor displays on the lefthand side of the screen, and the 3D viewport displays on the righthand side of the screen in Edit mode.
- In the 3D Viewport, navigate to your 3D object, then select every face.
- Press U to open the UV Mapping contextual menu, then select one of the following options:
- Cube Projection
- Sphere Projection
- Cylinder Projection
- Project from View
- Smart UV Project
Note
For more information, see the following official Blender documentation:
Vertex painting
Vertex painting is the process of storing color information directly on the vertices of your 3D object rather than through traditional textures or materials. In this approach, each vertex holds color data that Blender interpolates across the faces of a mesh, creating either smooth gradients or solid blocks of color without the need for UV mapping or image textures.
Vertex painting is useful for adding color variation to your assets in a lightweight, efficient way, especially in stylized workflows or games where performance is a concern, as it can reduce texture memory usage and draw calls. Many Roblox creators use vertex painting in conjunction with Studio's default materials, MaterialVariant objects, and SurfaceAppearance objects to create visual complexity on otherwise simple 3D objects.
<img src="https://prod.docsiteassets.roblox.com/assets/art/3p-software/blender/VP-NoColor.png" alt="A rocket launcher object in Blender without any color." width="100%"/>Object without color
<img src="https://prod.docsiteassets.roblox.com/assets/art/3p-software/blender/VP-WithColor.png" alt="A rocket launcher object in Blender with vertex paint on the handle." width="98%"/>Object with vertex paint
<img src="https://prod.docsiteassets.roblox.com/assets/art/3p-software/blender/VP-WithTexture.png" alt="A rocket launcher object in Studio with vertex paint and a SurfaceAppearance texture" width="95%"/>Object with vertex paint and image texture
To vertex paint:
Add a color attribute to store color information to your object's vertices.
In the 3D Viewport, select your 3D object.
Navigate to the Properties editor, then in the left-hand navigation, select the Data tab.

Click the Color Attributes dropdown menu to expand the container, then click the + button. The Add Color Attribute contextual menu displays.
Set Domain to Vertex, Data Type to Color, then click the Add button. Your object now has a color attribute.
Configure the 3D Viewport to display your color attribute.
In the 3D Viewport, navigate to the top right-hand corner Viewport Shading options, then click the button for the Solid shading mode.

Click the Viewport Shading dropdown arrow, then in the contextual menu, set Color to Attribute. The 3D Viewport updates to display your color attribute on your object.

Select a color for your brush.
In Vertex Paint mode, navigate to the top left-hand corner, then click on the active color swatch. A contextual menu displays.
Select your color on the color wheel, or with a RGB, HSV, or Hex code.

Apply color to your object.
- To apply color to individual vertices:
- In the 3D Viewport, click and drag over your object's vertices to apply your color with a smooth gradient.
- For further precision, press [ or ] to increase or decrease the brush size, respectively.
- To flood fill your color,
- In Edit mode, select the vertices or faces that you want to apply your color.
- In Vertex Paint mode, press CtrlX/⌘X. Your selected vertices or faces display the new color.
- To apply color to individual vertices:
Note
For more information on this process, see Blender's official Vertex Paint documentation.