
Source: Roblox Creator Hub · CC BY 4.0 · View source · Code samples: MIT Imported 2026-10-03. Formatting adapted for this site.
Add 3D audio
3D audio is directional sound that emits from a particular location in the 3D space, increasing or decreasing in volume depending on the distance and orientation between the audio emitter and listener. This means that as listeners or emitters move around the environment, players can dynamically hear that audio from different directions and volume levels.
Using the Gingerbread House - Start .rbxl file as a starting place and Gingerbread House - Complete Audio as a reference, this tutorial shows you how to add both looping and one shot 3D audio to your games, including guidance on:
- Looping environmental sounds that play as soon as players connect to the server.
- Triggering audio to inform players about key situational events that are important for their gameplay.
- Activating audio to provide players auditory feedback when they interact with 3D objects.
- Playing character sound bites that engage and guide players toward points of interest within their environment.
If at any point you become stuck in the process, you can use Gingerbread House - Complete Audio as a reference to compare your progress.
Note
If you want to add non-positional audio to your game, such as background music, UI interaction sounds, or voiceover cutscene dialogue, see Add 2D audio.
Audio objects
To create directional audio, it's important to understand the audio objects that you will be working with throughout this tutorial. There are six main types of audio objects for 3D audio:
- The
AudioPlayerobject loads and plays the audio file. - The
AudioEmitterobject is a virtual speaker that emits audio into the 3D environment. - The
AudioListenerobject is a virtual microphone that picks up audio from the 3D environment. - The
AudioDeviceOutputobject is a physical hardware device within the real world, such as a speaker or headphones. - The
AudioDeviceInputobject is a physical microphone within the real world. Wirescarry audio streams from one object to another.
All of these audio objects work together to emit sound just like their real-world counterparts. Let's take a look at how this works in practice using an example of a player wearing a headset while playing a game with their laptop:
The
AudioPlayerloads the1516791621audio asset ID into the game for a rain track.The
AudioEmitteremits a stream of the rain track audio into the 3D environment.A
Wirecarries the stream from theAudioPlayerto theAudioEmitterso that the stream comes out of the 3D speaker.The character's child
AudioListenerobject listens to that sound within the 3D environment and feeds it back to their headset.The
AudioDeviceOutputobject carries the sound from theAudioListenerto the player's physical speaker, or in this case, their headphones.The
AudioDeviceInputobject captures sound from the real world and feeds it back into the game for voice chat.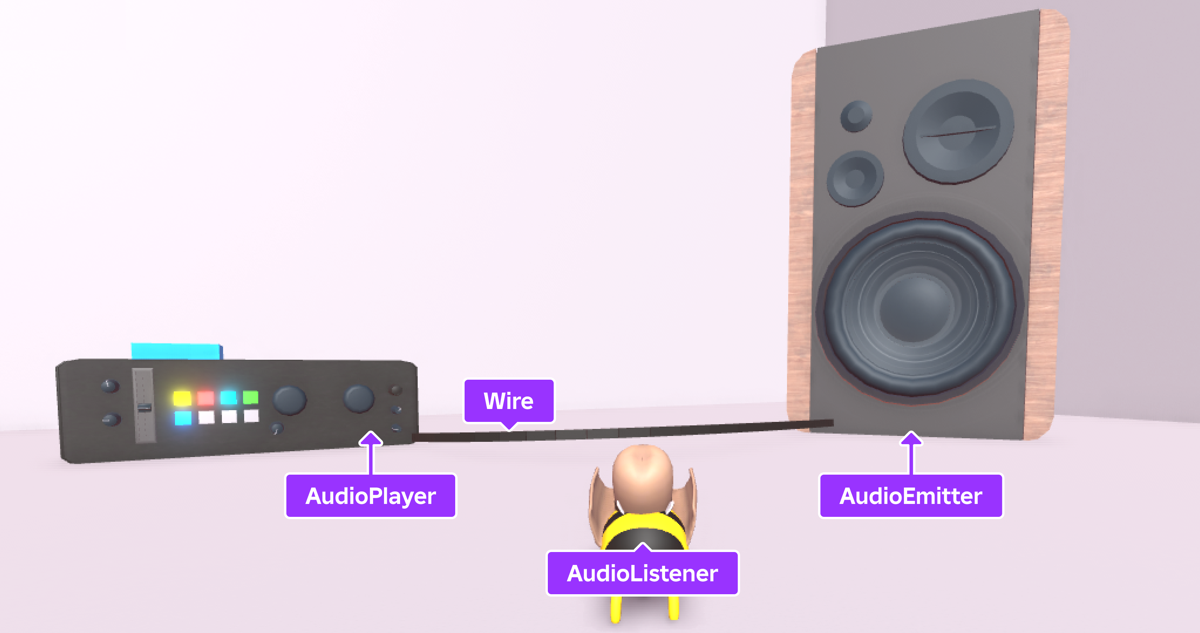
Object representations within the game
<img src="https://prod.docsiteassets.roblox.com/assets/tutorials/add-3D-audio/Realworld-Object-Representations.png" width="100%"/>Object representations in the real world
The following sections dive deeper and reference these objects as you learn how to play both looping and one shot 3D audio. As you review these objects with the upcoming techniques, you can more accurately predict how to capture and feed sound from the game to the player and vice-versa.
Looping audio
Looping 3D audio, or directional audio that repeats seamlessly as soon as players connect to the server, is a common sound design technique to enhance the atmosphere of the 3D space by making it feel alive and dynamic. In addition, looping 3D audio keeps your environmental sound sources consistent, such as the static of a television or the roar of a waterfall; if these sounds were to suddenly stop, the environment would feel unrealistic.
To demonstrate this concept, review how the following 3D audio for two large cascades stops as soon as the unlooped audio track is complete. While the water sounds initially immerse players into the outdoor environment, the sudden auditory change is jarring and unnatural to how a waterfall behaves in the real world.
Note
To create a seamless loop, you must match the end and start points of your audio track precisely so that players cannot detect its repetition. This process requires third-party audio editing software like Reaper or Audacity so that you can find a zero crossing and make a carefully timed cut. For step-by-step instruction on these methods, see Creating Perfect Audio Loops.
Similarly, the sample uses this technique for the flowing chocolate waterfall, and adjusts its volume according to the player's distance from the audio emitter. When the player is less than 20 studs away, the emitter emits the sound at full volume. As the player moves further away, the sloshing audio decreases in volume every 20 studs away from the audio emitter. This emulates real-world sound that decreases in volume the further you are from the source.
To recreate the looping 3D audio in the sample Gingerbread House - Complete Audio place file:
Enable a default listener that's attached to your player character.
- In the Explorer window, select the SoundService.
- In the Properties window, set DefaultListenerLocation to Character. When you run the game, the engine automatically:
- Creates a
AudioListenerunder each player character'sHumanoid.RootPartso that you can hear sounds shift in your real-world speakers according to the position and scale of sound sources within the game. - Creates an
AudioDeviceOutputunder SoundService.
- Creates a
In the Explorer window, navigate to Workspace ⟩ WaterfallAudioObject, then:
- Insert an AudioPlayer object to create an audio source for the waterfall.
- Insert an AudioEmitter object to emit a positional stream from WaterfallAudioObject.
- Insert a Wire object to carry the stream from the audio player to the audio emitter.

Select the AudioPlayer, then in the Properties window,
- Set AssetID to
rbxassetid://1516791621to play a rainy audio track. - Enable Looping so that the audio repeats seemlessly.
- Set AssetID to
Select the AudioEmitter, then in the Properties window, set DistanceAttenuation to
{0: 1}, {20: 0.8}, {40: 0.4}, {80: 0}so that the sound progressively decreases in volume every 20 studs away from the audio emitter.Select the Wire, then in the Properties window,
- Set SourceInstance to your new AudioPlayer to specify that you want the wire to carry audio from this specific audio player.
- Set TargetInstance to your new AudioEmitter to specify that you want the wire to carry audio to this specific audio emitter within the waterfall.
Back in the Explorer window, insert a Script into WaterfallAudioObject, rename it LoopWaterfallMusic, set its RunContext property to Client, then paste the following code into the script:
local audioPlayer = script.Parent
audioPlayer:Play()
Code explanation
The script starts by declaring a variable to represent the script's parent [`AudioPlayer`](/docs/audioplayer). The script then sets the audio source to play from the moment the player joins the game to the moment they exit the game.Playtest the game to hear the looping chocolate rain sound when your avatar is near the waterfall. When you rotate your character's head to look in a different direction, the sound dynamically shifts in your real-world speakers according to the emitter's position in the 3D space.
One shot audio
One shot 3D audio, or directional audio that plays once at a specific time and position unless a player triggers it again, provides players context about their actions, the environment, and any characters around them. Using this type of auditory feedback in your games is essential because it allows players to make strategic decisions like avoiding incoming enemies or picking up useful items.
The following sections provide implementation details for common gameplay scenarios in which players need timely, directional feedback, including situational gameplay events, object interaction, and non-playable character dialogue.
Event feedback
As players trigger key situational events within their environment, such as unlocking new gameplay areas or prompting enemy fire, it's essential that they understand where in the 3D space they need to direct their focus and attention. If they don't receive immediate auditory feedback, they may miss information that's important for their gameplay, leading to frustration at not knowing where to go or what to do next.
To demonstrate why this is important, let's review the one shot 3D audio from the Laser Tag template that plays from each player's blaster:
- A deep pop sound plays for every blast the player fires from their blaster.
- A clicking and robotic beep sound plays each time the player reloads their blaster with a new round.
Both of these sounds provide situational awareness by alerting all nearby players to the direction of where blasts are coming from so that they can make informed decisions to either join in on the fun or avoid potential danger.
The sample uses this same technique to provide players situational awareness about their reward for completing the main objective within the game. After they collect all three gumdrops, the door to the gingerbread house opens up to allow players access to the present inside.
Because there isn't a specific order that players need to collect the gumdrops, it's important that players are aware of the door opening no matter which gumdrop they collect last. Positional sound makes this possible so that players are aware of their success and where they need to go next regardless of their relative distance and direction from the door.
To recreate the one shot event feedback 3D audio in the sample Gingerbread House - Complete Audio place file:
In the Explorer window, navigate to Workspace ⟩ Door, then:
- Insert an AudioPlayer object to create an audio source for the volume.
- Insert an AudioEmitter object to emit a positional stream from Door.
- Insert a Wire object to carry the stream from the audio player to the audio emitter.

Select the AudioPlayer, then in the Properties window, set AssetID to
rbxassetid://5930776613to play a sliding metal gate audio track.Select the Wire, then in the Properties window,
- Set SourceInstance to your new AudioPlayer to specify that you want the wire to carry audio from this specific audio player.
- Set TargetInstance to your new AudioEmitter to specify that you want the wire to carry audio to this specific audio emitter within the volume.
Back in the Explorer window, navigate to ServerScriptService, then insert a Script, rename it GumdropService, set its RunContext property to Server, then paste the following code into the script:
-- Initializing variables
local Workspace = game:GetService("Workspace")
local Players = game:GetService("Players")
local ServerStorage = game:GetService("ServerStorage")
local TweenService = game:GetService("TweenService")

-- Modules
local Leaderboard = require(ServerStorage.Leaderboard)
local PlayerData = require(ServerStorage.PlayerData)

-- Variables
local gumdropsFolder = Workspace.Gumdrops
local gumdrops = gumdropsFolder:GetChildren()

local GUMDROP_KEY_NAME = PlayerData.GUMDROP_KEY_NAME
local GUMDROP_AMOUNT_TO_ADD = 1

local function updatePlayerGumdrops(player, updateFunction)
   -- Update the gumdrop table
   local newGumdropAmount = PlayerData.updateValue(player, GUMDROP_KEY_NAME, updateFunction)

   -- Update the gumdrop leaderboard
   Leaderboard.setStat(player, GUMDROP_KEY_NAME, newGumdropAmount)

   -- Check if the player has collected three gumdrops
   if newGumdropAmount >= 3 then

      -- Play the door event audio when the player collects three gumdrops
      local audioPlayer = Workspace.Door.AudioPlayer
      audioPlayer:Play()

      -- Animate the door to move downward
      local doorPart = Workspace.Door
      local tweenInfo = TweenInfo.new(2, Enum.EasingStyle.Linear)
      local tween = TweenService:Create(doorPart, tweenInfo, {Position = doorPart.Position + Vector3.new(0, -15, 0)})
      tween:Play()
   end
end

-- Defining the event handler
local function onGumdropTouched(otherPart, gumdrop)
   if gumdrop:GetAttribute("Enabled") then
      local character = otherPart.Parent
      local player = Players:GetPlayerFromCharacter(character)
      if player then
         -- Player touched a gumdrop

         local audioPlayer = gumdrop.AudioPlayer
         audioPlayer:Play()

         gumdrop.Transparency = 1
         gumdrop:SetAttribute("Enabled", false)
         updatePlayerGumdrops(player, function(oldGumdropAmount)
            oldGumdropAmount = oldGumdropAmount or 0
            return oldGumdropAmount + GUMDROP_AMOUNT_TO_ADD
         end)
         print("Player collected gumdrop")
      end
   end
end

-- Setting up event listeners
for _, gumdrop in gumdrops do
   gumdrop:SetAttribute("Enabled", true)
   gumdrop.Touched:Connect(function(otherPart)
      onGumdropTouched(otherPart, gumdrop)
   end)
end
Code explanation
Note
  This script handles additional functionality outside of triggering the positional audio, such as updating the leaderboard and triggering a non-positional sound every time a player collects a gumdrop. This is important for the gameplay of the sample, but it isn't important for understanding how to implement 2D audio, so this explanation will keep those sections at a high level.


  This script starts by initializing the [`Workspace`](/docs/workspace), [`Players`](/docs/players), [`ServerStorage`](/docs/serverstorage), and [`TweenService`](/docs/tweenservice) services so it can reference their children and functionality. Then, it requires the **Leaderboard** and **PlayerData** modules in [`ServerStorage`](/docs/serverstorage); these modules are responsible for creating and updating a leaderboard in the upper-right corner of the screen that tracks the amount of gumballs a player collects in the environment.

  The script's `updatePlayerGumdrops` function is where the bulk of the work occurs for triggering 3D audio for event feedback, and it takes two arguments:

  - `player` - A player that collects a gumdrop.
  - `updateFunction` - A callback function that updates the player's collected gumdrop amount.

  When a player collides with a gumdrop, the script:

  - Gets the player's new gumdrop collection amount value by calling the `PlayerData.updateValue` function.
  - Updates the leaderboard with this new amount by calling the `Leaderboard.setStat` function.
  - Checks to see if the amount is greater than or equal to `3`.

  When this value is greater than or equal to `3`, the script:

  - Plays the 3D audio track from the audio player to the audio emitter.
  - Moves the door linearly `15` studs below its current position.

  The rest of the script is largely in charge of detecting anything that collides with the gumdrop is a player so that it can trigger a non-positional sound for collection feedback. For more information on this part of the script, see [Add 2D audio - Gameplay feedback](/docs/roblox-tutorials-use-case-tutorials-audio-add-2d-audio).
Playtest the game to hear the slide gate sound after you collect all three gumdrops in the environment. When you rotate the camera, the sound dynamically shifts in your real-world speakers so that you hear it according to the emitter's position in the 3D space.
Object interaction
When players interact with 3D objects within their environment, such as turning on a light switch or picking up a weapon, it's important to provide instant feedback so that they intuitively understand how they're interacting with the object. The pairing of both a visual and auditory feedback reinforces the cause and effect relationship between the player's actions and the environmental response.
To expand on this concept, let's review the following one shot 3D audio from the Plant sample for the user flow of gardening a cabbage:
- A gentle clink sound plays when the player plants a seed.
- A wet, splash-like sound plays when the player waters their growing plant.
- A clip sound plays when the player collects the full-grown plant.
- A soft thud sound plays when the player places the cabbage into the wagon.
All of these sounds reinforce the player's proximity prompt key interactions with the object changing forms in the 3D space. For players with visual impairments in which color changes or animations are more difficult to decipher on their own, providing these multiple forms of sensory feedback help your 3D object interactions remain accessible and intuitive for as many players as possible.
To give a different example of how you can configure object interaction with multiple forms of sensory feedback, the sample provides both visual and auditory feedback whenever players step on the 3D peppermint button within the gingerbread house. When players aren't interacting with the button, it appears like a typical peppermint candy, but when they step on the button, the sample:
- Plays a celebratory jingle audio track.
- Tints the sides of the button with a green hue.
- Moves the button into the ground.
From here, you can connect this interaction to all sorts of unique gameplay actions, such as unlocking an item or triggering a special ability.
<img src="https://prod.docsiteassets.roblox.com/assets/tutorials/add-3D-audio/Button-Default.jpg" width="75%" />Default view
<img src="https://prod.docsiteassets.roblox.com/assets/tutorials/add-3D-audio/Button-Pressed.jpg" width="75%" />Pressed state
To recreate the one shot object interaction 3D audio in the sample Gingerbread House - Complete Audio place file:
In the Explorer window, navigate to Workspace ⟩ 3DAudioButton, then:
- Insert an AudioPlayer object to create an audio source for the button.
- Insert an AudioEmitter object to emit a positional stream from 3DAudioButton.
- Insert a Wire object to carry the stream from the audio player to the audio emitter.
Select the AudioPlayer, then in the Properties window, set AssetID to
rbxassetid://1846248593to play a cheerful, celebratory audio track.Select the Wire, then in the Properties window,
- Set SourceInstance to your new AudioPlayer to specify that you want the wire to carry audio from this specific audio player.
- Set TargetInstance to your new AudioEmitter to specify that you want the wire to carry audio to this specific audio emitters within the button.
Back in the Explorer window, insert a Script into 3DAudioButton, rename it PlayAudioWhenPressed, then paste the following code into the script:
local TweenService = game:GetService("TweenService")

local buttonModel = script.Parent.Parent
local buttonPart = buttonModel.ButtonPart
local buttonPressedAudioPlayer = buttonModel.ButtonPressedAudioPlayer

local tweenInfo = TweenInfo.new(.2, Enum.EasingStyle.Exponential)

local buttonTweenByIsPressed = {
   -- Pressed
   [true] = TweenService:Create(buttonPart, tweenInfo, {
      Size = buttonPart.Size / Vector3.new(2, 1, 1),
      Color = Color3.fromRGB(75, 151, 75),
   }),

   -- Default
   [false] = TweenService:Create(buttonPart, tweenInfo, {
      Size = buttonPart.Size,
      Color = Color3.fromRGB(196, 40, 28),
   }),
}

local function onIsPlayingChanged()
   local isPlaying = buttonPressedAudioPlayer.IsPlaying
   local tween = buttonTweenByIsPressed[isPlaying]
   tween:Play()
   end

onIsPlayingChanged()
buttonPressedAudioPlayer:GetPropertyChangedSignal("IsPlaying"):Connect(onIsPlayingChanged)
buttonPressedAudioPlayer.Ended:Connect(onIsPlayingChanged)

buttonPart.Touched:Connect(function(_hit)
buttonPressedAudioPlayer:Play()
end)
Code explanation
Note
  This script handles additional functionality outside of just playing 3D audio for object interactions, such as tweening the button's color and position. This is important for providing multiple sources of sensory feedback, but the design requirements for your use case may only require auditory feedback. If you just want to play audio when players touch the model, you can remove the tween functionality.


  The script starts by getting:

  - The [`TweenService`](/docs/tweenservice) so it can animate the button's part that sticks out of the ground.
  - The script's parent **3DAudioButton** model.
  - The button's part that sticks out of the ground.
  - The relevant audio player with your celebration sound audio track.

  The script then defines:

  - A `TweenInfo` object that specifies that the button's animation will play with an exponential animation style.
  - Two tweens that represent the button's pressed or unpressed state.
     - The `true` pressed state moves the button slightly downward into the ground and tints the sides of the part with a green hue.
     - The `false`unpressed state moves the button back to its original position and removes the previous tint.

  The remainder of the script is where the bulk of the work occurs for object interaction feedback, so let's review how the `onIsPlayingChanged` function and event listeners work together:

  1. `buttonPart.Touched` listens for a player to touch the button, then calls the `Play()` function to start playing the associated audio from the audio player. This process switches the [`AudioPlayer.IsPlaying`](/docs/audioplayer#audioplayer-isplaying) property from `false` to `true`.
  1. `buttonPressedAudioPlayer:GetPropertyChangedSignal("IsPlaying")` listens for the audio player's `IsPlaying` property to change, then calls the `onIsPlayingChanged` function.
  1. The `onIsPlayingChanged` function uses this information to trigger the tween that changes its visual appearance in the 3D space.
  1. To prevent the player from accidentally restarting the audio if they were to quickly jump on the button  in rapid succession, `buttonPressedAudioPlayer.Ended` listens for the audio player to finish playing before calling the `onIsPlayingChanged` function again.

  It's important to note that the `onIsPlayingChanged` event only fires when it changes from `false` to `true`, meaning that it doesn't fire when changing from `true` to `false`. This is intended behavior due to complications with timing of replicating properties from server to client. Because of this, the `Ended` event is provided and listened to in this example to cover both cases.
Playtest the game to hear the celebration sound when your player character touches the 3D button in the gingerbread house. When you walk away from the button, the sound's volume decreases.
Character dialogue
Providing directional audio from your non-playable characters (NPC) is helpful to guide players toward points of interest within their environment, and add depth to their interactions with other characters. In fact, in narrative-driven games, many designers strategically use character dialogue to indirectly teach players about their character, ally and enemy characters, or the world itself.
Common examples of this technique include:
- Dialogue style to set the tone of your game.
- Banter to teach players about character relationships.
- Enemy conversations to confess motivations or their position in relation to the player.
- Player characters speaking their thoughts aloud to gently guide the player to what they should do next, such as heal themselves, move to another location, or find an item.
- Ally characters talking with the player character to reveal in-game world details like its history, culture, and social issues.
To demonstrate what this can look like in practice, let's review the following one shot 3D audio from Beyond the Dark showcase that periodically plays when players are in the main lobby area of the space station.
Using the space station as a character, this dialogue clip provides players important context and lore about the overall setting. For example, from this single sentence players learn:
- They're in outer space, specifically on a space station named Kerr-Newman Deep Space Relay 14.
- Their environment is futuristic and welcoming.
- They are a visitor and will likely be leaving soon.
These details together immerse players within their environment, and add a sense of urgency to their mission. However, if players don't know what their main mission is, you can also use character dialogue to inform players what you want them to do within your game.
To illustrate, the sample uses a volume, or invisible region within the 3D space, to trigger character dialogue from the snowman to guide players to collect three gumdrops in order to open the door to his home. As one of the first things that players see as they join the game, players are more likely to trigger the dialogue and know what they need to do to be successful.
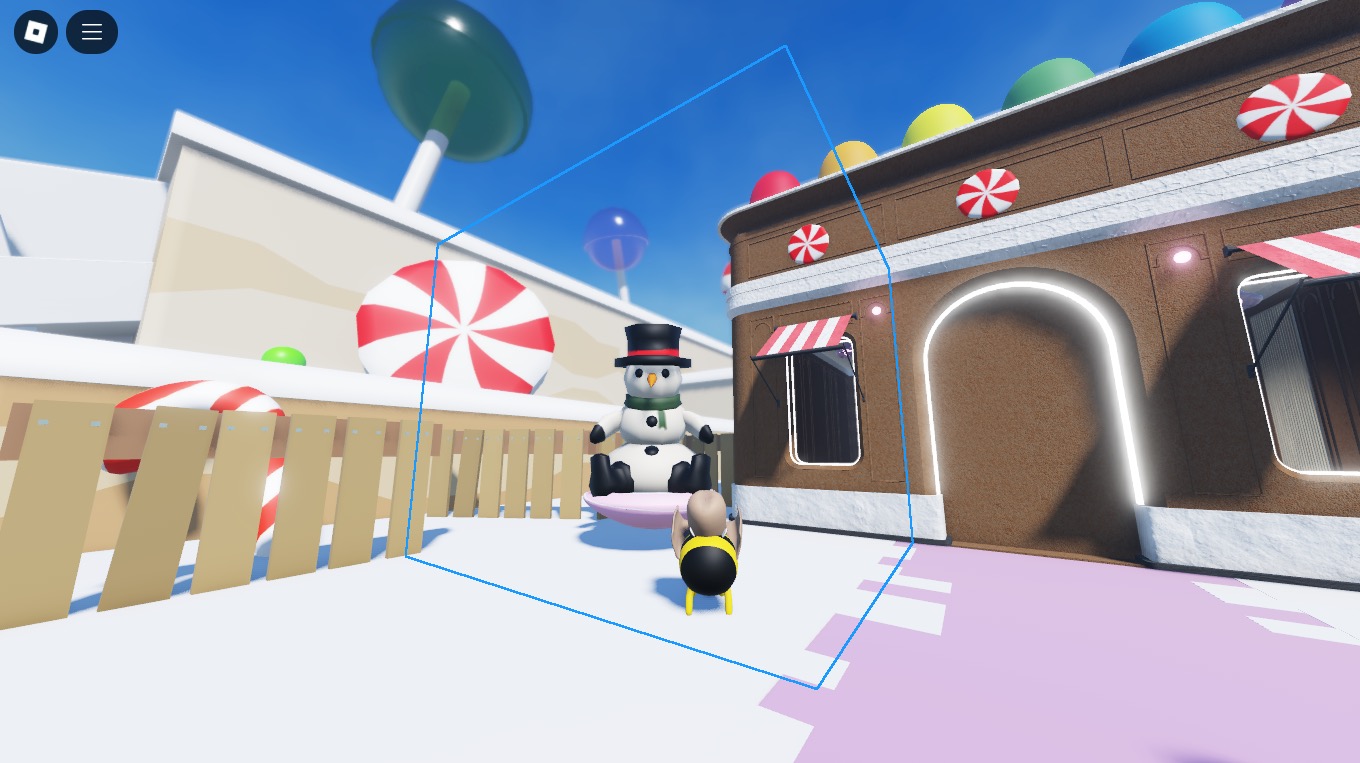
The volume around the snowman uses collision feedback to play audio when players enter the 3D region.
To recreate the one shot character dialogue 3D audio in the sample Gingerbread House - Complete Audio place file:
In the Explorer window, navigate to Workspace ⟩ DialogueVolume, then:
- Insert an AudioPlayer object to create an audio source for the volume.
- Insert an AudioEmitter object to emit a positional stream from DialogueVolume.
- Insert a Wire object to carry the stream from the audio player to the audio emitter.
Select the AudioPlayer, then in the Properties window, set AssetID to
rbxassetid://92917410841704to play an instructional audio track for the objective of the game.Select the Wire, then in the Properties window,
- Set SourceInstance to your new AudioPlayer to specify that you want the wire to carry audio from this specific audio player.
- Set TargetInstance to your new AudioEmitter to specify that you want the wire to carry audio to this specific audio emitter within the volume.
Back in the Explorer window, navigate to StarterPlayer ⟩ StarterCharacterScripts, insert a LocalScript, rename it PlayAudioWhenInVolume, and paste the following code into the local script:
local Workspace = game:GetService("Workspace")
local Players = game:GetService("Players")

local humanoid = script.Parent:WaitForChild("Humanoid")
local volumeDetector = Workspace.DialogueVolume
local trigger = humanoid:WaitForChild("Animator")
local debounce = false
local localPlayer = Players.LocalPlayer

volumeDetector.Touched:Connect(function(hit)
   if debounce then
      return
   end

   local hitCharacter = hit:FindFirstAncestorWhichIsA("Model")
   local hitPlayer = Players:GetPlayerFromCharacter(hitCharacter)

   if hitPlayer ~= localPlayer then
      return
   end

   debounce = true

   local audioPlayer = Workspace.DialogueVolume.AudioPlayer
   audioPlayer:Play()
   audioPlayer.Ended:Wait()

   debounce = false
end)
Code explanation
  This script starts by getting the Workspace and Players services so it can reference their children and functionality. For each player character that loads or respawns back into the game, the script waits for:

  - The character's [`Humanoid`](/docs/humanoid) and [`Animator`](/docs/animator) objects.
  - The volume object in the workspace named **DialogueVolume**.

  When anything collides with the volume, the `Touched` event handler function gets the first ancestor that's a [`Model`](/docs/model), which should be the character if the [`BasePart`](/docs/basepart) that collided with the volume is a descendant of a character model. If it is, the function then:

  - Sets debounce to `true`.
  - Plays and waits for the audio to end.
  - Sets debounce back to `false`.

  Setting debounce from `false` to `true` to `false` again after the audio finishes playing is a debounce pattern that prevents the audio from repeatedly triggering as players continuously collide with the volume. For more information on this debounce pattern, see [Debounce - Detect collisions](/docs/roblox-scripting-debounce#detect-collisions).
Playtest the game to hear the instructional character dialogue when your player character touches the volume around the snowman.