
Source: Roblox Creator Hub · CC BY 4.0 · View source · Code samples: MIT Imported 2026-10-03. Formatting adapted for this site.
Trails
A Trail is an object that creates a trail between and behind two Attachment objects as they move through space. Trails are useful to help players visualize movement, such as a sword slashing through the air, projectiles flying to their target, or footprints walking away.
After you create a trail, you can:
- Add a texture to create interesting visuals.
- Set a constant or gradient color and/or transparency.
- Modify a trail's lifetime.
- Specify the texture's length and mode to affect how it scales, repeats, and moves along with the trail's attachments.
Create trails
Before you begin to create a trail, it's useful to toggle on visibility of attachments so you can more easily discern how their spacing affects the trail's width. You can do so by enabling Show Constraint Details from Studio's View menu.
The following video demonstrates how attachments that are closer to each other create a trail with a smaller width:
To create a trail on a part:
In the Explorer window, insert two
Attachmentsand aTrailobject into the part.Hover over the part and click the ⊕ button. A contextual menu displays.
From the menu, insert two Attachments and one Trail.

Select the new Trail object and assign its attachments. Ensure you assign each attachment property to a different
Attachmentobject.- In the Properties window, select the Attachment0 property. Your cursor changes.
- In the Explorer window, select the first attachment you created.
- Back in the Properties window, select the Attachment1 property. Your cursor changes.
- In the Explorer window, select the second attachment you created.
Using the Move tool, position both attachments within the part according to how wide you want the trail to be.
To see the trail, move the part in any direction and the trail follows.
Note
Trails require attachments to function properly. If you remove either Attachment object from step 2, the trail stops rendering its texture.
Customize trails
By experimenting with the following properties, you can customize a trail's visual appearance to make unique gameplay elements like wind gusts, sword slashes, and tire marks from fast cars.
Note
The visual quality of your trails can change depending on the graphics settings on the player's device. To review your trail across quality levels, it's recommended to open Studio Settings, search for Editor Quality Level, and set it to the both the lowest and highest level after you finish customizing your trail.
Texture
The Texture property renders a texture across the length of the trail. You can set a trail's Texture property to any asset ID. For more information, including how to add or import your own textures, see here.
Color
The Color property tints the trail's texture to either a specific hue or a ColorSequence. The video below shows how a constant color compares with a gradient color across the trail's lifetime.
Constant Color
In the Explorer window, select the trail.
In the Properties window, select the Color property. You can either:
- Click on the color square to open the Colors pop-up window and select a color.
- Input three numbers into the RGB color value field.

Color Gradient
In the Explorer window, select the trail.
In the Properties window, click inside the Color property field, then click the ⋯ button.

In the color sequence popup, each triangle on the bottom axis is a keypoint that determines the color value of the trail at that point in its lifetime.
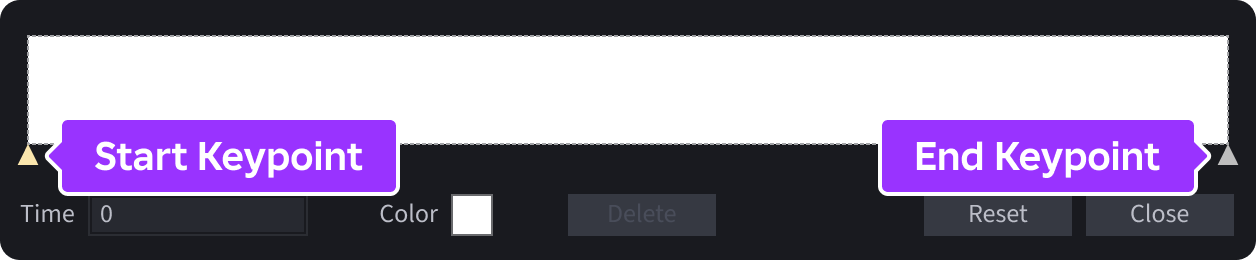
Click the keypoint at the start of the color sequence, click the small square next to Color, and select a color from the popup window.

If you want the trail to change color near the end of its lifetime, click the keypoint at the end of the color sequence, click the small square next to Color, and select a color from the popup window.

For more customization, you can:
- Add another keypoint by clicking anywhere on the graph.
- Make a color change sooner or later within the gradient by dragging an intermediary keypoint to a new position.
- Delete an intermediary keypoint by selecting it and clicking the Delete button.
- Reset the entire sequence by clicking the Reset button.
Transparency
The Transparency property sets the transparency of the trail's segments over its Lifetime. It can be a consistent value or a NumberSequence with ranges from 0 (totally opaque) to 1 (fully clear).
Constant Opacity
- In the Explorer window, select the trail.
- In the Properties window, select the Transparency property.
- Input the desired opacity for the trail.
Number Sequence
In the Explorer window, select the trail.
In the Properties window, click inside the Transparency property field, then click the ⋯ button.

In the number sequence popup, each square at the start and end of the graph is a keypoint that determines the opacity value of the trail at that point along its span. By default, the graph defaults to a straight line and the trail is of consistent opacity.

Perform any of the following actions:
- To change the opacity at a point, click on a keypoint and either drag it up or down, or enter a value in the Value field.
- To insert a new keypoint, click on any point in the graph.
- To delete a keypoint, select it and click the Delete button.
- Reset the entire sequence by clicking the Reset button.

Lifetime
The Lifetime property allows you to set the duration of the trail in seconds. When you decrease the value of this property, the trail moves through the space more quickly and consequently cuts down the length of the trail. This can provide the object with a faster, more animated visual appearance.
Trail with lifetime of 0.5 (left) vs. trail with lifetime of 3.0 (right)
Texture length/mode
A trail's TextureLength and TextureMode determine how its texture scales, repeats, and moves along with the trail's attachments.
Scaling and Repetition
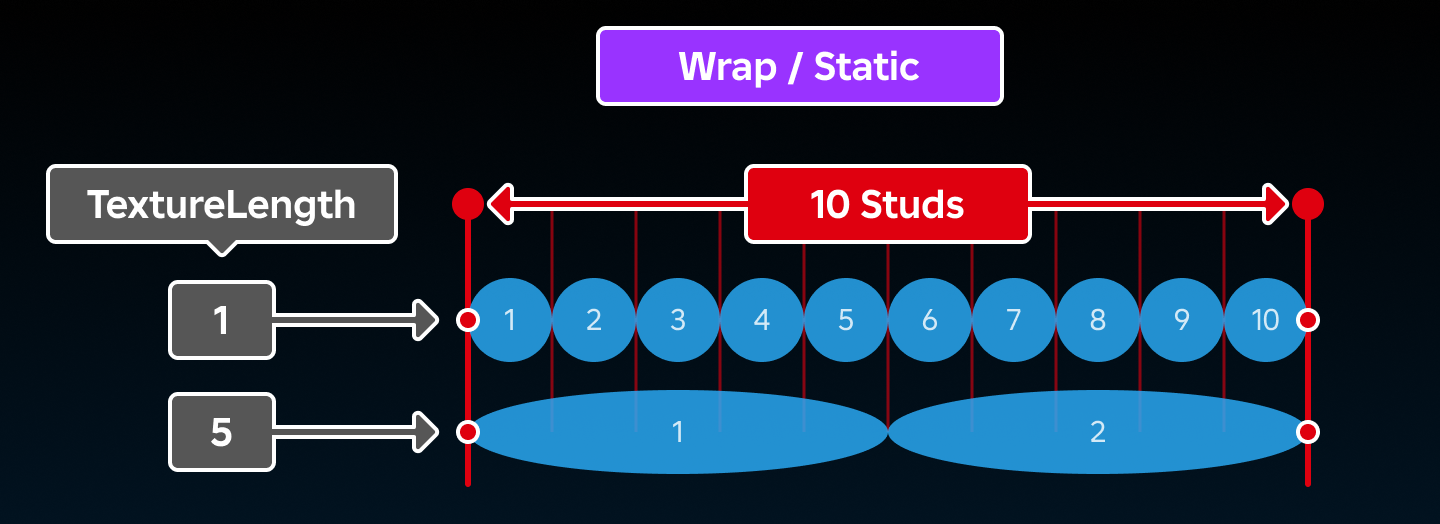
When TextureMode is set to TextureMode.Wrap or TextureMode.Static, the TextureLength property sets the length of the texture as it repeats across the trail's length.
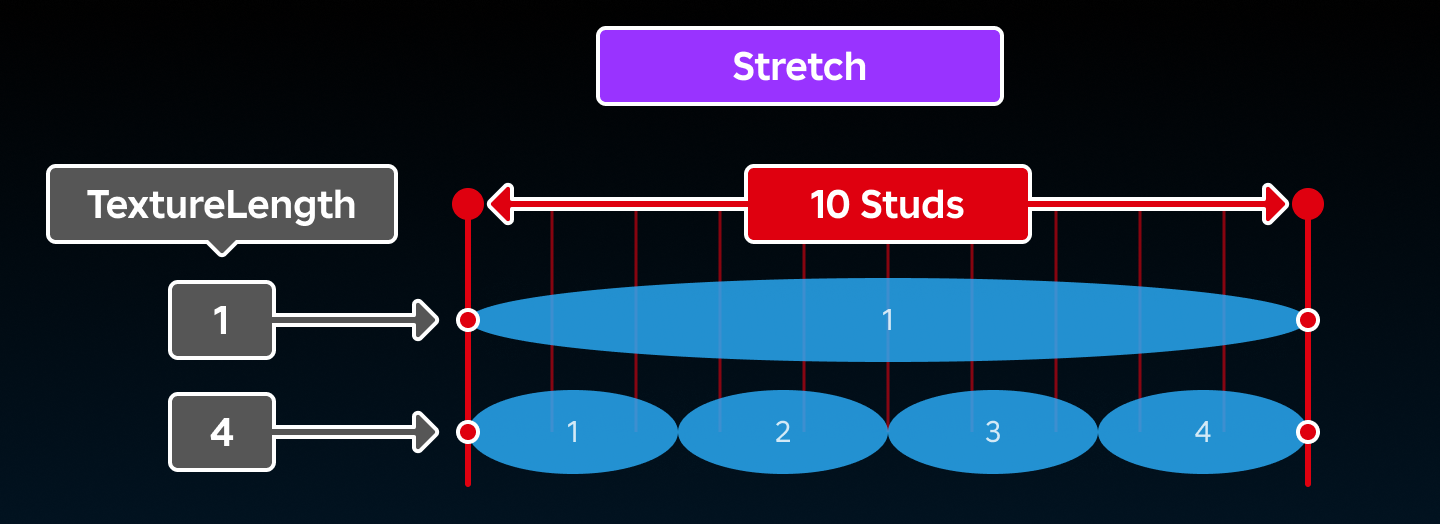
When TextureMode is set to TextureMode.Stretch, the texture will repeat TextureLength times across the trail's overall length.
Movement
The TextureMode property also affects the movement of the trail's texture as follows:
If set to
TextureMode.Stretch, the texture will stretch out based on the lifetime of the trail, and shrink inwards if the trail's attachments stop moving.If set to
TextureMode.Wrap, the texture will be tiled as the length of the trail changes, but the textures will remain stationary relative to their attachments.If set to
TextureMode.Static, the texture will be rolled out as the attachments move, and they will remain in place until their lifetime is met. This setting is ideal for trail textures that should appear "stamped" where rendered, such as paw prints or tire tracks.
Facing
A trail is a 2D projection existing in 3D space, meaning that it may not be visible from every angle. The FaceCamera property, when set to true, ensures that the trail always faces the CurrentCamera, regardless of its orientation.