
Source: Roblox Creator Hub · CC BY 4.0 · View source · Code samples: MIT Imported 2026-10-03. Formatting adapted for this site.
Layered Accessory Validation Tool
The Layered Accessory Validation Tool is a supplemental tool you can install in either Blender or Maya to help quickly identify and fix common issues with layered accessories before you export them.
<img src="https://prod.docsiteassets.roblox.com/assets/accessories/validation-tool/Blender-Validation-Tool.png" width="80%" />Blender Validation Tool
<img src="https://prod.docsiteassets.roblox.com/assets/accessories/validation-tool/Maya-Validation-Tool-Opened.png" width="80%" />Maya Validation Tool
While this tool can save you time in the typical iteration process between your 3D modeling program and Studio, the tool doesn't provide comprehensive verification of all aspects of layered accessory assets. You must ensure your layered accessory model meets both the general mesh requirements and Roblox-specific layered accessory specifications prior to importing it into Studio.
Install the tool
There are two separate installation files and instructions for Blender and Maya.
Note
The Layered Accessory Validation Tool is designed for both Blender 3.0 and Maya 2022. You can download and modify the tool for any use.
Blender
To install the Layered Accessory Validation Tool in Blender:
Download ValidationTool_Blender.zip and save the
.zipfile locally.In Blender, navigate to Edit > Preferences.
In Preferences, go to the Add-Ons section on the left side-bar.
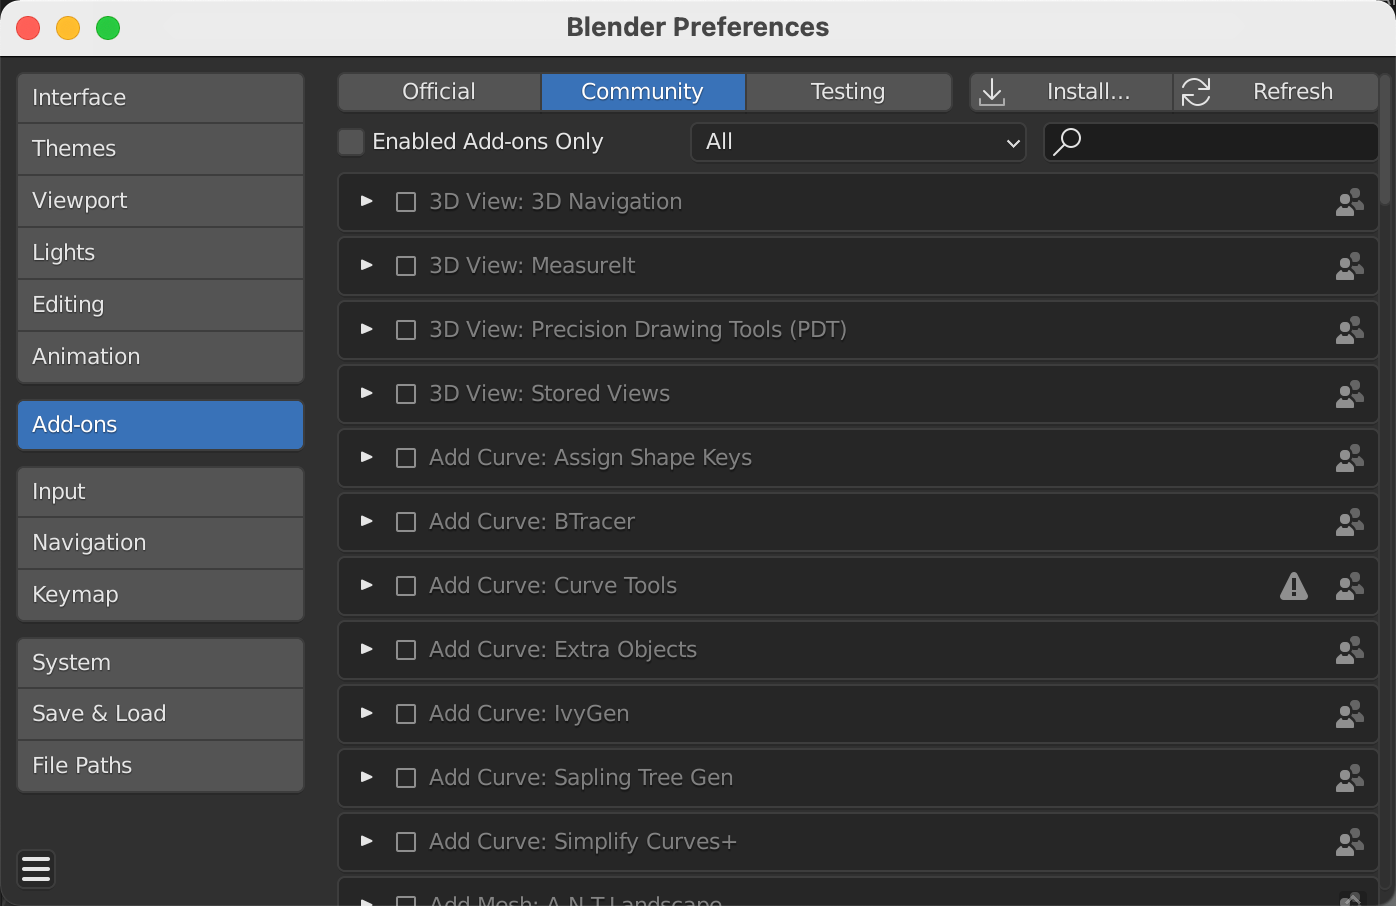
Click the Install... button. A file browser displays.
Select the downloaded
.zipfile and click Install Add-On.In the Add-Ons section, find the Validation Tool and enable the add-on.

Return to your workspace and expand the side toolbar in the Viewport to access the add-on.
<img src="https://prod.docsiteassets.roblox.com/assets/accessories/validation-tool/Blender-Sidebar-Indicator.png" />
Sidebar indicator
<img src="https://prod.docsiteassets.roblox.com/assets/accessories/validation-tool/Blender-Validation-Tool-Opened.png" width="48%" />Expanded sidebar
Maya
Before you begin the process of installing the Layered Accessory Validation Tool in Maya, you must install Python 3.0 or higher. If you already have Python installed, you can proceed to installing the tool.
To install the Layered Accessory Validation Tool in Maya:
Install Python 3.0+ on your device.
Download the appropriate installer from the official Python website.
Open the installer and follow the installation instructions.
- Enable Add Python ### to PATH before selecting Install Now.

Download ValidationTool_Maya.zip and unzip the content in a local directory.
Open the contents of the
.zipfile in a file browser.- If on Windows, double-click
install.bat. This runs a batch script that enables you to quickly run the Validation Tool in Maya. - If on Mac, right-click the
install.commandfile and select Open With > Terminal. This runs a terminal script that enables you to quickly run the Validation Tool in Maya.

- If on Windows, double-click
Note
If on Mac, you may need to adjust the read/write permissions for the install.command file to run successfully. This step requires administrator access.
To allow the install.command file to have full read and write access:
Open terminal and use the
cdcommand to navigate to the directory of the savedinstall.commandfile.Type the command
chmod 777 install.commandand press Enter. This should enable all read and write privileges for this file.When prompted, type your Maya version and press Enter. For example, if using Maya 2020, input 2020 as your version.

When installation is successful, the following message displays:

Open Maya and navigate to Windows > General Editors > Script Editor.

When using the plugin for the first time, in the Script Editor, type
import ValidationToolthen press the Play button in the top bar of the Script Editor. The plugin UI displays.
When using the plugin after the initial launch, launch the plugin by typing
ValidationTool.validationTool()and clicking the Play button.Alternatively, you can set up a shortcut from the plugin UI after initial launch by clicking the Create shortcut button on Maya shelf button.

Validate assets
With the plugin active and a layered accessory asset in your workspace, you can begin validating content. After the check, results with issues change to red (Blender) or yellow (Maya). You can resolve some failed checks by clicking the check button. See Checks and Troubleshooting Steps for details on each validation check.
<img src="https://prod.docsiteassets.roblox.com/assets/accessories/validation-tool/Blender-Failed-Check-Example.png" width="81%" />Checks without issues display as grey (Blender) or green (Maya).
<img src="https://prod.docsiteassets.roblox.com/assets/accessories/validation-tool/Blender-Failed-Check-Viewport.png" />In this example, potential intersection issues are highlighted in the Viewport.
To use the Layered Accessory Validation Tool on your asset:
- Select the object in your scene.
- Open the Validation Tool and click Check Assets. After a few moments, the UI updates and produces an output message.
- Results with issues are highlighted with red or yellow. Some issues can be automatically corrected by clicking the highlighted button.
Note
The Layered Accessory Validation Tool only checks for common layered accessory creation issues. Ensure your layered accessory model meets both the general mesh specifications and Roblox-specific layered accessory specifications before uploading to Studio.
Checks and troubleshooting steps
Refer to the table below for details on the specific checks and troubleshooting steps:
- **Layers**
- Checks for extra layers in the scene. Automatic fix attempts to remove extra layers. If the automatic fix fails, manually remove extra layers.
- **Transforms**
- Checks that geometry location, rotation, and scale are frozen (`0`,`0`,`0`). Automatic fix attempts to freeze the transforms. This may cause changes to your rig. If the automatic fix fails, manually freeze your geometry.
- **Unused Material**
- Checks for any unused data in the scene, such as [orphan data](https://docs.blender.org/manual/en/latest/editors/outliner/interface.html?highlight=orphan) (Blender) or [construction history](https://knowledge.autodesk.com/support/maya/learn-explore/caas/CloudHelp/cloudhelp/2022/ENU/Maya-Basics/files/GUID-503E227B-EF49-4A78-B3CA-7EAC588017C9-htm.html) (Maya), or unused materials. Automatic fix attempts to remove extra data. If automatic fix fails, manually remove unnecessary data and objects.
- **Keyframes**
- Checks for any unnecessary keyframes. Automatic fix attempts to remove keyframes. If automatic fix fails, manually remove keyframe data.
- **Attachment Points**
- Checks that attachment points are present and use the correct naming convention. Automatic fix attempts to parent any unexpected attachment points.
- **Intersection**
- Checks for any intersection between character geometry and the inner/outer cage mesh geometry. In Blender, clicking the button switches to **Edit Mode** and highlights vertices that are intersecting the inner or outer mesh. Some edges, such as edges of the holes for the sleeves, neck and torso edges, may be highlighted by default behavior and can be ignored.
- **Texture Format**
- Checks that textures match texture requirements, such as resolution size. Users can also select an external image file. Refer to the output messages to manually resolve any texture related issues.