
Source: Roblox Creator Hub · CC BY 4.0 · View source · Code samples: MIT Imported 2026-10-03. Formatting adapted for this site.
Calisthenics Tool
Note
This tool is no longer in active development. You are free to use the tool for any purpose. The tool may be out of date or incompatible with modern Roblox assets.
The Calisthenics Tool is a supplemental Blender add-on that allows you to quickly test your asset through a set of animation cycles to verify your skinning data. At any point during the animation testing, you can pause and use Blender's skinning Tools, such as Weight Painting brushes, to resolve any skinning imperfections.
Skinning your layered accessories and character bodies is a critical and often time-intensive process to create high quality assets that move and fit with different character bodies. Similar to the Layered Accessory Validation Tool, the Calisthenics Tool can save you time when testing your character models after rigging and skinning.
Note
The Calisthenics Tool doesn't provide complete verification of all potential skinning issues. You must also ensure that your custom models meet Studio's character body specifications and any applicable layered accessory specifications for the best results in your game.
<video controls loop muted src="https://prod.docsiteassets.roblox.com/assets/modeling/skinned-meshes/calisthenic-tool/Walking-Reference.mp4" width="90%"></video>Walking Animation
<video controls loop muted src="https://prod.docsiteassets.roblox.com/assets/modeling/skinned-meshes/calisthenic-tool/Running-Reference.mp4" width="90%"></video>Running Animation
<video controls loop muted src="https://prod.docsiteassets.roblox.com/assets/modeling/skinned-meshes/calisthenic-tool/Movement-Reference.mp4" width="90%"></video>Generic Movements
Installation
Note
The Calisthenics Tool plugin is designed for Blender 3.0+. You can download and modify the tool for any use.
To install the Calisthenics Tool in Blender:
Download the CalisthenicsTool.zip and save the
.zipfile locally.In Blender, navigate to Edit > Preferences.

In the left sidebar of the Preferences window, navigate to the Add-Ons section.
Click the Install… button. A file browser displays.
Select the
.zipand click Install Add-On.Using the search bar, search for "Calisthenics Tool" and select the add-on.
Enable the add-on by checking the box next to the add-on name.

Close the Preferences window. You can now access the Calisthenics Tool by expanding the tool sidebar in the Viewport.
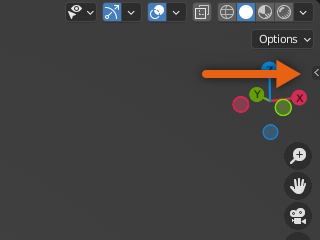
Use the arrow on the side of the Viewport to open the sidebar.
<img src="https://prod.docsiteassets.roblox.com/assets/modeling/skinned-meshes/calisthenic-tool/Calisthenics-Tool-Open.png" width="100%" />Access the Calisthenics Tool by selecting the tab in the sidebar tool menu.
Use the Calisthenics Tool
After installation, you can use the Calisthenics Tool whenever you want to test a standard R15 rigging armature with skinning data. With the Calisthenics Tool, you can check how a character body would move with generic animations, as well as attach reference rigid accessories to verify attachment during these movements. The tool also includes an option to automatically export your character, removing reference animation and accessory data.
You can try out the Calisthenics Tool using an example character body model.
Note
For demonstration purposes, this reference model doesn't contain FACS data. If you require a reference with facial animation, you can download the same model with FACS data from our reference models.
Test animations
When testing your character body model, first set the armature in the Calisthenics Tool then select one of the reference animations. It is important to visually verify your skinning quality using various movements and angles to ensure the best results for your model.
Note
If you encounter any errors or warnings when setting armature or playing animations, verify that your model uses an appropriate bone hierarchy and naming convention outlined in Roblox's custom mesh requirements.
To test animations:
Open a Blender project with an existing character body with a standard R15 rig, or import an appropriate character model
.fbxusing File > Import > FBX (.fbx).For easier visualization, hide non-rendered mesh objects, such as armature, cages, and attachments to better preview the reference animations.
Set which rig you want to test a reference animation on:
- In the add-on's Armature field, select the Eyedropper.
- In the Outliner, select the Armature object that contains your character's rig data.
Click on an animation cycle to preview, such as Walk, Run, Move or Idle.
Press Stop Animation to clear animation data.
If you notice any unexpected skinning deformations, pause on the frame and switch to Weight Paint mode or use Blender's other skinning tools to resolve. See Skin a humanoid model for additional instruction.
Test accessory attachments
You can add reference attachments to your character body model using the Attach Test Accessory buttons. These test accessories help preview how rigid accessories attach to your character and how they can move with your model. The tool includes two sets of rigid accessories to apply to your character.
<img src="https://prod.docsiteassets.roblox.com/assets/modeling/skinned-meshes/calisthenic-tool/Normal-Reference.png" width="85%" />Normal Size - Loads normal accessory references.
<img src="https://prod.docsiteassets.roblox.com/assets/modeling/skinned-meshes/calisthenic-tool/Slender-Reference.png" width="85%" />Slender Size - Loads slender accessory references.
To test accessories:
- Use the following Attach Test Accessory buttons to add or remove sample accessories to your character's attachment points:
- Normal Size - Adds normal scale test accessories.
- Slender Size - Adds slender scale test accessories.
- Detach Test Accessories - Removes any test accessories from your character.
- If an accessory is not attaching at an expected location, reposition the associated Attachment object in your character's rigging armature.
Export models
When you are ready to export your model, you can export your character body directly through the Calisthenics Tool. The tool automatically clears any of the test data and applies appropriate export settings.
Note
Using this tool to export models with facial animations may result in unexpected behavior because the stored FACS data can conflict with the tool's reference animations.
To export from the Calisthenics Tool:
In the Export Path field, set the export directory by clicking the folder icon and browsing to the appropriate file directory.

Click the Export Model button. The character model
.fbxpopulates in the designated folder asCharacter_Model_Export.fbx.
Note
If you are manually exporting your model with Blender's .fbx importer instead of the Calisthenics Tool, ensure the following before export:
- Detach the Calisthenics Tool's test accessories.
- Use the Stop Animation button to clear test animations from the timeline.
- Return the model to the default pose with no additional pose data.
- Verify your settings follow Roblox's Blender export settings.