
Source: Roblox Creator Hub · CC BY 4.0 · View source · Code samples: MIT Imported 2026-10-03. Formatting adapted for this site.
Inverse Kinematics
Inverse Kinematics (IK) is a common technique in computer animation to efficiently make characters move and interact realistically with their environment. The process of creating a realistic movement for a character often requires many iterations and minor adjustments of the various joints. With IK, you can pose and animate multiple character parts by posing or adjusting a single object.
This animation technique can provide solutions to the following examples:
<video controls src="https://prod.docsiteassets.roblox.com/assets/animation/inverse-kinematics/IK-Place-Hand.mp4" width="90%"></video>Grab and pose a character's hand while automatically adjusting the related limbs, such as the wrist, elbow, and shoulder.
<video controls src="https://prod.docsiteassets.roblox.com/assets/animation/inverse-kinematics/IK-Uneven-Surfaces.mp4" width="90%"></video>Make a character's feet interact realistically on different surfaces and slopes.
<video controls src="https://prod.docsiteassets.roblox.com/assets/animation/inverse-kinematics/IK-Drag-Accessory.mp4" width="90%"></video>Grab and move a single target object to quickly create realistic interactions with your character and props.
IKControl
You can use an IKControl to procedurally add IK to your character rigs outside of the Animation Editor. Studio allows you to programmatically apply IK to all characters to create realistic movement and interactions in your game.
When adding an IKControl, set the required properties correctly to avoid unexpected and unnatural animation results. As with all animation, test your IKControls to ensure that you achieve the desired behavior.
Required properties
When adding a IKControl to your character's Humanoid or AnimationController, you must set the following required properties to enable IK:
| Property | Description |
|---|---|
| [`Type`](/docs/ikcontrol#ikcontrol-type) | Specifies the behavior type of the IK control. See [`IKControlType`](/docs/enum-ikcontroltype) for the list of behavior options. Common behavior types are `Position` or `Transform`. |
| [`EndEffector`](/docs/ikcontrol#ikcontrol-endeffector) | A [`BasePart`](/docs/basepart) or [`Bone`](/docs/bone) in your character rig that tracks toward the [`Target`](/docs/ikcontrol#ikcontrol-target). For example, you can set a **LeftHand** bone as a [`EndEffector`](/docs/ikcontrol#ikcontrol-endeffector) to reach a doorknob object set as the [`Target`](/docs/ikcontrol#ikcontrol-target). |
| [`Target`](/docs/ikcontrol#ikcontrol-target) | The object the [`EndEffector`](/docs/ikcontrol#ikcontrol-endeffector) reaches or points toward. A [`Target`](/docs/ikcontrol#ikcontrol-target) can be any object with a world position. |
| [`ChainRoot`](/docs/ikcontrol#ikcontrol-chainroot) | Defines the chain of [`BaseParts`](/docs/basepart) or [`Bones`](/docs/bone) that the [`IKControl`](/docs/ikcontrol) affects. All connected parts between the [`ChainRoot`](/docs/ikcontrol#ikcontrol-chainroot) and the [`EndEffector`](/docs/ikcontrol#ikcontrol-endeffector) are affected by the [`IKControl`](/docs/ikcontrol) using the behavior type defined. For example, if your character's **LeftHand** is set as the [`Target`](/docs/ikcontrol#ikcontrol-target), you can apply IK to the entire left arm by setting [`ChainRoot`](/docs/ikcontrol#ikcontrol-chainroot) to the **LeftUpperArm**. To apply IK just to the parts below the elbow, set [`ChainRoot`](/docs/ikcontrol#ikcontrol-chainroot) to the **LeftLowerArm**. |
Test IKControls
You can add and edit IKControl programmatically or directly through the Explorer. You can even add and make changes to IKControl during a Play test to quickly check how various properties affect a character's movements.
To quickly test your IKControl using an Attachment as a target:
From Studio's mezzanine, initiate a playtest.
In the Explorer window, navigate to Workspace → your user's
Model. ThisModelinstance is named as your current Roblox account.Click the ⊕ icon next to your character model's
HumanoidRootPartand add an Attachment.
Select the Attachment and use the Move tool to position the object in front of your character in the viewport.

In the Explorer window, select the ⊕ icon next to your character's
Humanoidand add an IKControl.
Select the
IKControland set the following property values in the Properties window:

IKControl Properties
<img src="https://prod.docsiteassets.roblox.com/assets/animation/inverse-kinematics/IK-Explorer-Humanoid.png" width="67%" />Explorer - Character Model
Your character's left arm should now reach for the target Attachment. You can experiment with moving the Attachment or editing the IKControl properties to achieve different results.
Add constraints
You can use Constraints to restrict how joints can move when reaching its target. Constraints can ensure joints like the elbows and knees bend naturally, or to make the mechanical joints rotate in a specific orientation.
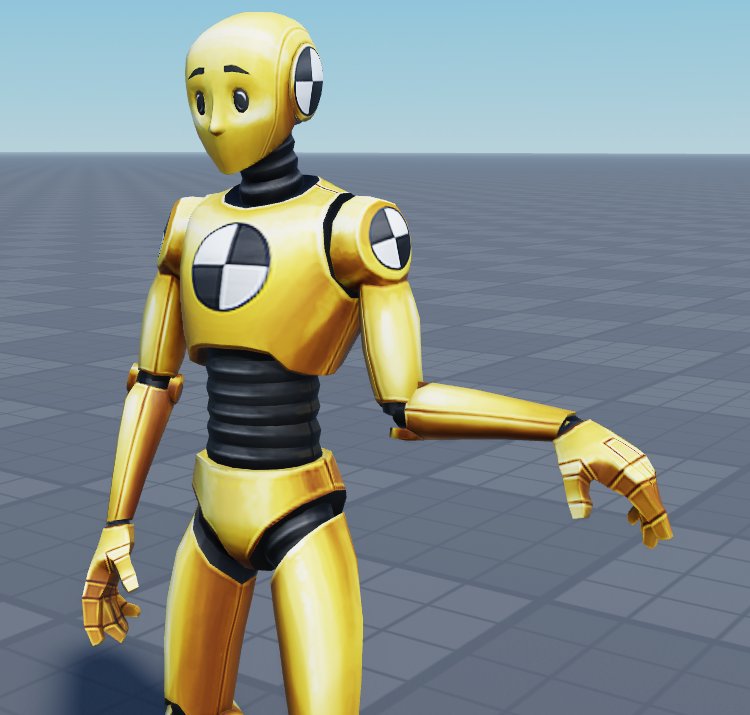
Elbow bending unnaturally
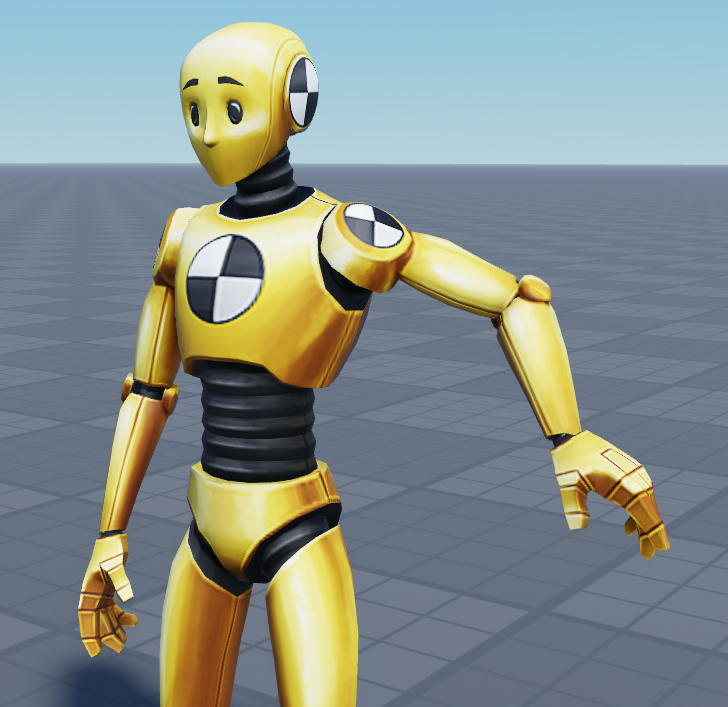
Elbow bending correctly
To add constraints to your character using IKControl, your IKControl and constraint must meet the following conditions:
- The attachments referenced in the constraint's
Attachment0/Attachment1properties attaches to the same parts as theMotor6DPart0/Part1. - The relative positions of
Attachment0/Attachment1must equal the corresponding positions of theMotor6DC0/C1CFrames. - The constraint and the IKControl share the same parent
Model.
The following instructions describe the process of adding a HingeConstraint to restrict the rotation of a character's elbow and adding a BallSocketConstraint to the wrist to limit the rotation angle.
Elbow
Characters with R15 rigs already include attachments in their joints that you can use to apply the elbow constraint. For the elbow, both the LeftUpperArm and the LeftLowerArm include a LeftElbowRigAttachment. Along with adding a constraint, you also need to add additional child attachments to each part's LeftElbowRigAttachment to specify which axis the elbow can rotate about.
To add the HingeConstraint and child attachments:
In the Explorer window, locate your model's LeftLowerArm and click the ⊕ button.
Add a HingeConstraint with the name
LeftElbowConstraint.In the Explorer window, navigate to the LeftUpperArm.LeftElbowRigAttachment and add an attachment:
Click the ⊕ button to add an Attachment with the name
LeftElbowConstraintAttachment0.In the viewport, select the attachment and use the Rotate tool to rotate the attachment so the yellow PrimaryAxis is the axis of your elbow's expected rotation.

Set the LeftElbowConstraint.Attachment0 property to this new attachment.
In the Explorer window, navigate to your model's LeftLowerArm.LeftElbowRigAttachment add an attachment:
- Click the ⊕ button and add an Attachment with the name
LeftElbowConstraintAttachment1. - Set the LeftUpperArm.LeftElbowConstraint.Attachment1 property to this new attachment.
- Copy the LeftElbowConstraintAttachment0.CFrameOrientation property and paste it as the LeftElbowConstraint.Attachment1.CFrameOrientation value.
- Click the ⊕ button and add an Attachment with the name
Note
If you see a red arrow on the constraint's visualization, that means your attachment orientations are violating the hinge constraint. Go back and make sure the LeftElbowConstraintAttachment1 has the same orientation as the LeftElbowConstraintAttachment0.
Test your IKControl to verify the elbow only rotates about its hinge axis:
Wrists
Even with the elbow constraint, the IKControl can still produce unrealistic poses with the wrists.
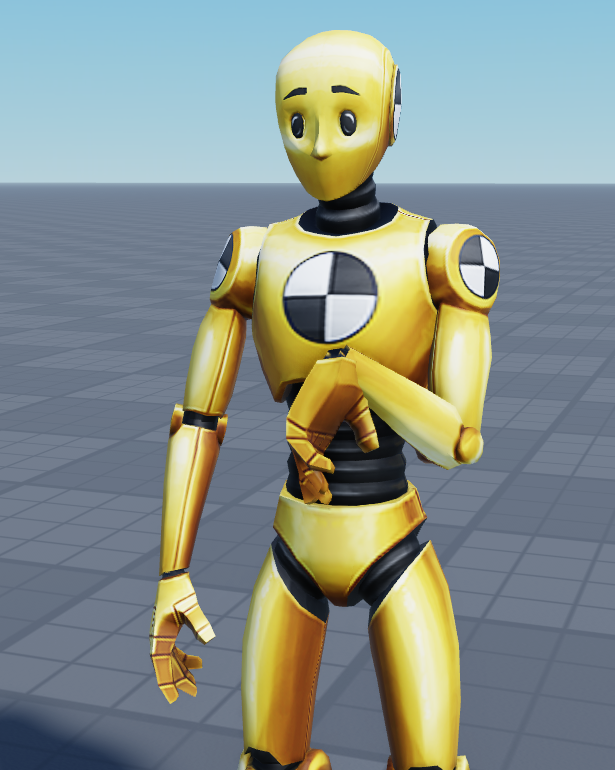
The wrist bends unnaturally at certain orientations
You can improve this by adding a BallSocketConstraint to limit the rotation of the wrist. While this is similar to the process for adding a HingeConstraint to the elbow, you can use the LimitsEnabled property on this constraint to further control the range of motion of the wrist.
To add a BallSocketConstraint for the wrist:
- In the Explorer window, locate your model's LeftHand and click the ⊕ button.
- Add a BallSocketConstraint with the name
LeftWristConstraint.
- Add a BallSocketConstraint with the name
- Locate your model's LeftLowerArm.LeftWristRigAttachment and add an attachment:
- Click the ⊕ button and add an Attachment with the name
LeftWristConstraintAttachment0. - In the viewport, select the attachment and use the Rotate tool to rotate the attachment so the yellow PrimaryAxis points toward the model's fingertips.

- Set the LeftWristConstraint.Attachment0 property to the new
LeftWristConstraintAttachment0.
- Click the ⊕ button and add an Attachment with the name
- Locate your model's LeftHand.LeftWristRigAttachment and add an attachment:
- Click the ⊕ button and add an Attachment with the name
LeftWristConstraintAttachment1. - Copy the LeftWristConstraintAttachment0.CFrameOrientation property and paste it as the LeftWristConstraintAttachment1.CFrameOrientation property.
- Set the LeftWristConstraint.Attachment1 property to this new LeftWristConstraintAttachment1.
- Click the ⊕ button and add an Attachment with the name
- In the Explorer window, select the LeftWristConstraint.
- In the Properties window, set the following:
- Enable LimitsEnabled.
- Set UpperAngle to
80. This controls how much the constraint's axis can rotate, and 80 degrees is approximately how much the wrist should be able to bend.
- Depending on your character you may want to tweak the direction the cone is pointing in. You can do this by using the Rotate tool to rotate the constraint's Attachment0.
When selecting the LeftWristConstraint, a green cone appears visualizing the wrist's range of motion.
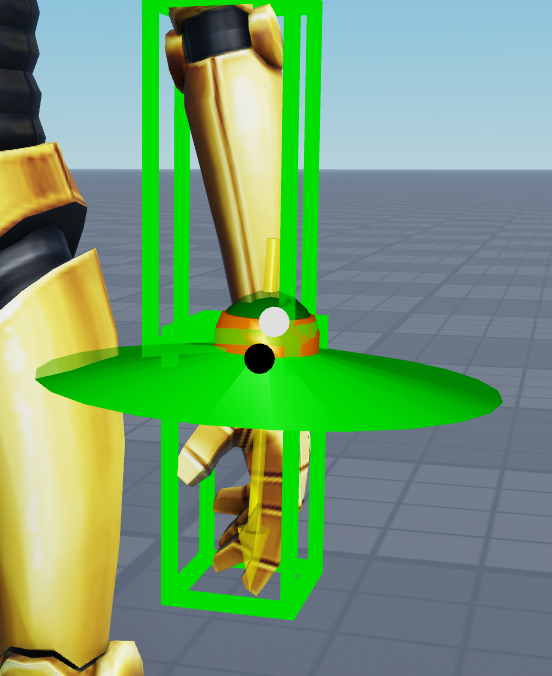
With the constraint set up, test the IKControl with the hand pointing down in front of the character and the wrist should rotate and bend more realistically.