
Source: Roblox Creator Hub · CC BY 4.0 · View source · Code samples: MIT Imported 2026-10-03. Formatting adapted for this site.
Greybox a playable area
Greyboxing is the process of building a level with simple shapes before investing time in scripting or creating final art assets. It helps you test gameplay, identify layout issues, and make changes quickly while the environment is still easy to modify.
In this section, you'll greybox the sea stack platforms that make up the playable area of the game. Once the layout feels right, you can begin scripting.
Plan the playable area
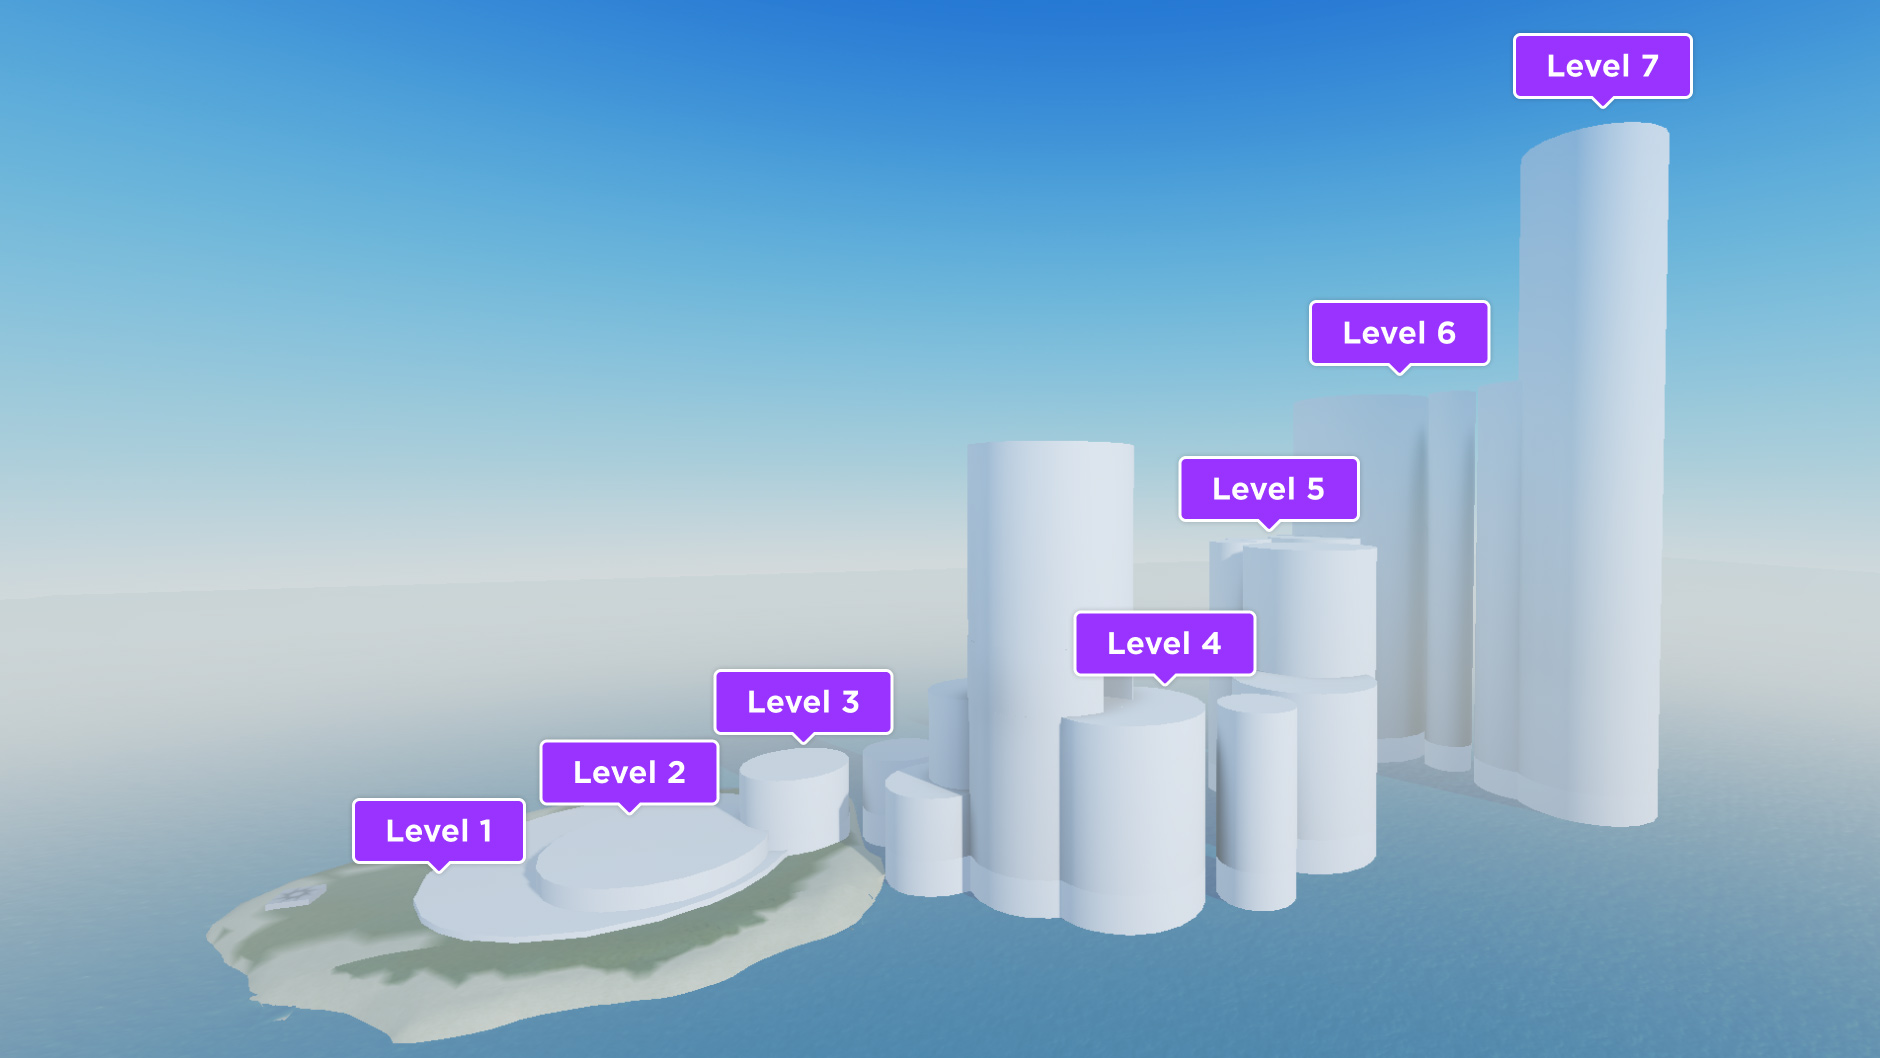
In the final game, players collect coins to increase their jump power and reach higher platforms. You'll implement this progression system later in the tutorial, but it's important to plan for it while greyboxing your environment. As a general rule, the height difference between platforms should gradually increase to encourage players to collect coins and continue progressing.
As a reference, the sample Island Jump - Building game uses seven height levels. The first platform sits low enough that players only need a few coins to reach it. The subsequent height differences increase to 8, 20, 35, 55, 81, and 110 studs, creating a steady sense of progression throughout the game.
Note
A stud is Studio's primary unit of length, equivalent to about 28 cm. If you create your own layout instead of using the Assistant prompt or recreating the sample, keep each new height level that requires a jump upgrade at least 30 studs above the previous one.
Add the platforms
Now that you have a plan for the difference in height between platforms, add placeholder Part objects to represent the sea stacks. Parts are Roblox's basic building blocks, with properties that control their shape, size, color, and other physical characteristics.
For this project, use cylinder parts to give players a flat top to land on when jumping.
A comparison between the sample Island Jump game's greybox and final geometry
<img width="100%" img src="https://prod.docsiteassets.roblox.com/assets/tutorials/block-out-a-playable-area/Add-Platforms-Greybox.jpg" alt="The sample Island Jump game's greybox geometry." />


<img width="100%" img src="https://prod.docsiteassets.roblox.com/assets/tutorials/block-out-a-playable-area/Add-Platforms-Final.jpg" alt="The sample Island Jump game's final geometry." />
Create an organization structure
Before adding parts, create two containers to keep the project organized. Roblox provides Folder objects for grouping related instances and Model objects for grouping 3D objects. In this tutorial, you'll create a World folder to hold the environment and a Blockout_Parts model inside that folder to hold the greybox platforms.
- In the Explorer, create a folder named World inside Workspace.
- Create a model named Blockout_Parts inside the new folder.
Note
In Studio, names are case-sensitive. You must spell World and Blockout_Parts exactly as shown or the scripts you add later will break.
Insert parts
Now that you have an organization structure, add the cylinders for your platforms. You can use an Assistant prompt, build your own layout manually, or recreate the layout of the sample game.
Build with Assistant
To get Assistant to generate the entire blockout in one step, copy the prompt that matches whether you want a unique layout or an exact copy of the sample game.
Create multiple cylinder Parts inside Workspace > World > Blockout_Parts to form platforms.
Start with one large, flat cylinder centered on the island, then add at least seven more cylinders that all start at the same vertical base but vary in height (like tall buildings) to create an upward path.
Adjust Size, Position, and Orientation so the top surfaces are flat and walkable, and set all Parts to Anchored.
Create the following cylinder parts inside Workspace > World > Blockout_Parts:
1. Level_1 (Size 12, 131, 131; CFrame.Position -23, -4, 9; CFrame.Orientation 0, 0, 90)
2. Level_2 (Size 20, 81, 81; CFrame.Position -8, 0, 24; CFrame.Orientation 0, 0, 90)
3. Level_3a (Size 40, 44, 44; CFrame.Position 42, 10, 9; CFrame.Orientation 0, 0, 90)
4. Level_3b (Size 40, 34, 34; CFrame.Position 87, 10, 4; CFrame.Orientation 0, 0, 90)
5. Level_3c (Size 40, 44, 44; CFrame.Position 97, 10, 49; CFrame.Orientation 0, 0, 90)
6. Level_4a (Size 75, 39, 39; CFrame.Position 112, 27.5, 46.5; CFrame.Orientation 0, 0, 90)
7. Level_4b (Size 75, 65, 65; CFrame.Position 137, 27.5, 69; CFrame.Orientation 0, 0, 90)
8. Level_4c (Size 75, 60, 60; CFrame.Position 159.5, 27.5, 91.5; CFrame.Orientation 0, 0, 90)
9. Level_4d (Size 75, 30, 30; CFrame.Position 207, 27.5, 106.5; CFrame.Orientation 0, 0, 90)
10. Level_4e (Size 75, 61, 61; CFrame.Position 250, 27.5, 74; CFrame.Orientation 0, 0, 90)
11. Level_5a (Size 130, 60, 60; CFrame.Position 268, 55, 50; CFrame.Orientation 0, 0, 90)
12. Level_5b (Size 130, 25, 25; CFrame.Position 256, 55, 2.5; CFrame.Orientation 0, 0, 90)
13. Level_5c (Size 130, 25, 25; CFrame.Position 276, 55, -17.5; CFrame.Orientation 0, 0, 90)
14. Level_5d (Size 130, 54, 54; CFrame.Position 322, 55, -21; CFrame.Orientation 0, 0, 90)
15. Level_6a (Size 211, 79, 79; CFrame.Position 367, 94.5, -41; CFrame.Orientation 0, 0, 90)
16. Level_6b (Size 211, 24, 24; CFrame.Position 387, 94.5, 11.5; CFrame.Orientation 0, 0, 90)
17. Level_6c (Size 211, 44, 44; CFrame.Position 397, 94.5, 51.5; CFrame.Orientation 0, 0, 90)
18. Level_7 (Size 321, 61, 61; CFrame.Position 407, 149.5, 79; CFrame.Orientation 0, 0, 90)
Make sure all Parts are anchored, correctly positioned, and oriented to form a continuous level layout.Create your own
In the Home or Model toolbar tab, click the small arrow next to the Part tool and choose Cylinder.

In the Explorer, drag the new cylinder Part onto your
Blockout_Partsmodel so that it becomes a child of the model.Use the Move, Scale, and Rotate tools (in the same toolbar) to size and position your cylinder as a large, flat platform in the middle of the island. See Transform parts for more information on these tools.
Note
To grab a single part, select it in the Explorer instead of the viewport. If you select a part in the viewport, it selects the entire model.

Repeat the previous steps for at least seven more cylinders, increasing the height of each one as you build outward from the island. Stop once you have a layout you can jump across.

Select the
Blockout_Partsmodel in the Explorer and click Anchor in the Home or Model toolbar to make sure the physics system doesn't move your parts when the game starts.
Recreate the sample
In the Home toolbar, click the Part dropdown and choose Cylinder. Drag the new part onto
Blockout_Partsin the Explorer.With the new cylinder selected, in the Properties window:
- Set Name to
Level_1. - Set Size to
12, 131, 131. - Set CFrame.Position to
-23, -4, 9. - Set CFrame.Orientation to
0, 0, 90so the flat top faces the sky.
- Set Name to
Repeat for the remaining seventeen platforms using the values below:
Name Size CFrame.Position CFrame.Orientation Level_2 `20, 81, 81` `-8, 0, 24` `0, 0, 90` Level_3a `40, 44, 44` `42, 10, 9` `0, 0, 90` Level_3b `40, 34, 34` `87, 10, 4` `0, 0, 90` Level_3c `40, 44, 44` `97, 10, 49` `0, 0, 90` Level_4a `75, 39, 39` `112, 27.5, 46.5` `0, 0, 90` Level_4b `75, 65, 65` `137, 27.5, 69` `0, 0, 90` Level_4c `75, 60, 60` `159.5, 27.5, 91.5` `0, 0, 90` Level_4d `75, 30, 30` `207, 27.5, 106.5` `0, 0, 90` Level_4e `75, 61, 61` `250, 27.5, 74` `0, 0, 90` Level_5a `130, 60, 60` `268, 55, 50` `0, 0, 90` Level_5b `130, 25, 25` `256, 55, 2.5` `0, 0, 90` Level_5c `130, 25, 25` `276, 55, -17.5` `0, 0, 90` Level_5d `130, 54, 54` `322, 55, -21` `0, 0, 90` Level_6a `211, 79, 79` `367, 94.5, -41` `0, 0, 90` Level_6b `211, 24, 24` `387, 94.5, 11.5` `0, 0, 90` Level_6c `211, 44, 44` `397, 94.5, 51.5` `0, 0, 90` Level_7 `321, 61, 61` `407, 149.5, 79` `0, 0, 90`
- Once all platforms are in, select the
Blockout_Partsmodel and click Anchor in the Home toolbar to make sure the physics system doesn't move your parts when the game starts.
Align parts
Note
If you used the sample Island Jump - Building game values when inserting your sea stack platforms, you can skip this step.
If you're creating your own layout, it's often easier to manage platform heights when every platform shares the same base elevation and only varies in size. The Align Tool can do this in a single click by aligning the bottom edge on the Y axis.
In the Explorer, select all of your platforms.
In the Model toolbar tab, click Align.
In the Align Tool window:
- Set Mode to Min.
- Set Align In to World and Y.
- Set Relative To in Selection Bounds.
Click Align.

All platforms align their bottom edge
Create a hollow tunnel
To add more visual variety, carve a tunnel through one of the sea stacks using Studio's solid modeling tools. For this tutorial, you'll use Negate to create the hole and Union to combine the parts into a single shape. For more information on all solid modeling tools, see solid modeling.
Build with Assistant
Create a hollow tunnel structure using these steps:

1. Create a cylinder Part named Tunnel with Size 24, 65, 69 and CFrame.Position 137, 77, 69 and CFrame.Orientation 0, 0, 90. Set Anchored to true.
2. Create a block Part named Hollow_Part with Size 24.5, 72, 22 and CFrame.Position 134.5, 77, 71 and CFrame.Orientation 0, 135, 90. Set Anchored to true. This part should intersect the cylinder to define the hollow space.
3. Negate the Hollow_Part so it becomes a subtraction shape.
4. Select both the Tunnel part and the negated Hollow_Part, then perform a Union operation so the hollow shape is cut out of the cylinder.
5. Rename the resulting union to Level_4b_Union.
6. Find the existing Level_4b platform, duplicate it, and rename the duplicate to Level_4b_Top.
7. Set Level_4b_Top to Size 74, 65, 69 and CFrame.Position 137, 126, 69 and CFrame.Orientation 0, 0, 90. Make sure it is Anchored and positioned above the tunnel.

Make sure all Parts are properly aligned and that the final result is a cylinder tunnel with an open passage and a platform placed on top.
Build it Yourself
Insert a cylinder part above one of your sea stacks to make the body of the tunnel. To recreate the sample, place this cylinder above
Level_4bwith and:- Set Name to
Tunnel. - Set Size to
24, 65, 69. - Set CFrame.Position to
137, 77, 69. - Set CFrame.Orientation to
0, 0, 90.
- Set Name to
Insert a block part next, positioned so it pokes through the cylinder where you want the tunnel opening. The block needs to be at least as tall as the cylinder and wide enough for a player to walk through. To recreate the sample:
- Set Name to
Hollow_Part. - Set Size to
24.5, 72, 22. - Set CFrame.Position to
134.5, 77, 71. - Set CFrame.Orientation to
0, 135, 90.

- Set Name to
Select the block in the Explorer and click Negate in the Model toolbar. The block turns translucent pink to show it's now a hole punch.

Select both the negated block and the cylinder, then click Union in the Model toolbar. The negated shape gets carved out of the cylinder, leaving a tunnel.

Rename the resulting union to something descriptive like
Level_4b_Union.Duplicate the platform underneath the tunnel and place the duplicate on top of the tunnel as a roof. To recreate the sample:
- Set Name to
Level_4b_Top. - Set Size to
74, 65, 69. - Set CFrame.Position to
137, 126, 69. - Set CFrame.Orientation to
0, 0, 90.

- Set Name to
Playtest the layout
Before you start scripting, playtest the layout to catch any issues while it's still easy to make changes.
Start a playtest from the Test tab and simulate the player's starting state.
- Find your character in the Explorer and select Humanoid.
- Enable UseJumpPower.
- In the Properties window, set JumpPower to
0. - As you reach higher platforms, increase JumpPower in increments of
30to simulate collecting jump upgrades and make sure that each level is reachable.

In the next section, you'll learn how to script the overall gameplay.